ArcGIS Developer Mapping APIs Quickstart
August 25, 2021
I have always been interested in maps and GIS data. Whether I am planning a hike or a backpacking outing for scouts or helping the Ozark Trail Association with their website, trail building, and maintenance or needing directions from one place to another, a good map and mapping tools are a necessity, and that’s where ArcGIS comes in.
ArcGIS has always been the gold standard for anything related to maps and GIS data. So, in this blog, we’ll take a look at some of the mapping options that are available with an ArcGIS Developer account and their Mapping APIs.
Get a Free Developer Account
To start building maps, applications, and location services, you will need an ArcGIS Developer account and an API Key.
The ArcGIS account is your user profile that is stored in the ArcGIS Platform and can be used to create and manage content, API Keys, and access to your applications.
An API Key is your access token that allows for accessing services and private content in the ArcGIS Platform.
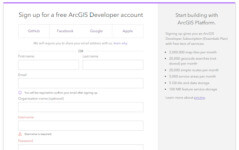
To sign up for a free account, go to https://developers.arcgis.com/sign-up/ and fill in your information:
The free tier gives you access to the following services.
- 2,000,000 map tiles per month
- 20,000 geocode searches (not stored) per month
- 20,000 simple routes per month
- 5,000 service areas per month
- 5 GB tile and data storage
- 100 MB feature service storage
There are more about pricing options at https://developers.arcgis.com/pricing/. If you are in need of more than just a free tier, there is a calculator that can help you determine the cost of what you need.
Once you have an account, you can go to the dashboard to add and manage API Keys to be used in your applications:
Creating Maps With the ArcGIS API for Javascript
A map typically contains a basemap layer and one or more data layers. You can display a specific area of a map using a map view along with setting the location and zoom level.
Let’s start with the basic HTML and CSS that you will need to create a page for a map.
<html>
  <head>
    <meta charset="utf-8" />
    <meta name="viewport" content="initial-scale=1, maximum-scale=1, user-scalable=no" />
    <title>Display a map</title>

    <style>
        html,
        body,
        #viewDiv {
            padding: 0;
            margin: 0;
            height: 100%;
            width: 100%;
        }
    </style>


  </head>

  <body>
    <div id="viewDiv"></div>
  </body>
</html>
Next, we’ll add the CSS and Javascript references needed for the ArcGIS Platform.
    <link rel="stylesheet" href="https://js.arcgis.com/4.18/esri/themes/light/main.css">
    <script src="https://js.arcgis.com/4.20/"></script>
Now, let’s add the script section that has the required modules for the Map, your API Key, and a MapView. I have also included a TileLayer and a FeaturedLayer.
<script>
  require(["esri/config", "esri/Map", "esri/views/MapView", "esri/layers/TileLayer", "esri/layers/FeatureLayer"], function (esriConfig, Map, MapView, TileLayer, FeatureLayer) {
    esriConfig.apiKey = "YOUR_API_KEY_HERE";

    const tileLayer = new TileLayer({
      // The National Map basemap
      url: "https://basemap.nationalmap.gov/arcgis/rest/services/USGSTopo/MapServer"
    });

    // Missouri Trails feature layer (points)
    const trailsLayer = new FeatureLayer({
      url: "https://services1.arcgis.com/5aT2bSwndcEclLh6/arcgis/rest/services/mpra_statewide_trails/FeatureServer"
    });

    const map = new Map({
      // basemap: "arcgis-topographic", // Basemap layer service
      layers: [tileLayer, trailsLayer]
    });

    const view = new MapView({
      map: map,
      center: [-90.8995, 37.6364], // Longitude, latitude
      zoom: 12.8, // Zoom level
      container: "viewDiv" // Div element
    });
  });
</script>
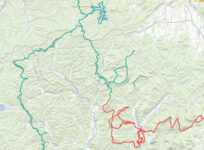
If you put all this together, you will get a map that displays The National Map TileLayer with the Missouri Trails FeatureLayer, centered near the Middle Fork, Trace Creek, and Taum Sauk sections of the Ozark Trail.
For more information about Map, MapView, TileLayer, and FeatureLayer, check out these tutorials:
Using Routes and Directions
You can use the Routing service to get driving directions, calculate drive times, and find routes. To create a route, you define a set of stops and use the service to find a route with directions.
You can start with the same HTML, CSS, and ArcGIS Javascript references from above.
Now, we will add the script section that has the required modules for the Graphic, route, RouteParameters, and FeatureSet modules.
require([
             "esri/config",
             "esri/Map",
             "esri/views/MapView",
             "esri/Graphic",
             "esri/rest/route",
             "esri/rest/support/RouteParameters",
             "esri/rest/support/FeatureSet"

           ], function(esriConfig, Map, MapView, Graphic, route, RouteParameters, FeatureSet) {

             esriConfig.apiKey = "YOUR_API_KEY";
Next, update the basemap and center property and define the route module service url.
  const map = new Map({
    basemap: "arcgis-navigation" //Basemap layer service
  });

  const view = new MapView({
    container: "viewDiv",
    map: map,
    center: [-118.24532,34.05398], //Longitude, latitude
    zoom: 12
  });

    const routeUrl = "https://route-api.arcgis.com/arcgis/rest/services/World/Route/NAServer/Route_World";
After that, we’ll need to add the code to get the origin and destination. This uses the route module to determine stops.
view.on("click", function(event){

             if (view.graphics.length === 0) {
               addGraphic("origin", event.mapPoint);
             } else if (view.graphics.length === 1) {
               addGraphic("destination", event.mapPoint);

               getRoute(); // Call the route service

             } else {
               view.graphics.removeAll();
               addGraphic("origin",event.mapPoint);
             }

           });

           function addGraphic(type, point) {
             const graphic = new Graphic({
               symbol: {
                 type: "simple-marker",
                 color: (type === "origin") ? "white" : "black",
                 size: "8px"
               },
             geometry: point
           });
             view.graphics.add(graphic);
           }
Now, we can find and solve the route and get the directions. This uses the stops parameter as a FeatureSet and the solve method.
The results are then added to the map as a Graphic. You can get driving directions from the route service with the returnDirections property on RouteParameters.
function getRoute() {
             const routeParams = new RouteParameters({
               stops: new FeatureSet({
                 features: view.graphics.toArray()
               }),

               returnDirections: true

             });

             route.solve(routeUrl, routeParams)
               .then(function(data) {
                 data.routeResults.forEach(function(result) {
                   result.route.symbol = {
                     type: "simple-line",
                     color: [5, 150, 255],
                     width: 3
                   };
                   view.graphics.add(result.route);
                 });

                 // Display directions
                if (data.routeResults.length > 0) {
                  const directions = document.createElement("ol");
                 directions.classList = "esri-widget esri-widget--panel esri-directions__scroller";
                 directions.style.marginTop = "0";
                 directions.style.padding = "15px 15px 15px 30px";
                 const features = data.routeResults[0].directions.features;

                 // Show each direction
                 features.forEach(function(result,i){
                   const direction = document.createElement("li");
                   direction.innerHTML = result.attributes.text + " (" + result.attributes.length.toFixed(2) + " miles)";
                   directions.appendChild(direction);
                 });

                 view.ui.empty("top-right");
                 view.ui.add(directions, "top-right");
                }

               })

               .catch(function(error){
                   console.log(error);
               })

           }

         });
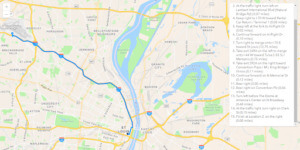
When you run this, you will click an origin and then a destination, and it will give you the route along with directions.
For more information about routes and directions, check out these tutorials.
APIs
There are lots of possibilities when it comes to using the ArcGIS APIs. Web, native, and scripting APIs are available. Below, I have listed and linked to a handful of options depending on how you need to interact with the APIs.
Web
Native
- ArcGIS Runtime API for .Net
- ArcGIS Runtime API for Android
- ArcGIS Runtime API for iOS
- ArcGIS Runtime API for Java
- ArcGIS Runtime API for Qt
Scripting and REST
Wrapping Up
I hope this post helped prepare you to get started with ArcGIS Developer and its Mapping API and tools! I know I have a lot of fun with them. The possibilities are truly endless!
If you’re looking for more information, take a deep dive into the resources I’ve listed below. I found them helpful.
More From Todd Horn
About Keyhole Software
Expert team of software developer consultants solving complex software challenges for U.S. clients.


