Infrastructure as Code Using Azure CLI
October 28, 2020
Infrastructure as Code (or IaC) is the process of using code and versioning in the same way you do your source code to manage your networks, VMS, and Azure resources. It generates the same environment every time it is applied, and it’s an important DevOps practice to use alongside continuous delivery. Using Azure CLI and Azure DevOps Release Pipeline, we can implement IaC.
The goal of IaC is to always set the target environment into the same configuration, regardless of the starting state. You make changes to the code environment description and version the configuration model.
The release pipeline executes this model to configure target environments. If you need to make any changes, you edit the source, not the target environment. This allows you to create reliable and stable environments on-demand that can be validated, tested, and repeated.
In this blog, we’ll look at how we can use Azure CLI and Azure DevOps Release Pipelines to achieve IaC. I’ll walk you through all the steps you need to take to get set up.
First things first, you will need to create an Azure account if you don’t already have one. We will also be using Azure DevOps. Check out Visual Studio Dev Essentials for everything you need to get started.
Step1: Azure CLI
We will need some of the basics from Azure CLI. If you need help getting started and set up, check out the Azure CLI Documentation.
These are the CLI commands we will look at for this example:
Create a Resource Group:
az group create --name $resourceGroupName --location $location
Create a Storage Account:
az storage account create --name $storageAccountName --resource-group $resourceGroupName --location $location --sku $storagesku
Create an App Service Plan:
az appservice plan create --is-linux --name $appServicePlanName --resource-group $resourceGroupName --sku $pricingTier --location $location
Create a Web App:
az webapp create --name $webAppName --resource-group $resourceGroupName --plan $appServicePlanName --runtime $runtime
Create an Azure Table:
az storage table create --name $azureTableName --connection-string $connectionString
Step 2: Azure DevOps
Now let’s move over to Azure DevOps and start putting all this together. If you are not familiar with Release Pipelines or need to create one, this article can get you started.
Log into Azure DevOps.
Then, go to Pipelines –> Releases, select the release you want, and click Edit.
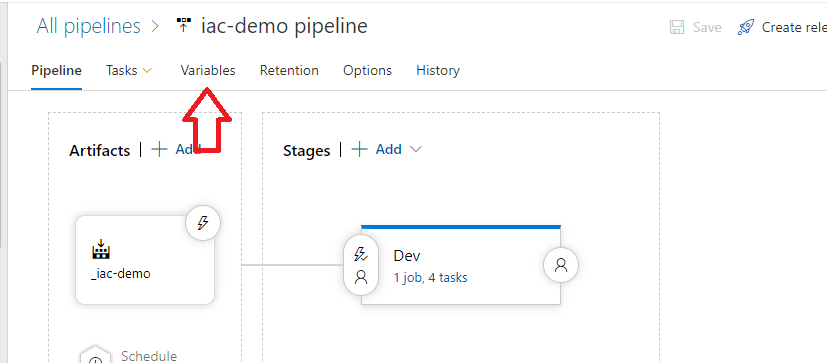
This will take you to the Edit Pipeline page.
Right now, I only have one Stage (“Dev”) defined, but you can add multiple stages to create your pipeline for Continuous Delivery (for example, Dev, QA, UAT, Prod).
Let’s add some variables to start. Click Variables.
Below are the variables that I will use in this example.
To add variables, click +Add in the lower left-hand corner.
If you have multiple stages, you can set the Scope to correspond with the Stage it should. (Release is the default – this allows for different variables in Dev, QA, UAT, etc.)
Next, select the Task dropdown. Then, click on the stage you want (in my case, “Dev”).
This will take you to the Task page. You can add an Agent job by clicking the icon with three dots in the right-hand corner.
Now, let’s add some Tasks.
First, click the + to the right of Agent Job. Then, search for Azure CLI using the search box. Finally, click Add.
As you are prompted to do, enter a Display name, and select an Azure Resource Manager connection.
Select Powershell Core as your Script Type. Then set Script Location to Inline script.
In the Inline Script box, we’ll put together some of the Azure CLI commands we talked about in the last section.
The Variables we added before can be included directly within the script in Script Arguments.
Create a Storage Resource:
Use Create Resource Group (az group create) with Create Storage Account (az storage account create).
Create a Storage Resource YAML:
variables:
  resource-group-name: 'iac-demo'
  location: 'centralus'
  storage-account-name: 'khsiacdemo'
  storage-sku: 'Standard_LRS'

steps:
- task: AzureCLI@2
  displayName: 'Azure CLI - Create Storage Resource'
  inputs:
    azureSubscription: 'Azure subscription 1'
    scriptType: pscore
    scriptLocation: inlineScript
    inlineScript: |
     [CmdletBinding()]
     param (
         [string]$location,
         [string]$resourceGroupName,
         [string]$storageAccount,
         [string]$storageSku
     )

     Write-Output "Creating resource group..."
     az group create `
         --location $location `
         --name $resourceGroupName

     Write-Output "Creating storage account..."
     az storage account create `
         --name $storageAccount `
         --resource-group $resourceGroupName `
         --location $location `
         --sku $storageSku
    arguments: '-resourceGroupName "$(resource-group-name)" -location "$(location)" -storageAccount "$(storage-account-name)" -storageSku "$(storage-sku)"'
Create a Web App Resource:
Use Create Resource Group (az group create) with Create App Service Plan (az appservice plan create) and Create Web App (az webapp create ( + config and update)).
Create a Web App Resource YAML:
variables:
  resource-group-name: 'iac-demo'
  location: 'centralus'
  app-service-plan-name: 'iac-demo-service-plan'
  web-app-name: 'iac-demo-web-app'
  pricing-tier: 'B1'

steps:
- task: AzureCLI@2
  displayName: 'Azure CLI - Create Web App Resource'
  inputs:
    azureSubscription: 'Azure subscription 1'
    scriptType: pscore
    scriptLocation: inlineScript
    inlineScript: |
     [CmdletBinding()]
     param (
         [string]$location,
         [string]$resourceGroupName,
         [string]$appServicePlanName,
         [string]$webAppName,
         [string]$runtime,
         [string]$pricingTier
     )

     Write-Output "Creating resource group..."
     az group create `
       --location $location `
       --name $resourceGroupName

     Write-Output "Creating service plan..."
     az appservice plan create `
       --is-linux `
       --name $appServicePlanName `
       --resource-group $resourceGroupName `
       --sku $pricingTier `
       --location $location

     Write-Output "Creating web app..."
     az webapp create `
       --name $webAppName `
       --resource-group $resourceGroupName `
       --plan $appServicePlanName `
       --runtime $runtime

     Write-Output "Setting api options..."
     az webapp config set `
       --resource-group $resourceGroupName `
       --name $webAppName  `
       --min-tls-version "1.2" `
       --linux-fx-version $runtime

     Write-Output "Setting api to HTTPS only..."
     az webapp update `
       --resource-group $resourceGroupName `
       --name $webAppName `
       --set httpsOnly=true

    arguments: '-resourceGroupName $(resource-group-name) -location $(location) -appServicePlanName $(app-service-plan-name) -webAppName $(web-app-name) -runtime ''"DOTNETCORE|3.1"'' -pricingTier $(pricing-tier)'
Create an Azure Table Resource:
Use Create Resource Group (az group create) with Create Storage Account (az storage account create) and Create Azure Table (az storage table create ( + a call to get the storage account connection string)).
Create an Azure Table Resource YAML:
variables:
  resource-group-name: 'iac-demo'
  storage-account-name: 'khsiacdemo'
  azure-table-name: 'Weather'
  storage-sku: 'Standard_LRS'
  location: 'centralus'

steps:
- task: AzureCLI@2
  displayName: 'Azure CLI - Create Azure Table Resource'
  inputs:
    azureSubscription: 'Azure subscription 1'
    scriptType: pscore
    scriptLocation: inlineScript
    inlineScript: |
     [CmdletBinding()]
     param (
         [string]$location,
         [string]$resourceGroupName,
         [string]$storageAccount,
         [string]$azureTableName,
         [string]$sku
     )

     Write-Output "Creating resource group..."
     az group create `
         --location $location `
         --name $resourceGroupName

     Write-Output "Creating storage account..."
     az storage account create `
         --name $storageAccount `
         --resource-group $resourceGroupName `
         --location $location `
         --sku $sku

     Write-Output "Get connection-string..."
     $response = az storage account show-connection-string `
         --name $storageAccount `
         --resource-group $resourceGroupName | ConvertFrom-Json

     $connectionString = $response.connectionString

     Write-Output "Creating azure table..."
     az storage table create `
         --name $azureTableName `
         --connection-string "$connectionString"
    arguments: '-resourceGroupName $(resource-group-name) -storageAccount $(storage-account-name) -azureTableName $(azure-table-name) -sku "$(storage-sku)" -location "$(location)"'
When you are all done, make sure you click Save in the upper right-hand corner.
To run the Release, click Create Release in the upper right corner. Then, go to the Release and click Deploy.
The Result
After a successful Release run, you will see the following over in your Azure Portal.
Storage Account
App Service Plan
Web App
Azure Table
By adding Variables for each Stage, this process allows you to create a repeatable environment and a set of Azure Resources whenever needed.
Going further, you can create Task Groups, which will allow these Tasks to be included in any Release Pipeline.
In Summary
Hopefully, this quick dive into IaC and Azure CLI has been helpful for you. My goal was to at least peak your interest to automate a few things around Azure Resources!
Your DevOps teams can work better together using a good set of practices and tools to deliver applications and their supporting infrastructures quickly, reliably, and to scale.
Addition Resources
More From Todd Horn
About Keyhole Software
Expert team of software developer consultants solving complex software challenges for U.S. clients.


