
Kubernetes on Raspberry Pi
Kubernetes, or k8s, is an important container orchestration platform. In this blog, I’ll describe creating a workable Kubernetes cluster implemented on a stack of four Raspberry Pi boards.
You could test the waters by using just one inexpensive Pi. For less than $100, you could run the k3s control plane (orchestrator) as well as a worker (agent) on a single 4 GB PI node with several pods. If you wanted more nodes, you could add more with no administrative hassle. I began with three, then added another. It totaled less than $450.
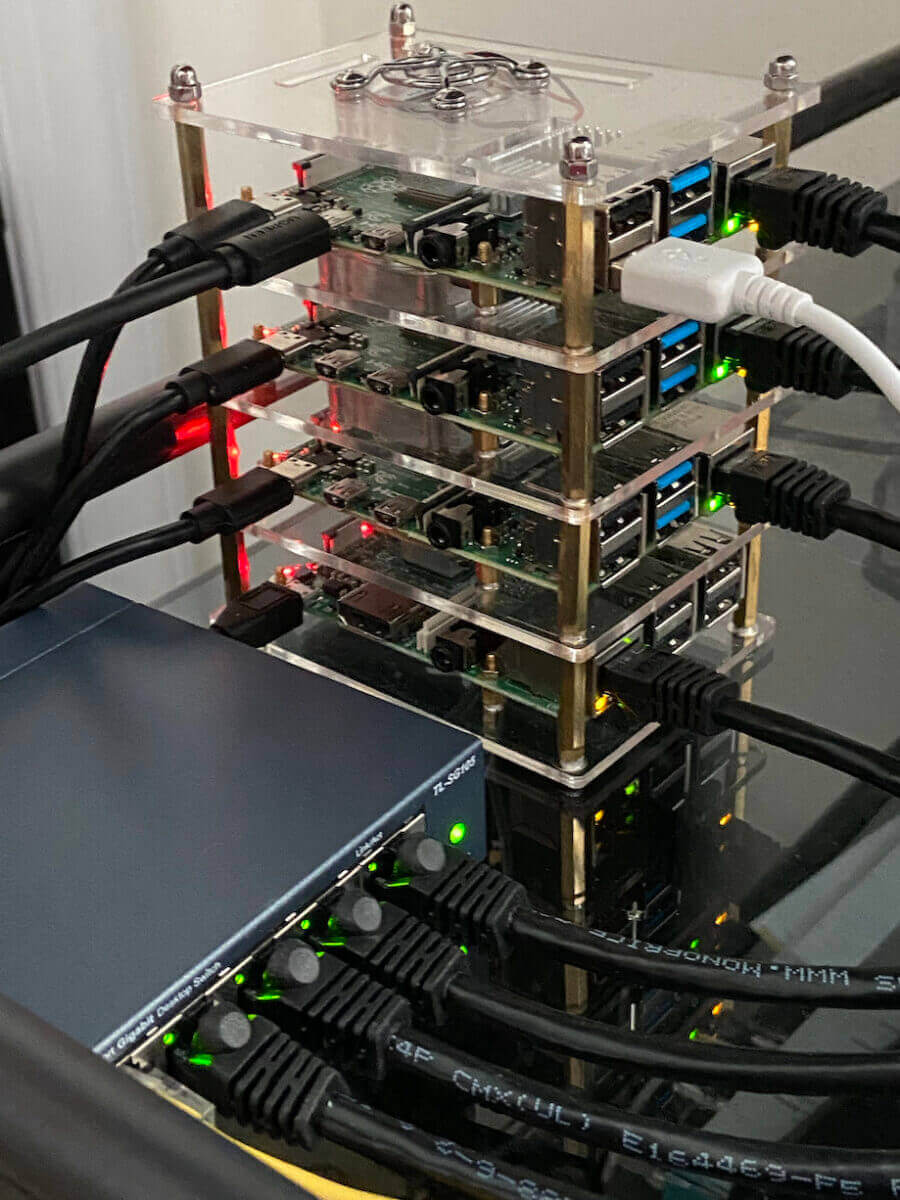
An old 2 GB Pi 3 became the oddball bottommost worker node in the picture below. The next two boards above it are a pair of 4 GB Pi 4B. I later added an 8 GB Pi 4B, used as the Kubernetes control plane.
In the end, I have a cluster of non-homogeneous nodes. Yours could be identical Pi 4B 4 GB boards. In this blog, I’ll outline how I created it, and I’ll show how to replicate a stateless app across Kubernetes pods running on the nodes — the Pi boards.
Each Raspberry PI uses an ARM processor. That’s the CPU architecture licensed for Apple Silicon and most mobile devices.

Raspberry PI Kubernetes Cluster
Why?
Kubernetes seemed overwhelming. Sure, after decades in the industry, I’m accustomed to I/T throwing new items at me, but Kubernetes makes it an art form. Someone said that Kubernetes is a fractal: learn a concept only to uncover multiple nested concepts or jargon.
I decided to acquire administrative “muscle memory” all the way to the hardware by issuing Kubernetes commands, applying configuration manifests, and writing code to run in pods contained in nodes I could hold in my hand.
No Cloud Provider?
A cloud provider is the textbook target for Kubernetes. I wanted to have a local, installation, not-on-a-VM, in a touchy-feely lab manner without watching a usage meter.
I created a four-node cloud that resides on my desk. It was a COVID lockdown project. It’s suitable for experimentation as well as real deployments. I own and administer it down to the metal. It’s mine to destroy and restore, capable of real, scalable service work. I know a person who runs a local cloud implemented on a rack of 20 Raspberry Pi boards. It works.
Not Kubernetes in Docker or a VM?
I’d worked with an Intel-based Macbook Pro and an ARM-based Mac mini M1. I use the implementation that runs in Docker, but it could operate in a VM, or bare metal. I recommend it as a lab environment, but I wanted multiple nodes on at least three real machines.
I saw it done on Raspberry PI. I had one of those. They’re inexpensive, so I purchased three more.
Rancher Kubernetes k3s
I referred to this site, among others, to check the field of Kubernetes implementation choices: https://www.reddit.com/r/kubernetes/comments/be0415/k3s_minikube_or_microk8s/
I chose k3s, by Rancher Labs, a certified distribution: https://rancher.com/docs/k3s/latest/en/. For my purposes, the difference between k3s and k8s is almost zero, except that k3s has a smaller footprint. Refer to https://www.civo.com/blog/k8s-vs-k3s.
Steps to Implement k3s on a Raspberry Pi
Here’s an outline I followed to obtain a running cluster:
- Hardware
- Bill of materials
- Mount boards in a case
- OS
- Choose a Linux distribution
- Install Linux on each micro SSD
- Configure boot images’ firmware
- Enable ssh connectivity to each board
- Configure k8s-friendly features on each OS
- Install k3s
- Server/control plane to one Pi node
- Workers/agents to remaining Pi nodes
- Stateless ping application
- Deploy
- Scale
- Dashboard GUI
Hardware
Target one or more 4 GB Raspberry 3B or 4B units. I reused an existing old 2 GB Raspberry 3B that uses 32-bit ARM v7 cores. The 4B units implement a 64-bit ARM v8, but can run ARM v7 32-bit apps. This mix of hardware gave me serendipitous experience restricting certain apps from the Pi 3, as well as scaling a 32-bit ARM V7 app across all pods.
Bill of Materials
A list of material items follows. It could vary.
| Count | Item | USD
Each |
USD
Total |
| 4 | Raspberry 4+ Pi, with 4 GB ram | $68 | $272 |
| 4 | 1-foot ethernet patch cord | $6 | $24 |
| 4 | Cana Raspberry power brick | $10 | $40 |
| 4 | 32 GB MSHD RAM cards | $10 | $40 |
| 1 | Five-port ethernet switch | $14 | $14 |
| 1 | Power strip having rotated sockets | $14 | $14 |
| 1 | Stack case for Raspberry Pi | $25 | $25 |
| Total cost of all items | $429 |
I purchased my items through Amazon. Search “purchase raspberry pi” to find alternative sources.
I first purchased two Pi 4B boards having 4 GB each. Later I added one 8 GB Pi 4B. I’d had no issues using it as a combination control plane (aka server, aka master) and worker (aka agent) as well as deploying other projects to it.
I cabled the boards to a port on my home network via a $15 five-port ethernet switch. I bought four patch cables to interconnect the boards to the switch. The fifth switch port connects my router. I administer everything via ssh. I can ssh into any node or even a pod container from my laptop, from another node or from a pod within a node. I administer the cluster from any of those origins.
It’s a lab setup. You could use WiFi for interconnection instead of cable lan to avoid the expense of patch cords and an ethernet switch.
Assemble The Case
Refer to the earlier screenshot. My case consists of a stack of four plexiglass slabs having holes, cutouts, and notches that align with a Raspberry Pi 3 or Raspberry Pi 4. The kit included heat sinks for each kind of Pi, threaded brass stand-offs, tiny screws, a jeweler’s screwdriver for those screws, and four fans that plug into power on a Pi’s digital I/O pins. I found it to be a good value for $20. Instructions were a bit brief.
You could forgo the stack case in favor of individual cases, or even no cases, especially if you only use one or two Pis. Either way, know that there will be a power wire and a patch cable associated with each. You could power each board via an ethernet POE hat. I did not.
Each Ubuntu server boot message-of-the-day (motd) reports a lessened CPU temperature due to sinks and fans. Lower temperatures mean less CPU throttling.
Operating System
Assume Linux for k8s OS. Raspberry Pi runs any ARM-based Linux.
Choose a Linux Distribution
For several years I used Raspian (now Raspberry Pi OS) with a GUI on my Raspberry 3. The Raspberry Pi Foundation provides the OS as the primary operating system for the Raspberry Pi family, but the Pi can run other distributions.
I wanted to lose the heavy GUI because we need only ssh for k3s administration. I use Ubuntu in several other endeavors. I chose Ubuntu 21.04 server for ARM as the OS for my four Raspberry PIs.
Install Linux on Each Board
Carry out the following tasks on a laptop or desktop computer:
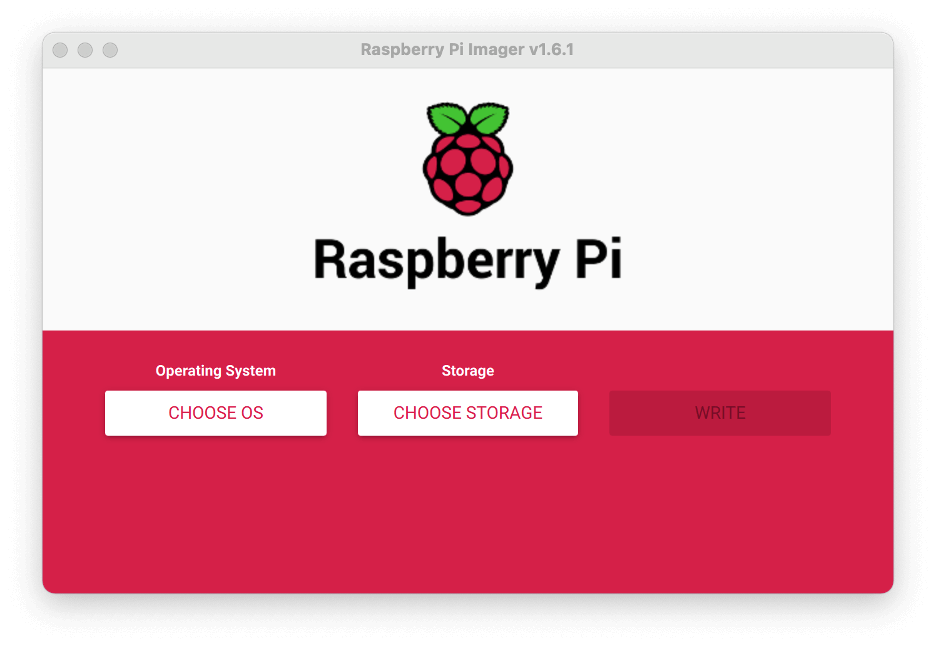
- Install the Raspberry Pi Imager application on a laptop. Ref https://www.raspberrypi.org/blog/raspberry-pi-imager-imaging-utility/
- Plug a 32 gb micro SD card into its full-sized SD card adapter.
- In turn, insert that adapter into a laptop SD slot or SD dongle.
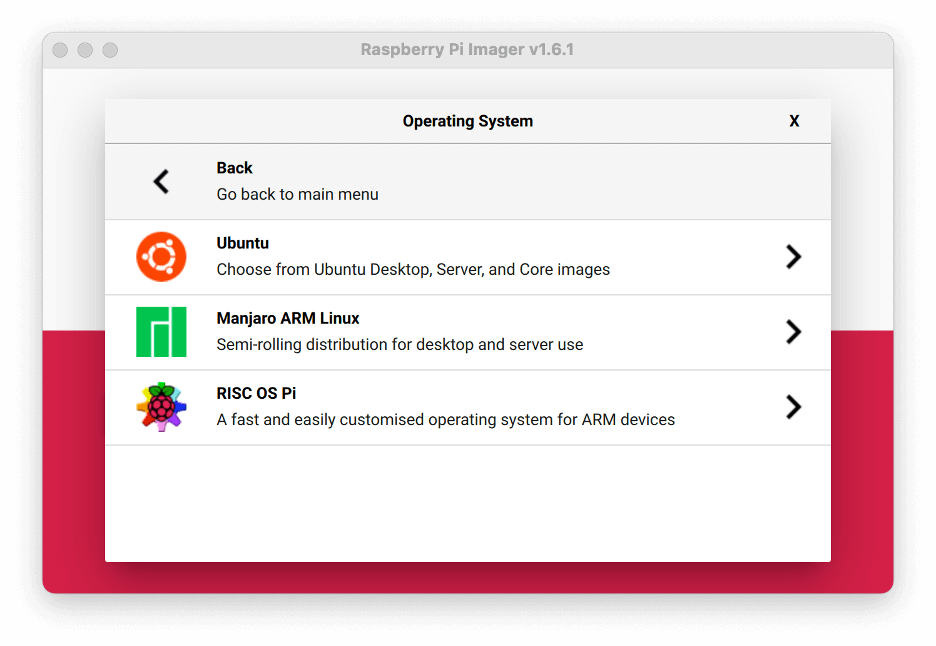
- Invoke the imager application on the laptop.
- Navigate to a recent “Other general-purpose OS -> Ubuntu -> 64-bit server for ARM architecture”.
- Choose storage “Generic SD/MMC — Media 32.0 GB”
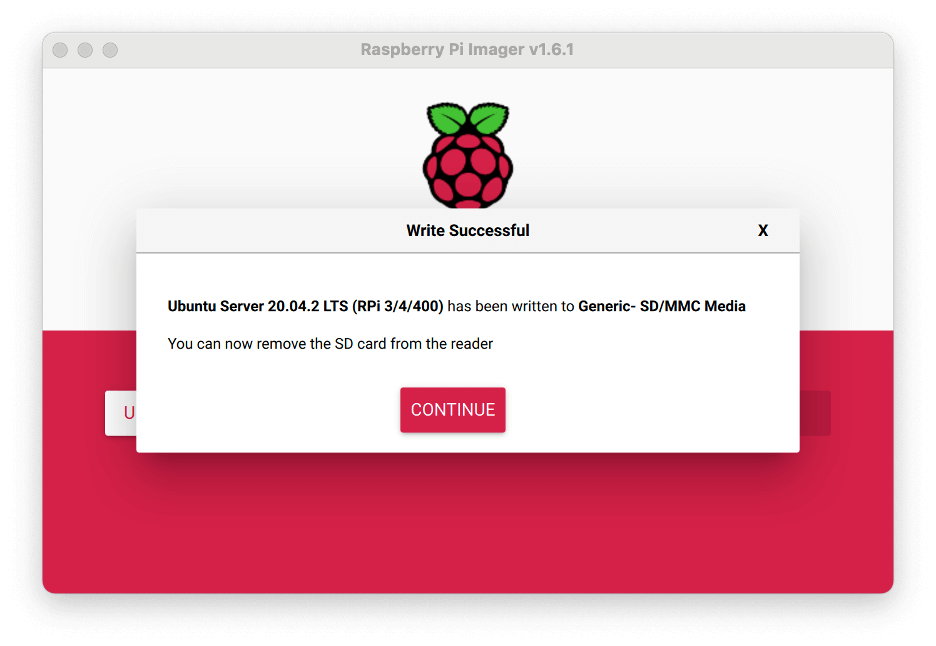
- Click the Write button
- Have a cuppa while you wait for “Write successful”
- The application will have ejected the SD card.
Configure Boot Images on Each Micro SSD
The imager ejects the card when finished. Continue:
- Physically remove the card from the PC to insert it into a target unpowered Raspberry Pi cabled to your router.
- Plug power into the Pi. The Pi will boot Ubuntu for the first time, initializing the boot card. You’re running blind to its console so far.
- Watch for the lights to appear less excited. After five or more minutes, remove the card from the Pi.
- Re-insert it into the PC.
- From the PC, access the
bootdirectory on the mounted card
Ubuntu on Raspberry Pi supplies files in the boot/firmware directory in lieu of the BIOS on a desktop system. We need to edit a couple of items.
Cgroup Memory Feature
Ubuntu ARM containers need the Linux cgroup memory feature to be manually enabled. Enable it by editing the
boot/cmdline.txtFor each micro SD card insert, it into the PC to carry out the following steps:
- Issue the following command to edit this file:
sudo vi /boot/firmware/cmdline.txt
2. Append the following to the file:
cgroup_enable=cpuset cgroup_memory=1 cgroup_enable=memory
The last line should match the final line below:

Later, when you boot and ssh into each board, you can verify the effect. You would see non-zero
num_cgroups for memory by issuing cat/proc/cgroups:
The screenshot shows 182
num_cgroups for memory (third column) – it’s working for that node.Config arm64 on Pi 4B Boards
Add the following line to /boot/firmware/config.txt:
arm64_bit=1
Save the file and eject the card from your PC
Boot Each Pi
Apply this section’s instructions to each Pi. Connect a Pi to your network.
- Insert its micro SD card into a Pi
- Power up the PI (plugin its power brick), You may need to cycle power twice
- Find the IP – try
arp -an | grep dc.71. Look at the local net on your router admin. I also used Angry IP Scanner
Use each node’s IP in the following sections.
Enable SSH Connectivity
Our Kubernetes friend is ssh. I used it directly and indirectly for network k3s interactions from this point onward.
See https://www.cyberciti.biz/faq/how-to-set-up-ssh-keys-on-linux-unix/ if you have questions. Basically, follow these steps:
- Use
ssh-keygenon your PC to generate your RSA public and private key pair. If you’re using Windows, use the way-of-the-day to carry out the equivalent. - On each node, issue
ssh-copy-id ubuntu@ip. Reply to the prompt in a sane manner. - Now log into the node via
ssh ubuntu@ip(just remove the “-copy-id” from the prior command). - Verify that you can log into the node as ubuntu. The initial password is ubuntu.
- Ubuntu OS then forces you to set a new password.
- Follow the prompts.
- Login again with the new password after Ubuntu forces you off.
Set Host Names
We need a well-known hostname and static IP for each Kubernetes node. I didn’t use a DNS, so I had to set /etc/hostname while reserving its IP address in the router.
-
sudo vi /etc/hostnamesudo vi /etc/hosts
I used a scheme that mapped to each Pi board in turn
| host name | IP address | Notes |
|---|---|---|
| ras31 | 192.168.1.31 | Pi 3B, 2 GB, 32-bit worker |
| ras41 | 192.168.1.41 | Pi 4B 4 GB, 32-bit worker |
| ras42 | 192.168.1.42 | Pi 4B, 4 GB, 64-bit worker |
| ras43 | 192.168.1.43 | Pi 4B, 8 GB, 64-bit server |
Add the hostname to /etc/hosts file as an address you reserve in your router. Add all hostname mappings to every PC used for administration as well.
sudo reboot- Login
- Verify the hostname via command
hostname
Here is a screenshot of an Ubuntu node motd splash screen after logging into a node via SSH. Note that I used a hostname.
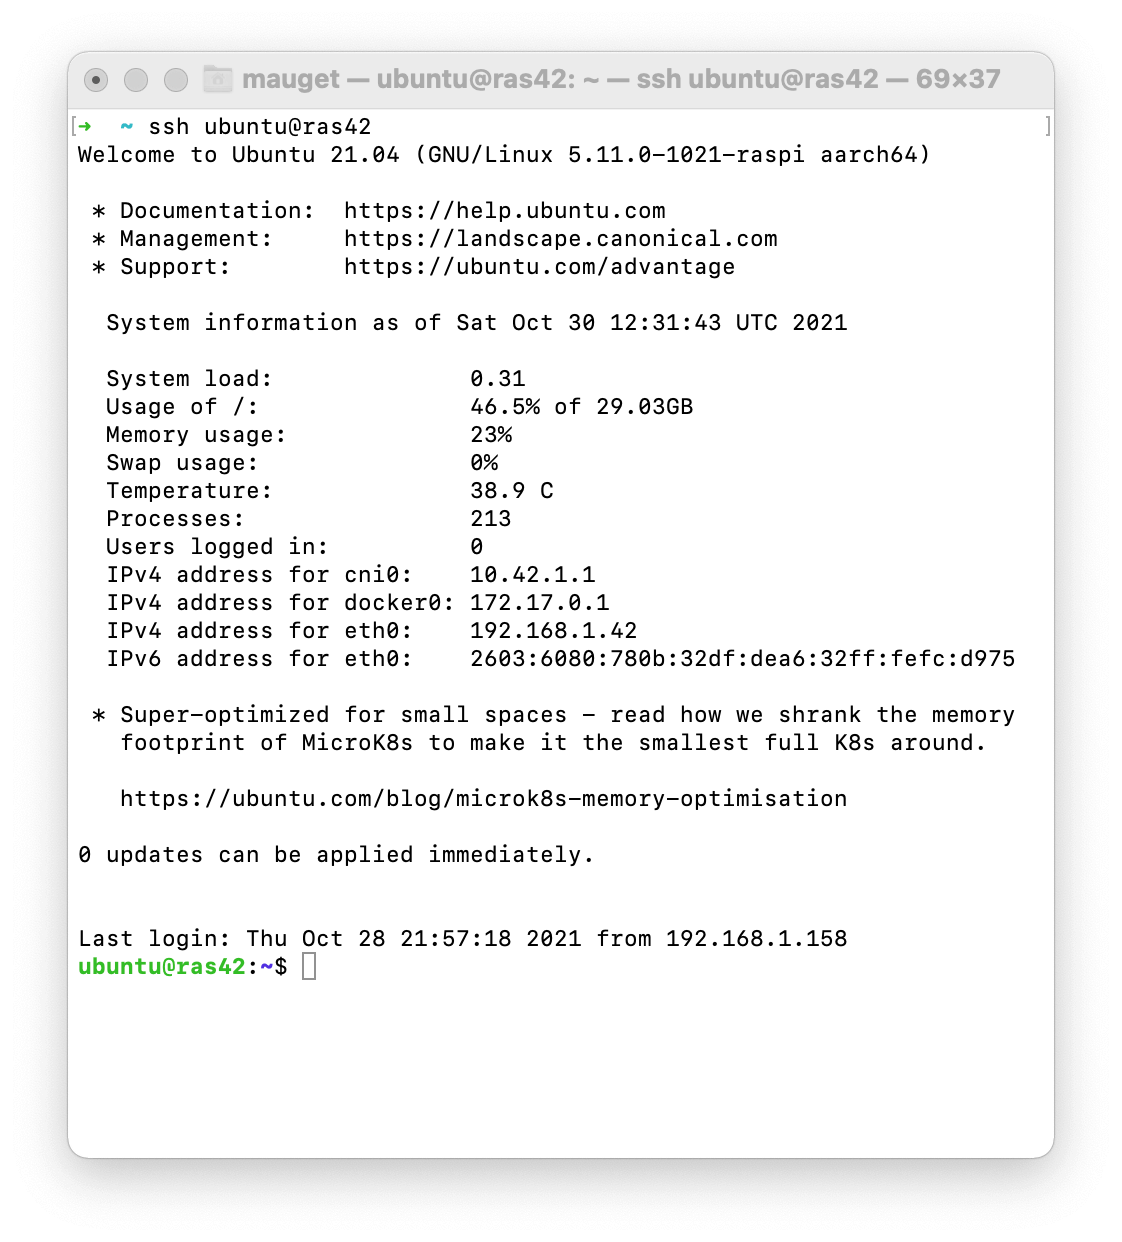
Enter exit to … exit.
Configure Kubernetes-Friendly OS Features
Each node can receive more features. Be sure to turn off swap at least:
Turn off Swap
Kubernetes will try to use it all. Swapping to “disk” isn’t good for the SD card or performance. Display swap with
cat /proc/swaps
My 4 gb Pi nodes had swap set by Ubuntu, but not set for my 8 gb Pi.
Comment out the swap entry if present in the <code>/etc/fstab</code> file. A comment is a prefix # on the line.
Docker
K3s uses containerd instead of Docker as its container engine. Still it’s handy to use Docker to work with images prior to deploying them. The image formats are identical for both container mechanisms.
sudo apt install docker.io
sudo usermod -a -G docker $USER
Finally, log out and re-login as ubuntu.
Docker ps should work without sudo now.
Install network-manager
The network manager is the state-of-art cli for network admin. Ensure you have it installed:
sudo apt install network-manager
Install k3s
Use k3sup (pronounced “ketchup”) to install k3s via ssh from a laptop. For reference, see https://github.com/alexellis/k3sup.
k3sup also creates a local KUBECONFIG file on the local laptop. We’ll supply that file later to all boxes that use kubectl to administer the k3s cluster.
Install k3sup on a laptop via curl:
curl -sLS https://get.k3sup.dev | sh
Install k3s Server
Use k3sup on the laptop to install a k3s server (control plane) on your chosen server node. For example, mine is at IP address 192.168.1.43.
export SERVER_IP=192.168.1.43
export USER=ubuntu

k3sup install --ip $SERVER_IP --user $USER
Install k3s Agents
For each agent (worker) node, set AGENT_IP in the following script and run it to install k3s-agent on that node.
export AGENT_IP=192.168.1.42

export SERVER_IP=192.168.1.43
export USER=ubuntu

k3sup join --ip $AGENT_IP --server-ip $SERVER_IP --user $USER
Set KUBECONFIG in Worker Nodes and Laptop
Setting a KUBECONIG reference into each node and admin PC enables each to find the server without a command-line switch value. Refer to https://kubernetes.io/docs/concepts/configuration/organize-cluster-access-kubeconfig/ to carry out the setting for each worker. This involves setting an environment variable that points to the config:
KUBECONFIG=/home/ubuntu/.kube/config
You can display the config by using kubectl from any node or configured PC. Here’s one queried within my ras42 node. Notice the server binding;
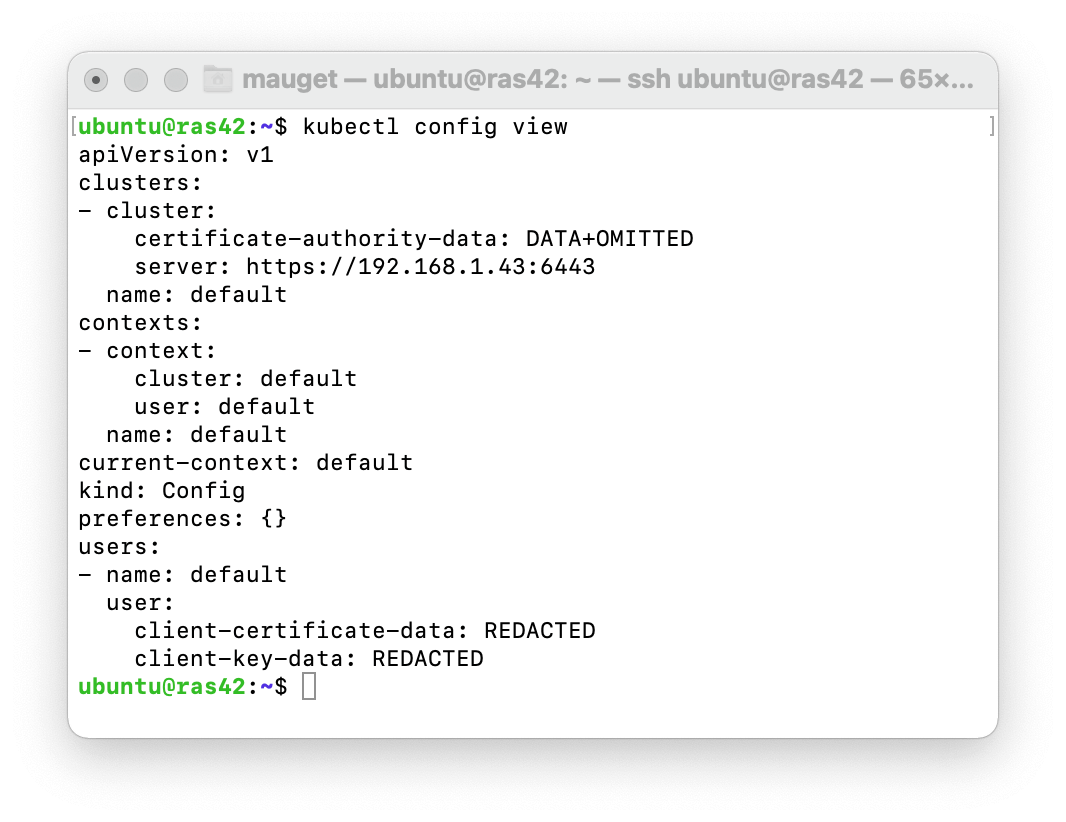
List Nodes Via kubectl
Your laptop should honor the kubectl command now. Let’s use it to list nodes. But first, k3s does not label workers’ roles. K8s does. Let’s label ours like those of k8s. Use kubectl from the laptop to label the workers.
kubectl label node ras31 node-role.kubernetes.io/worker=worker
kubectl label node ras41 node-role.kubernetes.io/worker=worker
kubectl label node ras42 node-role.kubernetes.io/worker=worker
Now kubectl will list the nodes and their roles:

Deploy kping Web App
I wrote the kping echo app to respond to an HTTP GET with its hostname. That’s a pod name if we execute kping in Kubernetes. I deployed it to DockerHub tagged with a minimal 32-bit arm Alpine Linux nodejs variant,
kping Source
The node.js application’s JavaScript source code:
const http = require('http');
const os = require('os');

const PORT = 8080;

const listener = (request, response) > {
const { socket } = { ...request };
if (socket) console.log(`request from ${socket.localAddress}:${socket.localPort}`);
    response.writeHead(200);
    response.end(`kping response from "${os.hostname()}"\n`)
};

http.createServer(listener).listen(PORT);
console.log(`kping listening on port ${PORT}`);
kping DockerFile
The kping app deploys as an arm32v7 image that will execute on Raspberry 4 as well as Raspberry 3, in a nod to my mixed cluster. The Apine-based nodejs is an order of magnitude smaller than the standard node Dockerhub image. I used the following DockerFile to create the mauget/kping:arm32v7 image on DockerHub that will provide containers that run on the mix of arm v7 and arm v8 nodes that I have.
# docker build -t kping .
# docker run --name kping-container -p 8080:8080 -d kping

FROM arm32v7/node:12-alpine3.12
ADD app.js /app.js
ENTRYPOINT ["node", "app.js"]
kping Deployment Manifest
The deployment kping-deployment.yaml declares replicas count, the image and name for a pod container, as well as the app name and selectors used to manage a kping deployment.
apiVersion: apps/v1
kind: Deployment
metadata:
  name: kping
spec:
  replicas: 4
  selector:
    matchLabels:
      app: kping
  template:
    metadata:
      name: kping
      labels:
        app: kping
    spec:
      containers:
      - image: mauget/kping:arm32v7
        name: nodejs
kping NodePort Sevice Manifest
The service kping-service.yaml declares NodePort binding to kping containers replicated pods.
kind: Service
apiVersion: v1
metadata:
  name: "kping"
spec:
  selector:
    app: "kping"
  ports:
    - protocol: "TCP"
      port: 8080
      targetPort: 8080
  type: "NodePort"
Apply The Manifests
Kubernetes’ philosophy is to bring the state of the system into sync with each applied manifest.
kubectl create -f ./kping-deployment.yaml
kubectl create -f ./kping-service.yaml
Check the effect via kubectl from the PC or any node:
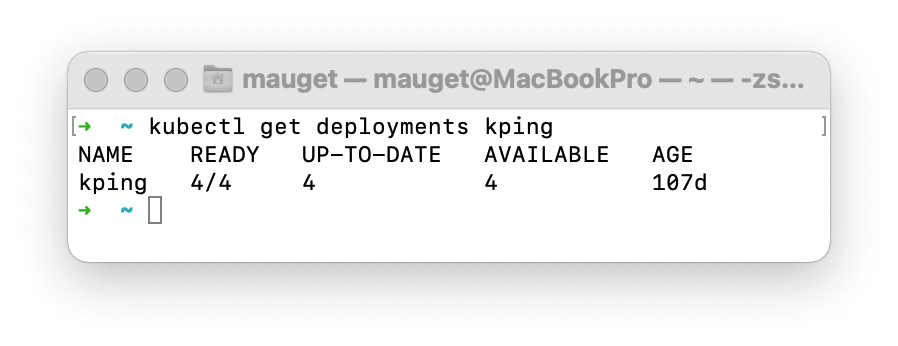
At this point, kping is deployed and replicated to four pods chosen by k3s according to the “replicas” value in the deployment manifest. We can scale the replica later via kubectl. A kping NodePort service exposes the deployment to the local lan. The cluster should be operational. How can we see that?
Smoke Test
Let’s loop infinite curl requests to the NodePort service to see each instance respond with its hostname.
Start by finding the NodePort port value from a terminal open on any node or the laptop PC:

Use the external port with the node’s IP or name to access the NodePort from any kubectl-enabled device on the local lan. I aimed my laptop’s curl command at my ras42 node. I appended the NodePort 32053 taken from the kubectl get svc response. Know that the port value varies, being assigned at each deployment. Kubernetes will distribute inbound requests to the NodePort across replicas.
Spin the curl command via a shell loop:
while true: do curl ras42:32053; done;
Thus we have it: each instance returns its hostname. The result shows k3s spraying the requests across kping deployment replicas.

This end-to-end test verified that the cluster is operational.
If you aim a browser at that IP and port, it, too, will render the kping instance name. If you click browser refresh, the hostname won’t change until you wait several seconds for the http keep-alive timeout interval.
You can scale the number of replicas up or down by setting replicas on the deployment. Here, I scaled from four to five pod replicas:
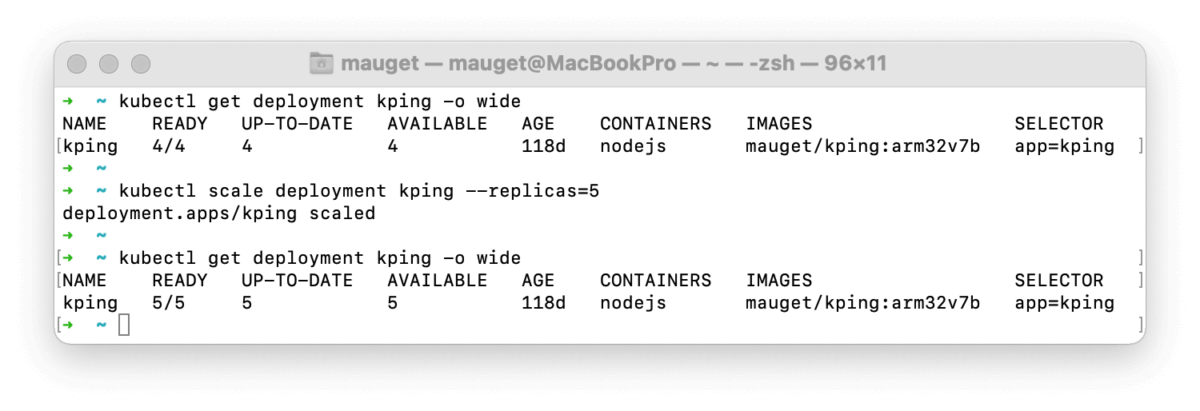
Had we watched the loop during scaling, we would see it continue, even as k3s started or killed pods. That’s Kubernetes at work: dynamically scaling a distributed application on command.
Dashboard
A GUI dashboard renders administrator requests and responses via a kubectl proxy. It is handy for viewing bar charts and pie charts of resource usage. You can issue many kubectl actions and queries in a click-it manner as well.
For straightforward installation instructions refer to https://rancher.com/docs/k3s/latest/en/installation/kube-dashboard/.
Start the kubectl proxy running in a window:
kubectl proxy
Access the dashboard at link http://localhost:8001/api/v1/namespaces/kubernetes-dashboard/services/https:kubernetes-dashboard:/proxy/
The dashboard authenticates via a token. I use a small shell script to obtain the token that I paste into the dashboard authentication popup.
#!/bin/sh
kubectl -n kubernetes-dashboard describe secret admin-user-token | grep '^token'

Kubernetes Dashboard
You can carry out many of the functions of kubctl through the dashboard. It wants to time out the user session aggressively, but you can disable the session timeout.
This screenshot shows pod CPU activity while looping kping requests.

Conclusion
This blog described constructing a working four-node Kubernetes cluster running on real hardware that cost under $450.
- The goal was a touchy-feely Kubernetes installation running on real local hardware.
- Much of the work involved of assembling a physical stack of Raspberry Pi boards, followed by preparing each operating system to run k3s, a small-footprint Kubernetes.
- Installation and administration of k3s relied on ssh.
- We carried out Kubernetes installation by a k3sup command issued to each node.
- A kubeconfig file in each participating external machine environment enabled administration from those machines.
- A smoke test deployed a replicated app that returned its hostname at each request.
- We scaled the app horizontally dynamically without disruption.
- The Kubernetes Dashboard is a GUI front end for visualizing much of the kubectl cli.
I admit that it’s anticlimactic to carry out all this work just to run a scaled-out echo app. The kping app isn’t good for much except testing Kubernetes behavior. Perhaps a follow-on could discuss data volumes and state, a replicated web app, as well as using Ansible to maintain the nodes’ Ubuntu OS. As I said, Kubernetes is a fractal. I think it’s a fun fractal. For more blogs on Raspberry Pi, check out this fun one on Using RetroPie to Build Keyhole’s Gaming Console.
More From Lou Mauget
About Keyhole Software
Expert team of software developer consultants solving complex software challenges for U.S. clients.
Share This Post
Join The Thousands Of Devs Who Subscribe


Yeah. There has been a siesmic shift in IT back to centralization “out there in the cloud” and the virtual layered on virtual is now the thing. What you’ve done here with some Raspberry PIs it fantastic.
Thank you.
Nice work! I am looking at doing the same with powered by solar.