
Learn Svelte by Making a Word Puzzle: Part 2, Reactivity
If you’re new here, please check out Part 1 of this series for instructions on how to get started. In that installment, we walked through how to install Svelte and learned how to make Svelte components!
So far in this multi-part series, we’ve used Svelte to make the frontend of a Word Puzzle Game, but it does not receive user input, yet. That doesn’t make for a very fun game!
In Part 2 of this series, we’re going to make our game a little more functional. We’ll accomplish the following tasks.
- Allow users to guess a word
- Manage state for the guesses
- Track the correctness of each letter in each guess
By the end of this post, we will be one step closer to having a Svelte-based, fully functional Word Puzzle Game! Without further ado, let’s get started.
Let the Users Type
If we want input from our users, our first approach might be to use an HTML input form. Let’s start off with this approach:
src/routes/index.svelte:
<script>
	import Guess from '../lib/components/Guess.svelte';

	let wordGuesses = ['worm', 'engineer', 'testing', 'run', 'kanban'];

	let currentGuess = '';
</script>

{#each wordGuesses as word}
	<Guess {word} />
{/each}

<input bind:value={currentGuess} />

<div>Current Guess: {currentGuess}</div>
Here’s what’s different:
- We are initializing a new variable,
currentGuess. - We are using Svelte’s
bind:to set the value each time theinputvalue changes. - We then display the current value of the guess in a div beneath the input.
This gets us the data, but it doesn’t display the data using the same tile letters that users would expect to see. We can try to use the Guess component to display how the user’s guess would line up with the other words they’ve tried. However, we will find that this approach is a bit naive; it won’t work even when using bind: on our component prop.
<script>
	import Guess from '../lib/components/Guess.svelte';

	let wordGuesses = ['worm', 'engineer', 'testing', 'run', 'kanban'];

	let currentGuess = '';
</script>

src/routes/index.svelte:

{#each wordGuesses as word}
	<Guess {word} />
{/each}

<input bind:value={currentGuess} />

<Guess bind:word={currentGuess} />
Why doesn’t this work? Let’s do some inspection.
<script>
	import Letter from './Letter.svelte';

	/** @type {string} */
	export let word = '';

	let statusList = ['new', 'close', 'wrong', 'right'];

	/** @type {(someWord: string) => {char: string; status: string}[]}*/
	let zipWordData = (someWord) =>
		[...someWord].map((char) => {
			let statusIndex = Math.floor(Math.random() * 10) % statusList.length;
			return { char, status: statusList[statusIndex] };
		});

	console.log(word); // hopefully this logs our guess as we type it in

	let guessWithStatus = zipWordData(word);
</script>

src/lib/components/Guess.svelte:

<div class="wordGuess">
	{#each guessWithStatus as guessLetter}
		<Letter char={guessLetter.char} status={guessLetter.status} />
	{/each}
</div>

<style>
	.wordGuess {
		display: grid;
		gap: 0.1rem;
		max-width: 25rem;
		grid-template-columns: repeat(10, 10fr);
		margin: 0.75rem;
	}
</style>
Here, we have added console.log(word) to the Guess component. However, this too does not show our bound word.
What gives? The answer is Svelte’s approach to rendering and reactivity. Let’s dive in.
Reactivity in Svelte
Svelte tries to be efficient by eliminating the Shadow-DOM diffing loop, resulting in a leaner, cleaner user experience. The tradeoff is that developers must exercise more control over which of their variables trigger renders.
While this may sound foreign coming from a library like React, in Svelte, the process is easy. Here’s why.
- Assignments are reactive.
- Statements can be marked as reactive statements by prefixing the line with
$:.
Let’s see how this works in our Guess component.
<script>
import Letter from './Letter.svelte';
/** @type {string} */
export let word = '';
/** @type { {char: string; status:string}[] } */
let guessWithStatus = []; // initializing here
let statusList = ['new', 'close', 'wrong', 'right'];
/** @type {(someWord: string) => {char: string; status: string}[]}*/
let zipWordData = (someWord) =>
[...someWord].map((char) => {
let statusIndex = Math.floor(Math.random() * 10) % statusList.length;
return { char, status: statusList[statusIndex] };
});
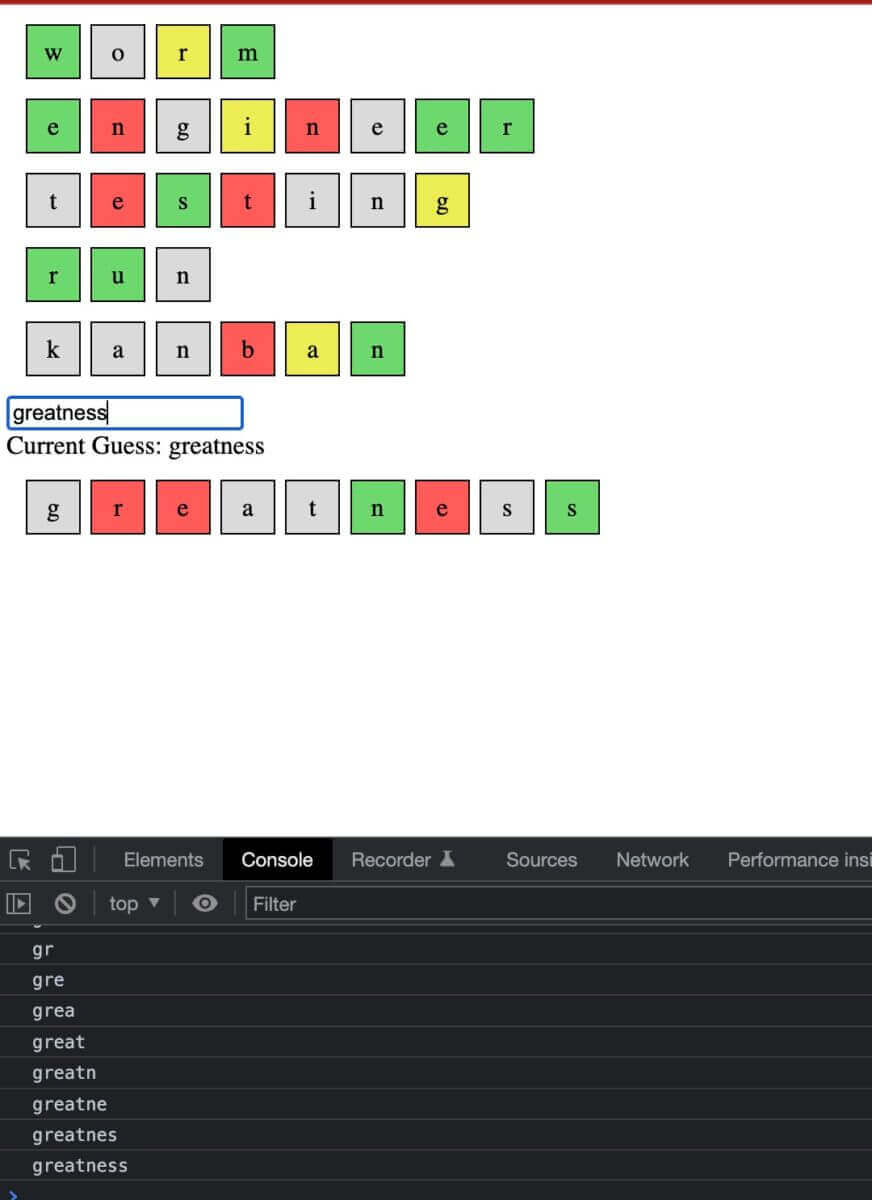
// these statements are now reactive
$: console.log(word);
$: guessWithStatus = zipWordData(word);
</script>
src/lib/components/Guess.svelte: (...etc...)
Here we have marked 2 statements with $:, so that whenever the underlying data is changed (in this case, the word variable), those statements are re-run and the component (and not the rest of the game) is rendered anew.
Being selective in when components are rendered may take a paradigm shift if we are coming from other libraries, but it can be an effective tool. In our game’s example, we might want to hold off rendering whether a user’s guess is correct until they hit the enter key.
At this point, we have a way to type in a word directly into a Guess. However, that input field feels clunky. The user should know what they’re typing based entirely on the Guess, right? Let’s remove input and handle assignment of our guess by handling the keyDown event on the browser window.
src/routes/index.svelte:
<script>
	import Guess from '../lib/components/Guess.svelte';

	let wordGuesses = ['worm', 'engineer', 'testing', 'run', 'kanban'];

	let currentGuess = '';

	/** @type {(keyEvent: KeyboardEvent) => void} */
	let handleKeydown = (keyEvent) => {
		//Adds the current key to the guess
		currentGuess = currentGuess + keyEvent.key;
	};
</script>

<svelte:window on:keydown={handleKeydown} />

{#each wordGuesses as word}
	<Guess {word} />
{/each}

<!-- Removing the input element
	<input bind:value={currentGuess} /> -->

<Guess bind:word={currentGuess} />
Note that we did not have to mark the statement inside handlekeyDown as a reactive statement because we are assigning currentGuess in that function, and assignments are reactive.
Note also that in this simple function, if we were to type keys like ‘Enter’ or ‘Backspace’, we’d end up with some nasty output. Let’s go ahead and handle those cases, and also allow the user to add to the list of guesses.
src/routes/index.svelte:
/** @type {(keyEvent: KeyboardEvent) => void}*/
let handleKeydown = (keyEvent) => {
	if (keyEvent.code.startsWith('Key') && currentGuess.length < 10) {
		// Gets letters (and not numbers or special characters).
		// The length condition also keeps us within our grid.
		currentGuess = currentGuess + keyEvent.key;
	} else if (keyEvent.code === 'Backspace') {
		// If the user hits Backspace, then let's remove the last letter.
		currentGuess = currentGuess.substring(0, currentGuess.length - 1);
	} else if (keyEvent.code === 'Enter') {
		// If the user presses Enter, then add their guess to the list.
		wordGuesses = [...wordGuesses, currentGuess];
		currentGuess = '';
	}
};
Again, we want to use assignment whenever we want reactivity for wordGuesses. If we were to simply use .push(currentGuess), that would not trigger an update to our each block.
Let’s start with an empty list and allow our users to fill it with their own guesses.
Putting it all together
Let’s first clean some things up. Our users shouldn’t see what status their letters are in as they are typing. Let’s fix this by adding an isNew prop to our Guess component.
src/lib/components/Guess.svelte:
<script>
	import Letter from './Letter.svelte';

	/** @type {string} */
	export let word = '';

	// By default, use the colors, but if true, just 'new'
	export let isNew = false;

	/** @type {(someWord: string) => {char: string; status: string}[]}*/
	let zipWordData = (someWord) =>
		[...someWord].map((char) => {
			let statusIndex = Math.floor(Math.random() * 10) % statusList.length;
			if (statusIndex === 0) statusIndex++; // added this to not see 'new' status in guesses
			return { char, status: statusList[statusIndex] };
		});

	$: guessWithStatus = zipWordData(word);
</script>

<div class="wordGuess">
	{#each guessWithStatus as guessLetter}
		<Letter char={guessLetter.char} status={isNew ? 'new' : guessLetter.status} />
	{/each}
</div>

(style...)
We can then set isNew to true for the component tracking the user’s guess.
src/routes/index.svelte:
(...)

<svelte:window on:keydown={handleKeydown} />

{#each wordGuesses as word}
	<Guess {word} />
{/each}

<Guess bind:word={currentGuess} isNew={true} />
…and let’s spruce up the style in our Letter component as well.
src/lib/components/Letter.svelte:
.tile {
	text-transform: capitalize;
	font-family: Arial, Helvetica, sans-serif;
	font-size: 24px;
	display: grid;
	justify-content: center;
	align-items: center;

	border: 1px solid black;
	width: 2rem;
	height: 2rem;
	border-radius: 2px;
}

.new {
	background-color: rgb(218, 218, 218);
}
.close {
	background-color: rgb(236, 236, 83);
}
.wrong {
	background-color: rgb(208, 72, 72);
	color: rgba(255, 255, 255, 0.333);
}
.right {
	background-color: rgb(110, 216, 110);
}
With all of this together, this is actually looking like a real game!

Nice work everyone.
Wrapping Up
Today, we learned about two kinds of reactivity in Svelte:
- Reactive statements using
$: - Reactive assignments using
=
Next time, we’re going to learn about the third type of reactivity: using Svelte stores to bind data across components.
Thank you for learning with us at Keyhole Software. Keep up with all our posts at the Keyhole Dev Blog!
More From James Slaughter
About Keyhole Software
Expert team of software developer consultants solving complex software challenges for U.S. clients.
Share This Post
Join The Thousands Of Devs Who Subscribe


Discuss This Article
Subscribe
Login
0 Comments
Oldest