
Using Jest and Testing Library with React Native Part VII: Random Information about Jest
Wow! This is the very last part of our series! It’s been so fun to write these, and I sincerely hope you’ve learned a few things that will help you going forward. Below, you’ll find the series outline.
Seriers Outline:
- Part I: Setting Up
- Part II: Writing the First Test
- Part III: Testing for an Element That Isn’t Present
- Part IV: Button Testing
- Part V: Testing Styles of a Component
- Part VI: Functional Testing
- Part VII: Further Helpful Information – Current Article
In our past tutorials, we have gone over the different things we can test with Jest and Testing Library with React Native. In this tutorial, we will cover a few random things I find helpful that we can do with Jest.
Watching the Tests
There is a way to watch changes as we make them! This is pretty useful depending on your circumstances and goals.
Running this is quite easy.
Using yarn:
yarn test --watch
Using NPM:
npm yarn test --watch
You should see that the App.test.js test ran, and you should also see this:
Now, let’s make a change to one of the tests. It should automatically rerun the tests. This can be super helpful in a number of situations.
- You are fixing a test and don’t want to keep running
yarn testornpm test. - You are encountering an error and are trying to debug why it isn’t working.
- You have a few tests to write and don’t want to keep running the test command each time.
Watch a Certain Test
With the feature we discussed above, we went over watching the tests. Imagine you had 20 files you are testing but only want to test one of those files. You don’t want to run each test every time you make a change, right?! That would be a headache and a waste of time.
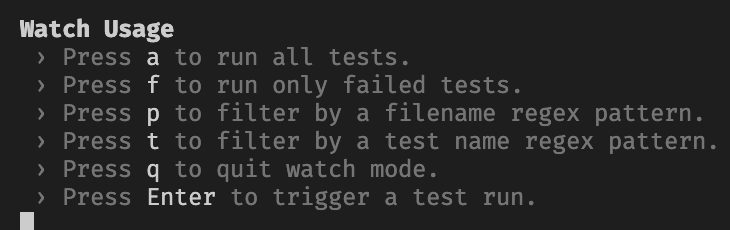
Well, lunkily, when running the watch command, yarn test --watch or npm test --watch, you have some options to bypass this.
- Press
ato run all tests. - Press
fto run only failed tests. - Press
pto filter by a filename regex pattern. - Press
tto filter by a test name regex pattern. - Press
qto quit watch mode. - Press
Enterto trigger a test run.
The one we want to use for this situation is number 3, Press p to filter by a filename regex pattern.
Press P and type App.test.js. This should run our test. If you put something in for the regex, like your name, it should show: No tests found, exiting with code 0.
In our case, we don’t have more than one file. However, for a project you are working on that has a good amount of files, this would be helpful.
Coverage
Jest has an option that allows us to see if we have written a test for all our code.
Run this command:
Yarn:
yarn test --coverage
Node:
npm test --coverage
You should see someting like this:

If you see the above, that means we have wrote a test for every line of code in App.js. Great job!
Let’s test it out. Remove one of your tests. I’m going to remove our functional one.
Run the coverage command again.
You should see something like this:

We no longer have 100% coverage. As App.js is a simple file, it’s easier to get 100%. If you don’t have 100% coverage, that is okay! The coverage is to show what we may not be covering and a call can be made if that should be covered or not.
Mock
With the tests we wrote, we didn’t have a component that expected a function for a prop, so let’s just pretend we have a component that accepts a function.
  //This is a sample file
  const functionSample = () => {...};

  //...

  <MockComponent doSomething={functionSample} />

  //...
In this case, we would mock doSomething using jest.fn(), like this:
  //This is a sample test

  it('should run fake test', () => {
   ...

   const {//...} = render(<MockComponent doSomething={jest.fn()}
  });
jest.fn() allows us to mock a function without needing to write custom code for it. We don’t need to mock a function. If you want to, this is an easy way to do it.
Mock a Module
Within your app, you may be using a module from another codebase. This might be something used to make HTTP Requests (Axios, Fetch, etc) or another package.
When we have something like axios, the way we mock it is:
jest.mock('axios');
Another example is Switch from react-native:
jest.mock('react-native/Libararies/Components/Switch/Switch', () => 'Switch');
As you see above, we are mocking two external modules differently. Depending on what you want to mock, you may need to research how to mock it. It shouldn’t be too difficult! Just type it into Google.
You can also create a mock for one of your functions. See this resource for more information.
Setup File
Jest also has the ability to add a setup file. A setup file allows us to add something we want to run with each test. This would usually be a common place to mock functionality you need through the tests.
To add a setup file, create a new file on the root of the project and name it (jestSetup.js for example).
Open up jest.config.js file, and update or add setupFiles in module.exports:
//...
module.exports = {
  setupFiles: ['./jestSetup.js']
};
//...
Further Resources
Want to dig deeper? Here are a few resources I would suggest checking out. Happy researching!
- Jest
- Jest CLI
- Testing library for React Native
- Testing Library React Native Queries
- Testing Library React Native API
- React Native
Summary
And that’s a wrap! In this tutorial series, we’ve covered everything from getting started with Jest and Testing Library for React Native to Funtional Testing and lots more in between.
I really hope you have enjoyed our journey into Using Jest and Testing Library for React Native! If you have any questions about this post or any other part of the tutorial series, please leave a comment here or on another post!
If you haven’t already, make sure you explore the full series. Thanks for reading and happy testing!
[Editor’s Note: Never miss a post by subscribing to receive new blogs by email. No spam, opt-out anytime.]More From Justin Leach
About Keyhole Software
Expert team of software developer consultants solving complex software challenges for U.S. clients.
Share This Post
Join The Thousands Of Devs Who Subscribe


Discuss This Article
Subscribe
Login
0 Comments
Oldest