
Xamarin.Forms App Push Notifications with Azure Notification Hubs
Push notifications are a vital feature for today’s enterprise mobile applications. Why are they so important? They allow the business to communicate with its users without requiring the application to be in an open state.
Xamarin.Forms allows developers to create user interfaces in XAML with code behind it in C#, which then renders as native controls on iOS and Android platforms.
In this blog, we go through a step-by-step tutorial for setting up and configuring push notifications on Xamarin.Forms applications using Azure Notification Hub. Let’s dive right in.
Note: We used the configuration demonstrated here just recently to configure push notification for the Fly Tyer World‘s mobile app. If you’d like to see first-hand how the push notifications show in production, you might check it out on either the Apple App Store or Google Play Store. Plus there are some great fly tying/flyfishing videos!
Prerequisites
- Azure subscription
- Visual Studio with Xamarin on Windows
- Active Google account
- The latest version of Xcode
- iOS 10 (or later version) compatible device
- Apple Developer Program membership
Note: Because of configuration requirements for iOS push notifications, you must deploy and test the sample application on a physical iOS device (iPhone or iPad) instead of in a simulator.
Setup Push Notifications for the Android Platform
Create a Firebase Project and Enable Firebase Cloud Messaging
- Sign in to the Firebase console, and create a new Firebase project if you don’t already have one.
- After creating the project, select Add Firebase to your Android app.

- On the Add Firebase to your Android application page, take the following steps:
- For the Android package name, enter a name for your package. For example: “com.hub2020.project33”
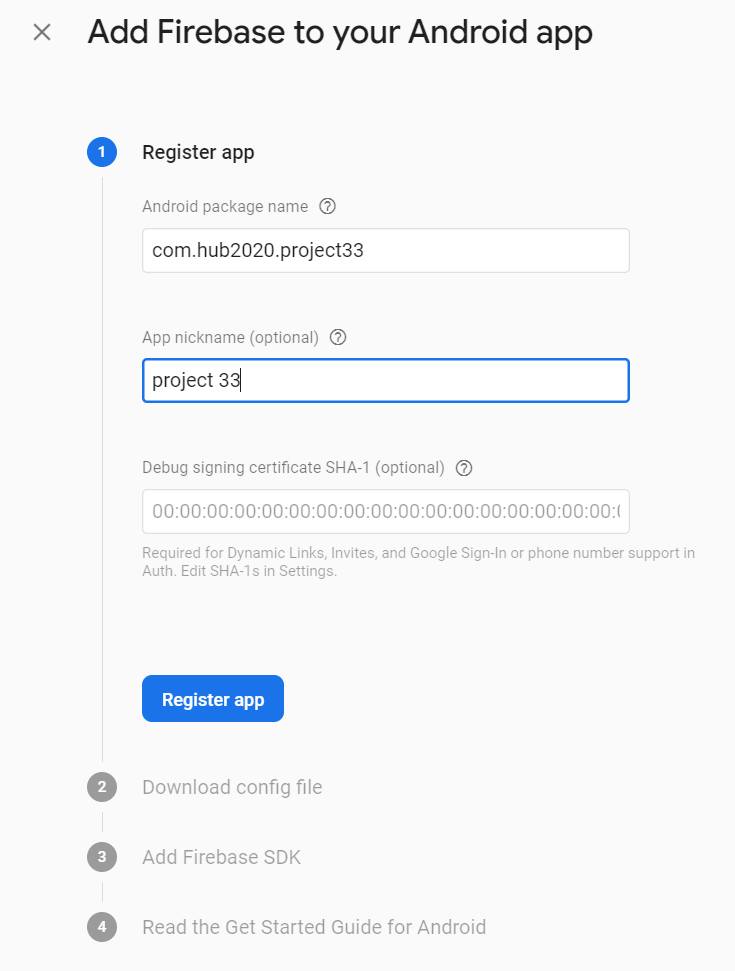
-
- Select Register app.
- Select Download google-services.json. Then save the file into the folder of the project and select Next.

-
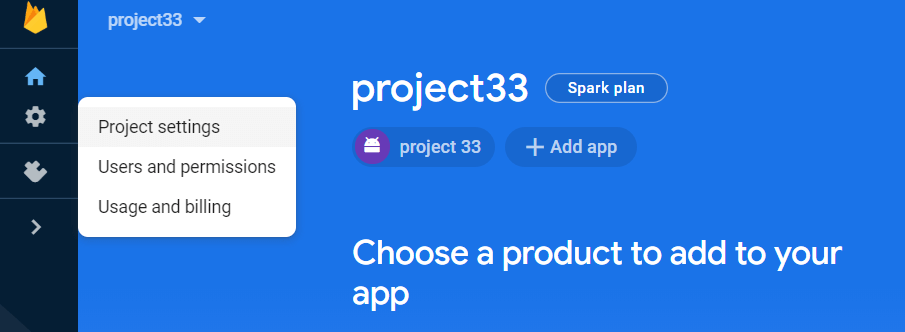
- Select Next and then Continue to console

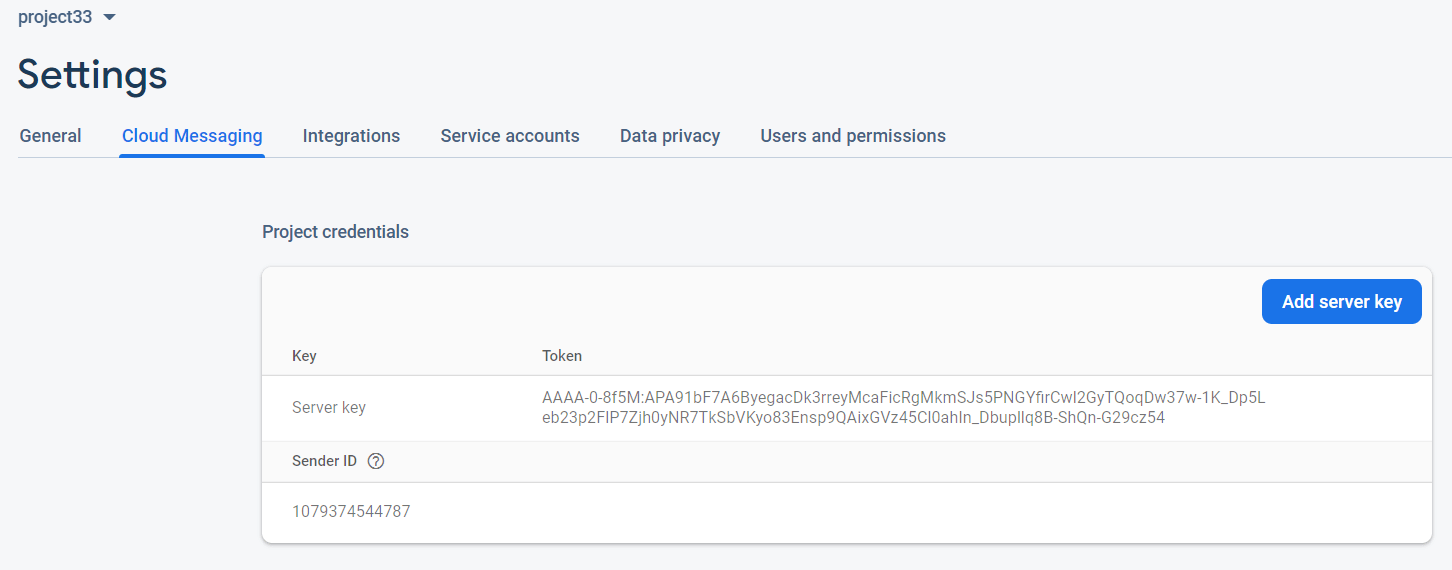
- In the Firebase console, select the Project Settings.
- Switch to the Cloud Messaging tab at the top. Copy and save the server key that is required to configure the notification hub.
Set Up Push Notifications for iOS Platform
Generate the certificate signing request file
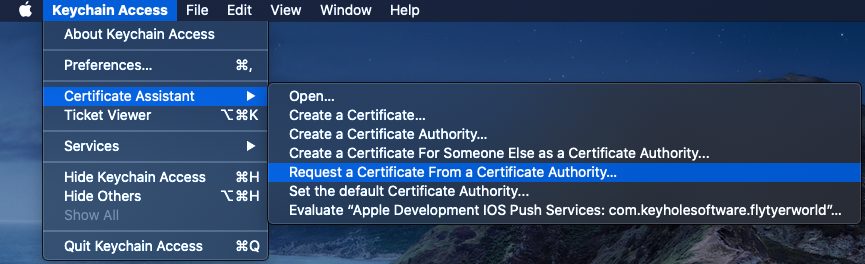
The Apple Push Notification Service (APNs) uses certificates to authenticate push notifications. Here are the instructions below to create the necessary push certificate to send and receive notifications. Generate the Certificate Signing Request (CSR) file, which Apple uses to generate a signed push certificate.
- On your Mac, run the Keychain Access tool. Select Keychain Access, expand Certificate Assistant, and then select Request a Certificate from a Certificate Authority.
- Select your User Email Address, enter your Common Name value, make sure to specify Saved to disk, and then select Continue. Leave CA Email Address blank as it isn’t required. Then enter a name for the CSR file in Save As, select the location in Where, and then select Save.
Create Apple Development Certificate
- On Apple Developer Center, under Certificates, Identifiers & Profiles, select Certificates and select + to create new development certificates.
- Select Apple Development under the Software section and select Continue.

- Choose the location of the CSR file under Choose File and select Continue.
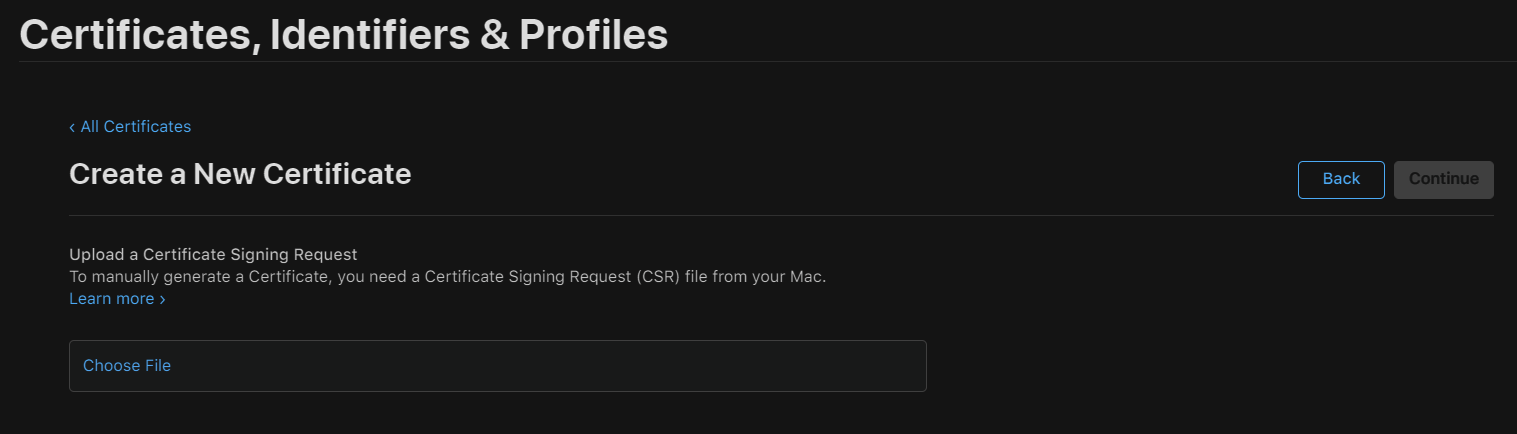
- Download your certificate to your Mac, then double click the .cer file to install in Keychain Access.
Register your Application with Apple
- If you haven’t already registered your application, browse to the iOS Provisioning Portal at the Apple Developer Center. Sign in to the portal with your Apple ID, and select Identifiers. Then select + to register a new application.

-
- On the Register a New Identifier screen, select the App IDs radio button. Then select Continue.

- Update the following two values for the new application and then select Continue and then select Register.
- Description: Type a descriptive name for your application.
- Bundle ID: Enter a Bundle ID as below


Create a Certificate for Notification Hubs
A certificate is required to enable the notification hubs to work with APNS. Follow the steps to create a .p8 certificate that can be used for token-based authentication.
- Make note of the App ID Prefix (this is a Team ID) and Bundle ID
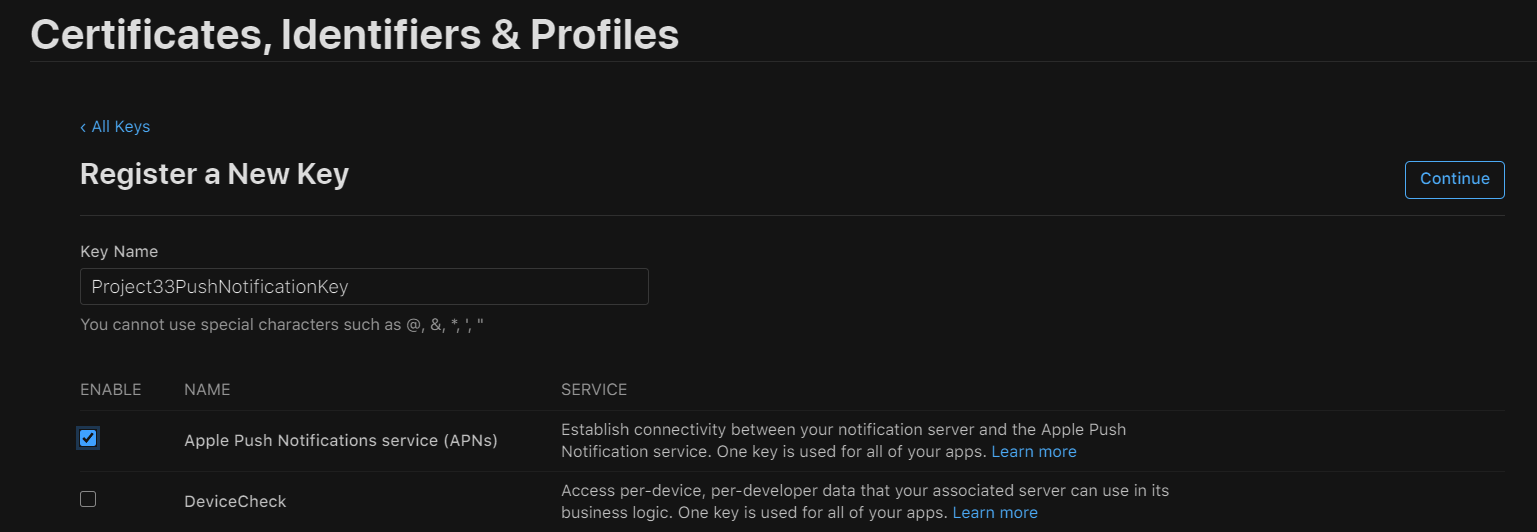
- Back in Certificate, Identifiers & Profiles, click Keys
- Click the + button to create a new key.
- Provide a suitable Key Name value, then check the Apple Push Notification service (APNs) option and then click Continue, followed by Register on the next screen.
- Click Download and then move the .p8 file to a secure local directory, then click Done.

- Make note of the Key ID value.
- Open .p8 certificate in a suitable application of your choice such as Visual Studio then make note of the key value. This is the value between —–BEGIN PRIVATE KEY—– and —–END PRIVATE KEY—–. This is the token value that will be used later to configure Notification Hub.
At the end of these steps, you should have the following information to configure notifications hubs iOS settings.
- Team ID
- Bundle ID
- Key ID
- Token value
Create a Provisioning Profile for the Application
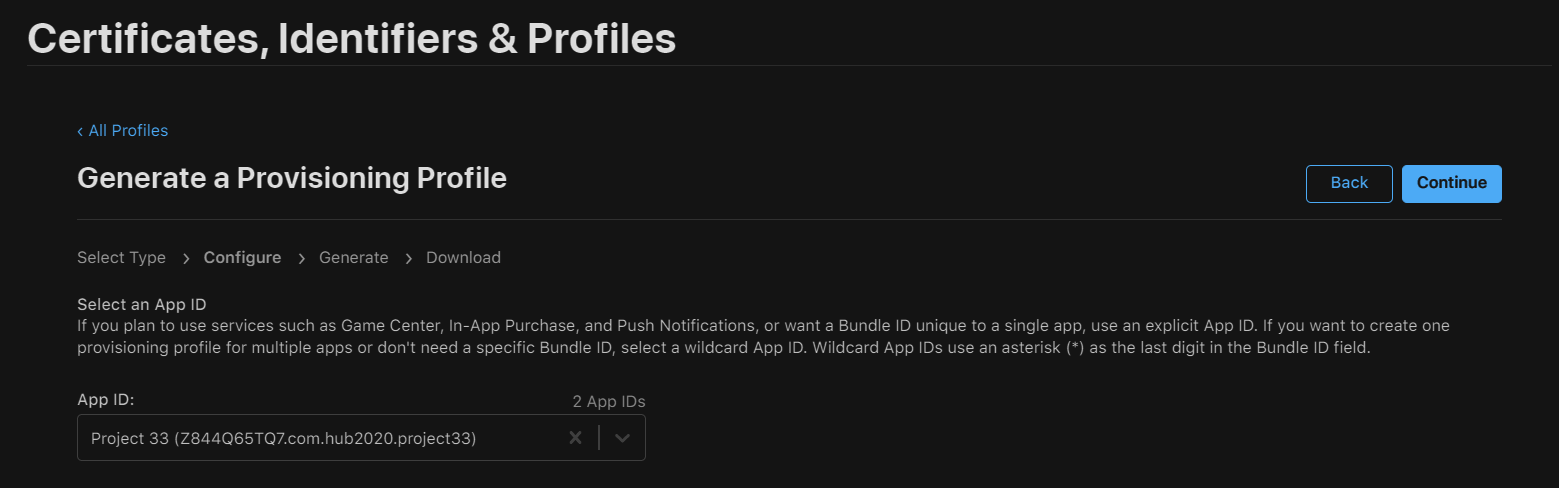
- Go to the Profiles and create a new profile.
- Select iOS App Development under Development as the provisioning profile type, and then select Continue.

- Next, select the app ID from the App ID drop-down list, and select Continue.
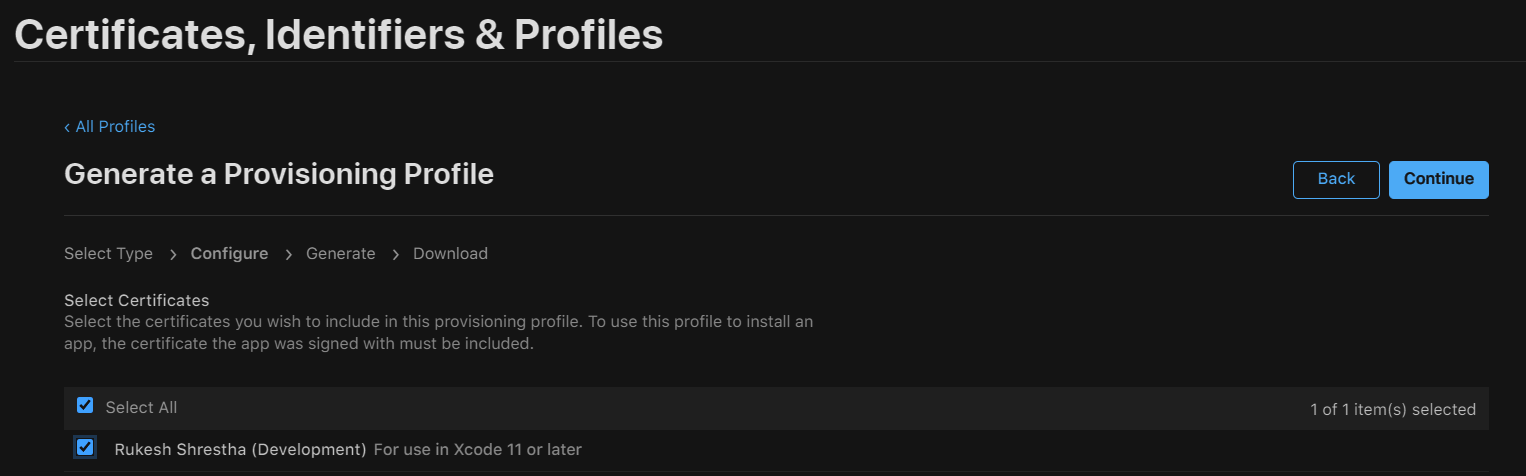
- In the Select certificates windows, select the development certificate, and select Continue.
- Next, select the devices to use for testing, and select Continue.
- Finally, choose a name for the profile in Provisioning Profile Name, and select Generate.
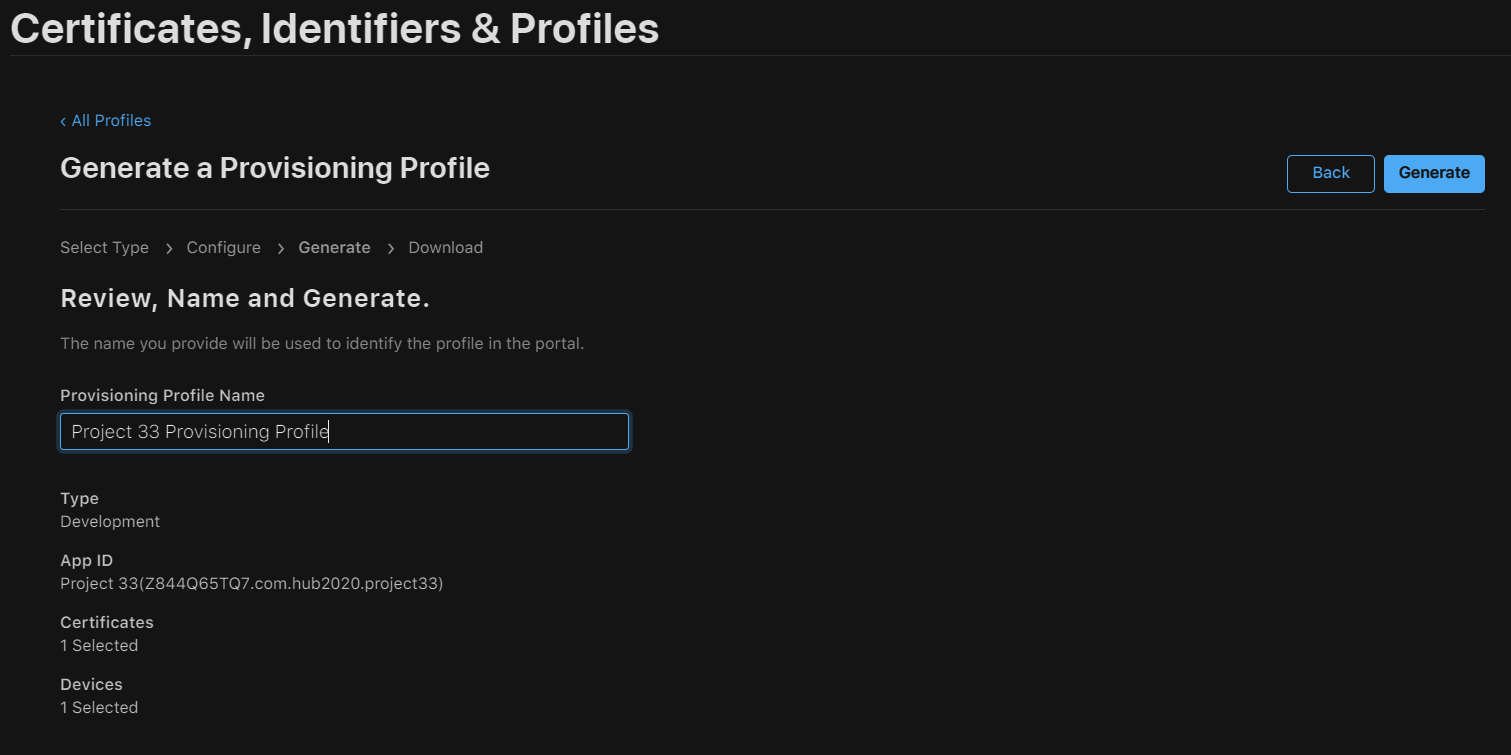
- Download the Provisioning Profile on your Mac and double click the file to install your Provisioning Profile.
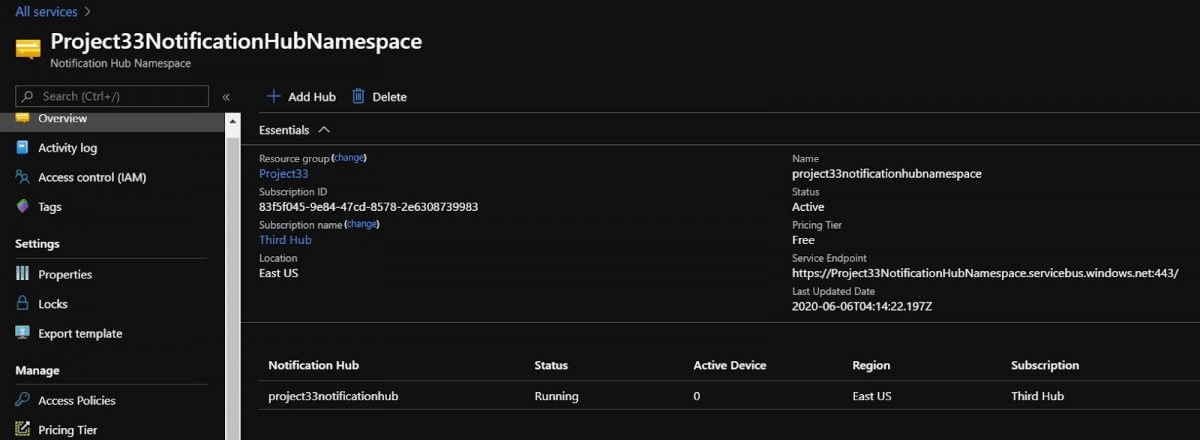
Create a Notification Hub
- Sign in to the Azure portal.
- Select All services on the left menu, and then select Notification Hubs in the Mobile section.

- On the Notification Hubs page, select Add on the toolbar.

- On the Notification Hub page, enter the required information, and select Create.

- Go to all resources and select the created notification hubs namespace from the list.
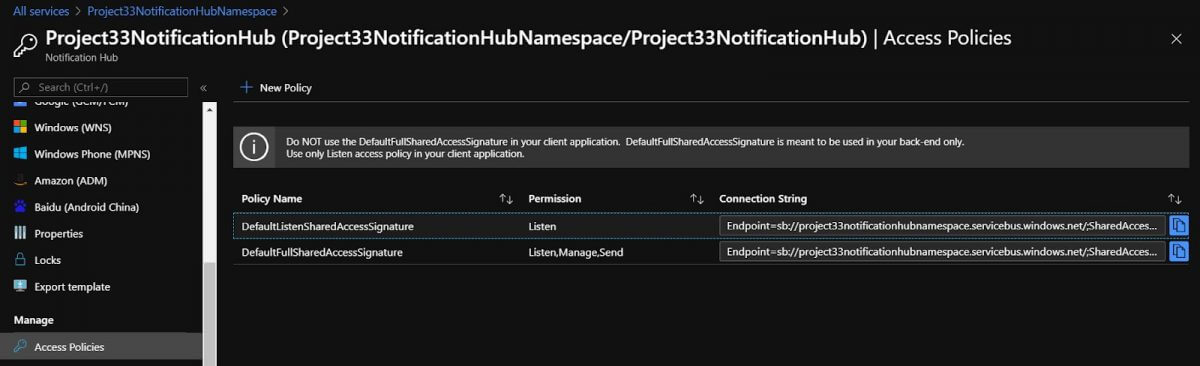
- Select Notification Hub and then select Access Policies from the list. Note the two connection strings that are required later to handle push notifications.
Set up Push Notification Services and Azure Notification Hub
- Android Setup. Copy the FCM Server Key and save it as the API Key under Google(GCM/FCM) in Azure Notification Hub.

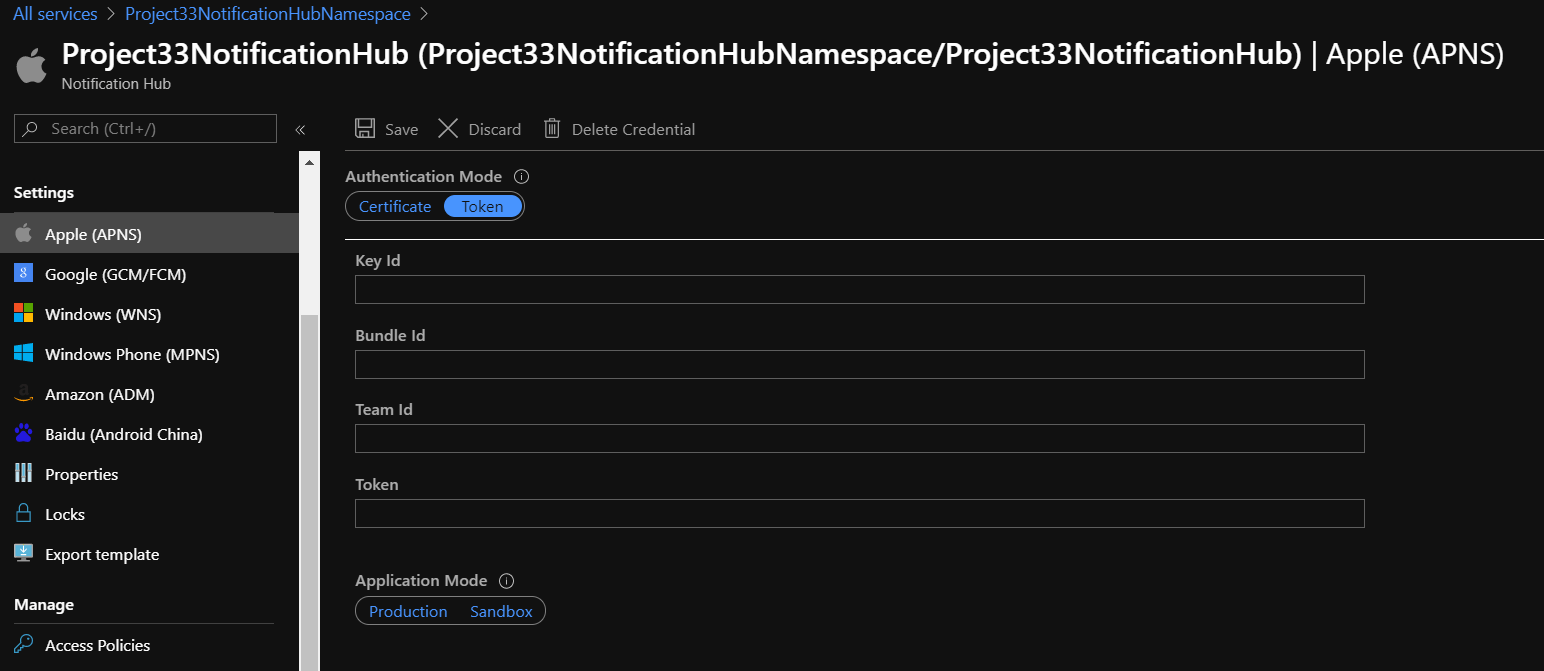
- Apple Setup. Under Apple(APNS) settings, select Token and enter all the required information that we have already gathered above when creating the .p8 certificate.
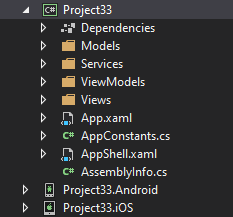
Create a Cross-Platform Xamarin.Forms Application
- Open Visual Studio and create Xamarin.Forms application.

This will create three projects: a common project, Android, and an iOS-specific project.
The sample application contains a AppConstants.cs file, which defines properties used by the platform projects. This file needs to be customized with values from your Azure Notification Hub. The following code shows theAppConstants.cs file:
public static class AppConstants
{
    public static string NotificationChannelName { get; set; } = "XamarinNotifyChannel";
    public static string NotificationHubName { get; set; } = "< Insert your Azure Notification Hub name >";
    public static string ListenConnectionString { get; set; } = "< Insert your DefaultListenSharedAccessSignature >";
    public static string DebugTag { get; set; } = "XamarinNotify";
    public static string[] SubscriptionTags { get; set; } = { "default" };
    public static string FCMTemplateBody { get; set; } = "{\"data\":{\"message\":\"$(messageParam)\"}}";
    public static string APNTemplateBody { get; set; } = "{\"aps\":{\"alert\":\"$(messageParam)\"}}";
}
2. Customize the following values in AppConstants.cs to connect the sample application to Azure Notification Hub:
- NotificationHubName: Use the name of the Azure Notification Hub you created in your Azure portal.
- ListenConnectionString: This value is found in the Azure Notification Hub under Access Policies. Use the first what with Listen permission as shown in the below screenshot:


Configure the Native Android Project for Push Notifications
- Configure the Android Package name to match the package name in the Firebase console.
- Install the following NuGet packages to interact with Google Play, Firebase, and Aure Notifications Hubs:
- Xamarin.GooglePlayServices.Base
- Xamarin.Firebase.Messaging
- Xamarin.Azure.NotificationHubs.Android
- Copy the
google-services.jsonfile that you downloaded during FCM setup to the project and set the Build Action toGoogleServicesJson. - Configure
AndroidManifest.xmlto communicate with Firebase.
Thereceiverelements within theapplicationelement allow the application to communicate with Firebase. Theuses-permissionelements allow the application to handle messages and register with Azure Notification Hub. The completeAndroidManifest.xmlshould look similar to the example below:
<manifest xmlns:android="http://schemas.android.com/apk/res/android" android:versionCode="1" android:versionName="1.0" package="YOUR_PACKAGE_NAME" android:installLocation="auto">
  <uses-sdk android:minSdkVersion="21" />
  <uses-permission android:name="android.permission.INTERNET" />
  <uses-permission android:name="com.google.android.c2dm.permission.RECEIVE" />
  <uses-permission android:name="android.permission.WAKE_LOCK" />
  <uses-permission android:name="android.permission.GET_ACCOUNTS"/>
  <application android:label="Project33.Android">
    <receiver android:name="com.google.firebase.iid.FirebaseInstanceIdInternalReceiver" android:exported="false" />
    <receiver android:name="com.google.firebase.iid.FirebaseInstanceIdReceiver" android:exported="true" android:permission="com.google.android.c2dm.permission.SEND">
      <intent-filter>
        <action android:name="com.google.android.c2dm.intent.RECEIVE" />
        <action android:name="com.google.android.c2dm.intent.REGISTRATION" />
        <category android:name="${applicationId}" />
      </intent-filter>
    </receiver>
  </application>
</manifest>
- Override
FirebaseMessagingServiceto handle messages.
To register with Firebase and handle messages, subclass the FirebaseMessagingService class. The sample application defines a FirebaseService class that subclasses the FirebaseMessagingService. This class is tagged with an IntentFilter attribute, which includes the com.google.firebase.MESSAGING_EVENT filter. This filter allows Android to pass incoming messages to this class for handling:
[Service]
[IntentFilter(new[] { "com.google.firebase.MESSAGING_EVENT" })]
public class FirebaseService : FirebaseMessagingService
{
    public override void OnNewToken(string token)
{
    // NOTE: save token instance locally, or log if desired

    SendRegistrationToServer(token);
}

void SendRegistrationToServer(string token)
{
    try
    {
        NotificationHub hub = new NotificationHub(AppConstants.NotificationHubName, AppConstants.ListenConnectionString, this);

        // register device with Azure Notification Hub using the token from FCM
        Registration registration = hub.Register(token, AppConstants.SubscriptionTags);

        // subscribe to the SubscriptionTags list with a simple template.
        string pnsHandle = registration.PNSHandle;
        TemplateRegistration templateReg = hub.RegisterTemplate(pnsHandle, "defaultTemplate", AppConstants.FCMTemplateBody, AppConstants.SubscriptionTags);
    }
    catch (Exception e)
    {
        Log.Error(AppConstants.DebugTag, $"Error registering device: {e.Message}");
    }
}

public override void OnMessageReceived(RemoteMessage message)
{
    base.OnMessageReceived(message);
    string messageBody = string.Empty;

    if (message.GetNotification() != null)
    {
        messageBody = message.GetNotification().Body;
    }

    // NOTE: test messages sent via the Azure portal will be received here
    else
    {
        messageBody = message.Data.Values.First();
    }

    // convert the incoming message to a local notification
    SendLocalNotification(messageBody);

    // send the incoming message directly to the MainPage
    SendMessageToMainPage(messageBody);
}

void SendLocalNotification(string body)
{
    var intent = new Intent(this, typeof(MainActivity));
    intent.AddFlags(ActivityFlags.ClearTop);
    intent.PutExtra("message", body);

    //Unique request code to avoid PendingIntent collision.
    var requestCode = new Random().Next();
    var pendingIntent = PendingIntent.GetActivity(this, requestCode, intent, PendingIntentFlags.OneShot);

    var notificationBuilder = new NotificationCompat.Builder(this)
        .SetContentTitle("XamarinNotify Message")
        .SetSmallIcon(Resource.Drawable.ic_launcher)
        .SetContentText(body)
        .SetAutoCancel(true)
        .SetShowWhen(false)
        .SetContentIntent(pendingIntent);

    if (Build.VERSION.SdkInt >= BuildVersionCodes.O)
    {
        notificationBuilder.SetChannelId(AppConstants.NotificationChannelName);
    }

    var notificationManager = NotificationManager.FromContext(this);
    notificationManager.Notify(0, notificationBuilder.Build());
}

void SendMessageToMainPage(string body)
{
    //Todo: add code to handle message
}


}
- Add incoming notifications to Xamarin.Forms UI.
The MainActivity class needs to obtain permission to handle notifications and manage incoming message data. The following code shows the complete MainActivity implementation:
[Activity(Label = "Project33", Icon = "@mipmap/icon", Theme = "@style/MainTheme", MainLauncher = true, ConfigurationChanges = ConfigChanges.ScreenSize | ConfigChanges.Orientation, LaunchMode = LaunchMode.SingleTop)]
public class MainActivity : global::Xamarin.Forms.Platform.Android.FormsAppCompatActivity
{
    protected override void OnCreate(Bundle savedInstanceState)
    {
        TabLayoutResource = Resource.Layout.Tabbar;
        ToolbarResource = Resource.Layout.Toolbar;

        base.OnCreate(savedInstanceState);

        global::Xamarin.Forms.Forms.Init(this, savedInstanceState);
        LoadApplication(new App());

        if (!IsPlayServiceAvailable())
        {
            throw new Exception("This device does not have Google Play Services and cannot receive push notifications.");
        }

        CreateNotificationChannel();
    }

    protected override void OnNewIntent(Intent intent)
    {
        if (intent.Extras != null)
        {
            var message = intent.GetStringExtra("message");
            //Todo: add code to handle message
        }

        base.OnNewIntent(intent);
    }

    bool IsPlayServiceAvailable()
    {
        int resultCode = GoogleApiAvailability.Instance.IsGooglePlayServicesAvailable(this);
        if (resultCode != ConnectionResult.Success)
        {
            if (GoogleApiAvailability.Instance.IsUserResolvableError(resultCode))
                Log.Debug(AppConstants.DebugTag, GoogleApiAvailability.Instance.GetErrorString(resultCode));
            else
            {
                Log.Debug(AppConstants.DebugTag, "This device is not supported");
            }
            return false;
        }
        return true;
    }

    void CreateNotificationChannel()
    {
        // Notification channels are new as of "Oreo".
        // There is no need to create a notification channel on older versions of Android.
        if (Build.VERSION.SdkInt >= BuildVersionCodes.O)
        {
            var channelName = AppConstants.NotificationChannelName;
            var channelDescription = String.Empty;
            var channel = new NotificationChannel(channelName, channelName, NotificationImportance.Default)
            {
                Description = channelDescription
            };

            var notificationManager = (NotificationManager)GetSystemService(NotificationService);
            notificationManager.CreateNotificationChannel(channel);
        }
    }
}
Configure the Native iOS Project for Push Notifications
- Configure the Bundle Identifier in the
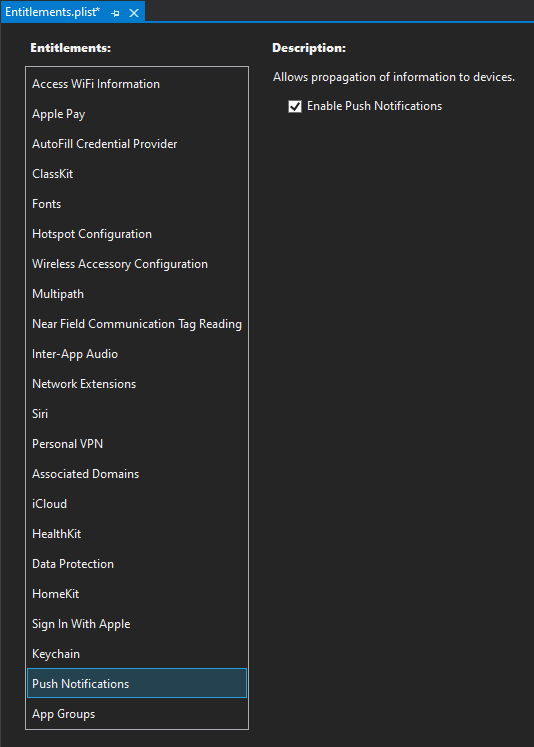
Info.plistfile to match the value used in the provisioning profile. - Add the Enable Push Notification option to the
Entitlements.plistfile.
- Add the
Xamarin.Azure.NotificationHubs.iOSNuGet package to your project. - Register for notifications with APNS.
public override bool FinishedLaunching(UIApplication app, NSDictionary options)
{
    global::Xamarin.Forms.Forms.Init();
    LoadApplication(new App());

    base.FinishedLaunching(app, options);

    RegisterForRemoteNotifications();

    return true;
}

void RegisterForRemoteNotifications()
{
    // register for remote notifications based on system version
    if (UIDevice.CurrentDevice.CheckSystemVersion(10, 0))
    {
        UNUserNotificationCenter.Current.RequestAuthorization(UNAuthorizationOptions.Alert |
            UNAuthorizationOptions.Sound |
            UNAuthorizationOptions.Sound,
            (granted, error) =>
            {
                if (granted)
                    InvokeOnMainThread(UIApplication.SharedApplication.RegisterForRemoteNotifications);
            });
    }
    else if (UIDevice.CurrentDevice.CheckSystemVersion(8, 0))
    {
        var pushSettings = UIUserNotificationSettings.GetSettingsForTypes(
        UIUserNotificationType.Alert | UIUserNotificationType.Badge | UIUserNotificationType.Sound,
        new NSSet());

        UIApplication.SharedApplication.RegisterUserNotificationSettings(pushSettings);
        UIApplication.SharedApplication.RegisterForRemoteNotifications();
    }
    else
    {
        UIRemoteNotificationType notificationTypes = UIRemoteNotificationType.Alert | UIRemoteNotificationType.Badge | UIRemoteNotificationType.Sound;
        UIApplication.SharedApplication.RegisterForRemoteNotificationTypes(notificationTypes);
    }
}
- Register the application with Azure Notification Hub and subscribe to tags.
When the device has successfully registered for remote notifications during the FinishedLaunching method, iOS will call the RegisteredForRemoteNotifications method. This method should be overridden to perform the following actions:
public override void RegisteredForRemoteNotifications(UIApplication application, NSData deviceToken)
{
    Hub = new SBNotificationHub(AppConstants.ListenConnectionString, AppConstants.NotificationHubName);

    // update registration with Azure Notification Hub
    Hub.UnregisterAll(deviceToken, (error) =>
    {
        if (error != null)
        {
            Debug.WriteLine($"Unable to call unregister {error}");
            return;
        }

        var tags = new NSSet(AppConstants.SubscriptionTags.ToArray());
        Hub.RegisterNative(deviceToken, tags, (errorCallback) =>
        {
            if (errorCallback != null)
            {
                Debug.WriteLine($"RegisterNativeAsync error: {errorCallback}");
            }
        });

        var templateExpiration = DateTime.Now.AddDays(120).ToString(System.Globalization.CultureInfo.CreateSpecificCulture("en-US"));
        Hub.RegisterTemplate(deviceToken, "defaultTemplate", AppConstants.APNTemplateBody, templateExpiration, tags, (errorCallback) =>
        {
            if (errorCallback != null)
            {
                if (errorCallback != null)
                {
                    Debug.WriteLine($"RegisterTemplateAsync error: {errorCallback}");
                }
            }
        });
    });
}
- Add APNS notifications to Xamarin.Forms UI.
When a device receives a remote notification, iOS calls the ReceivedRemoteNotification method. Incoming message JSON is converted into an NSDictionary object and the ProcessNotification method extracts values from the dictionary and sends them to the Xamarin.Forms MainPage instance. The ReceivedRemoteNotifications method is overridden to call ProcessNotification as shown in the following code:
public override void ReceivedRemoteNotification(UIApplication application, NSDictionary userInfo)
{
    ProcessNotification(userInfo, false);
}

void ProcessNotification(NSDictionary options, bool fromFinishedLaunching)
{
    // make sure we have a payload
    if (options != null && options.ContainsKey(new NSString("aps")))
    {
        // get the APS dictionary and extract message payload. Message JSON will be converted
        // into a NSDictionary so more complex payloads may require more processing
        NSDictionary aps = options.ObjectForKey(new NSString("aps")) as NSDictionary;
        string payload = string.Empty;
        NSString payloadKey = new NSString("alert");
        if (aps.ContainsKey(payloadKey))
        {
            payload = aps[payloadKey].ToString();
        }

        if (!string.IsNullOrWhiteSpace(payload))
        {
            (App.Current.MainPage as MainPage)?.AddMessage(payload);
        }

    }
    else
    {
        Debug.WriteLine($"Received request to process notification but there was no payload.");
    }
}
Test Notifications Using the Azure Notification Hub
Azure Notification Hubs enable you to check that your application can receive text messages. The Test Send section in the notification hub allows you to choose the target platform and send a message. Clicking the Send button generates a report that includes the number of devices reached with the message. The following screenshot shows an Android notification test in the Azure portal:

Wrap Up
I hope that you enjoyed this Xamarin.Forms tutorial for App Push Notifications using Azure Notification Hub!
We used this configuration just recently with the Fly Tyer World‘s mobile app. If you’d like to see first-hand how it works in production, you might check out Fly Tyer World on either the Apple App Store or Google Play Store.
Please leave any questions in the comment section.
References
- https://docs.microsoft.com/en-us/xamarin/xamarin-forms/data-cloud/azure-services/azure-notification-hub#configure-android-manifest
- https://docs.microsoft.com/en-us/azure/notification-hubs/xamarin-notification-hubs-push-notifications-android-gcm#create-a-firebase-project-and-enable-firebase-cloud-messaging
- https://docs.microsoft.com/en-us/azure/notification-hubs/xamarin-notification-hubs-ios-push-notification-apns-get-started#generate-the-certificate-signing-request-file
More From Rukesh Shrestha
About Keyhole Software
Expert team of software developer consultants solving complex software challenges for U.S. clients.
Share This Post
Join The Thousands Of Devs Who Subscribe
What if i wanna subscribe to another tag, for example when user suceefully login into the app, and i require to send a push notification to a specific tag (username)
John, although not with Xamarin, I have done this type of work wish AWS SNS. The way I engineered it was to keep track of the “user” and their “device” when it is registered that they want notifications. It would be good to keep track of Apple vs Android as sometimes messages have to be different. So some way of keeping track that “userA” belongs to “samsung S8” with id = “69adsade3@” for this application i.e. a database. Thus when you want to directly send a message to one particular device it is possible to do so. It isn’t necessarily a subscription, but a direct call to just 1 particular device. Otherwise, subscriptions begin to get unruly. Subscriptions to a tag should be for things like system updates or system wide or groups.