
Part 2: Creating an FHIR API – Implementation Part A
Welcome back to our series, Creating an FHIR API. This is Part 2 in our 4-part series on standing up an FHIR using GCP. In Part 1, we talked through two of the offerings out there, Google and Azure, and based on the pros and cons, I decided to use GCP FHIR Cloud Healthcare API.
In this part, we’ll start in on our implementation. A forewarning: we won’t be able to finish it during this installment, so stay tuned for parts 3 and 4! Let’s dive in.
Before We Begin…
Before we dive into implementing GCP FHIR, there are several pieces of documentation needed to create the GCP FHIR Cloud Healthcare API. It’s helpful to have all of these open so that you have a thorough understanding of the appropriate steps to take. The fact there are so many was also a motivating factor behind the writing of this blog. This blog post will reference “Creating and Managing FHIR Stores” and “Streaming and Synchronizing FHIR Resources with BigQuery” as well as many others.
There are some obvious prerequisites to following this tutorial. An account on GCP is required, and you’ll need a Project that is configured with billing. It’s also advised that if the data going into the FHIR data store represents real PHI/PII, a BAA between your company and Google must have been signed and ratified. Lastly, make sure the Cloud Healthcare API has been enabled.
Once you have the above, you are ready to begin following the rest of the steps listed below.
Creating of BigQuery Resources
Let’s start by creating our BigQuery resources. First, log into the GCP Console.

Next, type “BigQuery” into the search, and click on the first link.

Then, in Explorer, click on the vertical ellipsis. Then, Create dataset.

Ensure the current project is selected, and enter in a unique Data Set ID. For the location, since this is only a demo, select a single region within the US. Ideally, this should be near wherever you are testing it from and near the rest of the resources that will be created throughout this demo.
Then, consider the implications of enabling a table expiration. If data needs to be periodically expired, then setting an appropriate amount of days it should remain in BigQuery is necessary.
Lastly, BigQuery gives the option of a Google-managed encryption key or BYOK (Bring Your Own Key). There are pros to having Google manage the encryption key, such as lower operational overhead. Many organizations, however, require BYOK wherever possible, which can and should play into the option selected on this screen. For the purposes of this demo, the Google-managed encryption key will be selected.

You can then navigate to the newly created BigQuery Dataset and verify that everything looks correct.

There are additional considerations when creating a BigQuery data set that aren’t covered in this blog post – namely, access control and encryption at rest. Both are recommended to be reviewed when creating a BigQuery dataset for use in production scenarios.
Creation of the FHIR Repository Resources
Once the BigQuery dataset is created, we need to create the dataset that the FHIR API will operate on top of. Search for Datasets, and click on Healthcare -> Browser.

Then click the +Create Dataset button.

Give the data set a name that conforms with the organization’s naming policy for cloud resources. In this example, the name “dsGCPDDEMO001” is composed of:
- ds = Dataset
- GCP = Google Cloud Platform (identify it from resources on other clouds like AWS or Azure)
- D = DEV environment
- DEMO = name of the application
- 001 = increment based on the # of resources of this type in this cloud, in this environment, for this application
Then, select the region. Keep in mind that for HIPAA compliance, the data should reside within the borders of the US. Ideally, this would be enforced at an organizational level with validations on which regions resources can be deployed to. This applies to a single-region deployment, which is suitable for a DEV environment as it has a lower cost than a multi-region deployment.

Then, the resource will show as created.

Click on the name of the newly created dataset, and then click on +Create Data Store.

Select Type = FHIR and ID = whatever unique name fits within the organization’s naming guidelines. In this example, “fdsGCPDDEMO001” is used where “fds” = “FHIR Data Set.”

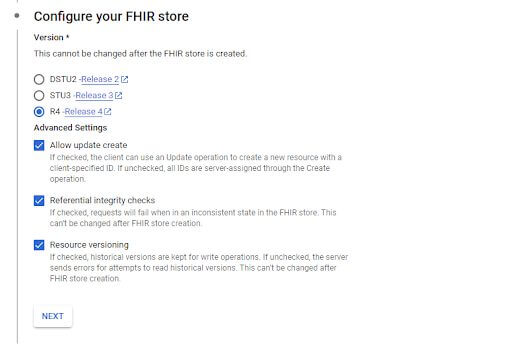
Then, select the FHIR release that will be used in this new data set. In this example, R4 is used.
Additionally, “Allow update create” is selected so that resources can be created with a client-provided ID (e.g. an MPI for a patient). Leave the referential integrity checks and resource versioning enabled as well.
In the next step, click that the data should be streamed to BigQuery, and then browse for the BigQuery Dataset created at the beginning of this blog.

Once selected, you may see the following error.

This indicates that the service account associated with the Cloud Healthcare API does not have bigquery.dataEditor and bigquery.jobUser permissions. This is likely not something that can be configured by members of the development or DevSecOps team and usually needs to be set by the administrator of the GCP project.
Once the appropriate permissions are obtained, use the defaults for Recursive Structure Depth and FHIR Resource Types.
The next step is around Cloud Pub/Sub notifications.

Click into the dropdown, select Create a topic, and you are presented with this screen:
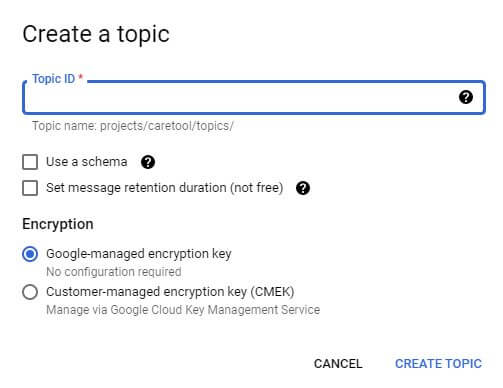
The Topic ID can be the same as the FHIR data store ID. Leave the “Use a schema” checkbox unchecked. Enable message retention, and use the default of 7 days.
Although the feature is not free, it does allow for events on the topic to eventually age out. Ideally, a customer-managed key would be used, but a Google-managed key will be selected for this demo.
Create the topic, it is automatically selected, and then, click Next, and we’re finished! The FHIR repository resources are set up.
Wrapping Up
That wraps up Part 2 of the series and the first chunk of our implementation tutorial! Now, you should have created both your BigQuery resources and your FHIR repository resources.
Next time in Part 3, we’ll get further into the implementation. We’ll cover authentication methods and populating data. See ya soon!
Series Quick Links
- Part 1: Creating an FHIR API – Google or Azure?
- Part 2: Creating an FHIR API – Implementation Part A
- Part 3: Creating an FHIR API – Implementation Part B
- Part 4: Creating an FHIR API – Wrapping Things Up
More From Zach Gardner
About Keyhole Software
Expert team of software developer consultants solving complex software challenges for U.S. clients.
Share This Post
Join The Thousands Of Devs Who Subscribe

Discuss This Article
Subscribe
Login
0 Comments
Oldest