
Using Equivalence Class Partition and Boundary Value Analysis while Unit Testing
The value of writing tests for code, especially unit tests, is clearly evident. Testing enhances software quality, improves security, inspires customer satisfaction, and most of all, saves the company money. Catching errors in the development phase before they reach production can save a company thousands.
I wanted to share a couple of the strategies I’ve followed in my career when it comes to writing unit tests. We’ll start with Equivalence Class Partitioning and finish with Boundary Value Analysis. While they are different, they can be used together to help make sure you’re writing the best unit tests you can write.
Equivalence Class Partition
Equivalence Class Partition is a test case design technique that involves dividing input test data into separate partitions with similar elements. This is a technique that can be used at any level of software testing and should be used first. The assumption here is that testing one data value from each partition is equivalent to testing the entire partition.
Let’s think of this in terms of input with the type of String. Below, we have a simple form that accepts the nominations for favorite dog.

…now before you go rushing off to enter my dog’s name (haha), let’s break down the input test data used in this input field to follow the Equivalence Class Partition test case design technique.
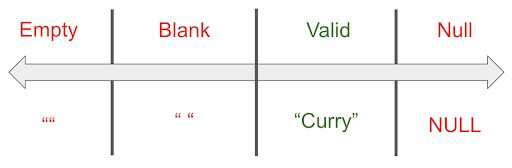
The definition states that we need to divide the test data into separate partitions with similar elements. An easy way to think about this is by thinking about what is considered valid input and what is considered invalid input. In this example, a valid input is anything that is a name that is not an empty string (“”), blank string (“ “), or null.
Below, I went ahead and made a quick chart that displays the separate partitions of the possible data input. You’ll be able to see I added a valid input partition that is equal to “Curry”.. which happens to be my dog’s name if you couldn’t guess.
Let’s try another example. This time, we have a method that accepts a number of pizzas that a customer can order. The number of pizzas being ordered must be somewhere between 5 and 10.
public int orderPizza(int numOfPizzas) {
	if (numOfPizzas < 5 || numOfPizzas > 10) {
		return 5;
	}

	return numOfPizzas;
}
Once again, let’s think of what is considered valid input and what is invalid input when using this design technique. When we apply this technique, we determine that invalid input is considered when numOfPizzas is 5 or less and/or 10 or more. Valid input is when numOfPizzas is anywhere between 6 and 10.

Boundary Value Analysis
Boundary Value Analysis is a test case design technique to test values around the partitions. Boundary values are the upper and lower limits of a variable that we’re testing.
Let’s think about this in terms of cookies… because who doesn’t like cookies?
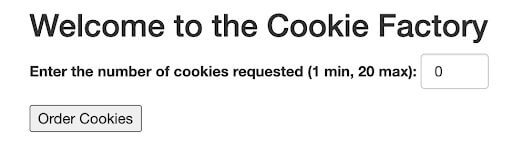
Before we get started, can we talk about the limits on the number of cookies a person can order?! I mean who puts a limit on the number of cookies we can order!?
Okay, on a more serious note, in the picture above, we have a Cookie Factory application that accepts an order of cookies that can range anywhere from 1 to 20 cookies.
Using the definition of Boundary Value Analysis, we can determine that the lower boundary would be 1 and the upper boundary would be 20. Another way to think about this is to think about what would be considered a valid value and what would be an invalid value. Sounds familiar, right?
Let’s refer to the following chart to help explain this in more detail. In the chart below, we have divided the possible values that can be entered into the Cookie Factory application into three partitions.
Once again, the divided sets are called Equivalence Partitions or Equivalence Classes. There are three partitions, 1 valid and 2 invalid.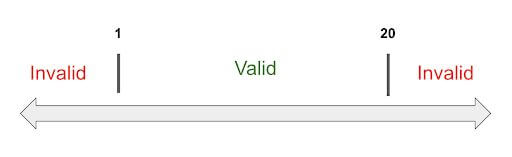
Boundary Value Analysis involves testing values around the boundary of the partitions. In order to test the lower boundary, we need to test the lower boundary minus one, the lower boundary, and the lower boundary plus 1. Similarly, in order to test the upper boundary, we need to test the upper boundary minus 1, the upper boundary, and the upper boundary plus 1. The chart below helps gives us a visualization.
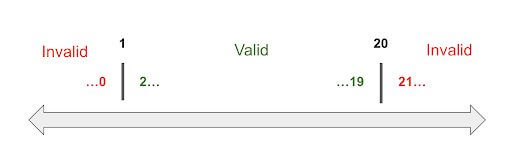
This would give us the following possible values that need to be tested.
- 0 – Lower boundary minus one
- 1 – Lower boundary
- 2 – Lower boundary plus one
- 19 – Upper boundary minus one
- 20 – Upper boundary
- 21 – Upper boundary plus one
Notice how we don’t need to worry about testing the valid values in the range from 3 to 18. Testing these values (between 2 and 19) would be valid and have the same end result as the values on the edge of the range. It’s widely recognized that the input values at the outer edge of the range or around the boundary end up causing more errors in the system.
Additionally, this is one of the biggest advantages of boundary value analysis, which is the ability to reduce a very large number of test cases to manageable chunks. Whereas if our range was between 1 and 2000, the number of test cases would stay the same in regards to Boundary Value Analysis.
Now that we have a general feel for Boundary Value Analysis, let’s apply it to an easy code snippet. In the example below, we have a method named calculate. This method accepts a parameter, determines whether the parameter is greater than zero and whether it’s greater than 5. If the value isn’t greater than zero, it returns zero. If the value is greater than 0 and 5, it adds 5 and returns. If the value is greater than zero but less than 5, it returns itself.
public int calculate(int value) {
	if (value < 0) {
		return 0;
	}

	If (value > 5) {
		return value + 5;
} else {
	return value;
}
}
We can divide this up into partitions. This is a little different than the example from before because our valid range is from 0 on. Thus, when dividing this example into partitions we ended up having two valid partitions. One from 0 to 5 and another one from 5 onwards.
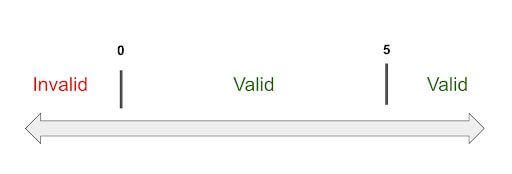
These are our boundaries in this case. Our lower boundary will be 0 and our upper boundary will be. Another easy way to determine this is by looking at the conditional in the code. Following our definition of Boundary Value Analysis, we will test around each boundary. The lower boundary minus 1, lower boundary, and the lower boundary plus 1 as well the upper boundary minus 1, upper boundary, and upper boundary plus 1.
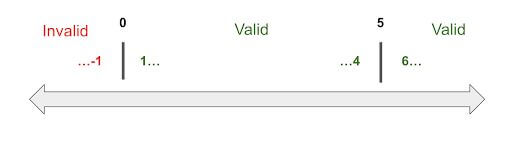
This would give us the following possible values that need to be tested
- -1 – Lower boundary minus one
- 0 – Lower boundary
- 1 – Lower boundary plus one
- 4 – Upper boundary minus one
- 5 – Upper boundary
- 6 – Upper boundary plus one
To Recap
Using Equivalence Class Partition helps break down what is considered valid and invalid input. This is the first thing that we should do when we start writing unit tests. For me personally, I like to go off the pure type of input parameter for the method I’m testing (ex for String -> Null, empty, blank, populated).
Using Boundary Value Analysis, it’s easier and faster to find defects. This is mostly due to the fact that the density of defects at boundaries is greater. Additionally, when using Boundary Value Analysis the overall time of writing and executing our tests is greatly reduced as less test data is required
Additionally, for your viewing pleasure, here’s a picture of my dog Curry. We can name him the Unit Testing mascot. 😉

Side note: If getting paid to write blogs in your free time is something you’d enjoy, check out our Careers page. It’s an exciting time to join the Keyhole team, and we may just have a spot for you!
More From Joseph Pasmore
About Keyhole Software
Expert team of software developer consultants solving complex software challenges for U.S. clients.
Share This Post
Join The Thousands Of Devs Who Subscribe


Discuss This Article
Subscribe
Login
0 Comments
Oldest