
Batching Excel Files in Azure to Order DME
As a software architect at Keyhole Software, my goal is to help clients design automated workflows that allow them to spend more time achieving their business’s OKRs and less time on laborious tasks that provide little to no value. A common way to achieve this objective is to allow two systems to communicate in the background using APIs.
The scenario I came across, which spurred the authoring of this blog post, was around the ordering of DME (Durable Medical Equipment) within a Health Care application. We want our users to be able to submit orders for the equipment in an easy and efficient manner. The solution also had to allow for a user to manually reorder the equipment (in case it got lost or damaged) as well as automatically request renewals once the lifetime of the equipment elapsed.
In an ideal world, our application would be able to invoke APIs on behalf of the user to submit the request. Unfortunately, the organization that fulfills the request doesn’t offer APIs. Their preferred methodology is to receive the requests by someone on staff and transcribe the order into their internal ordering system. The solution we needed had to both optimize the workflow of the users of our application and take into account the limitations of the receiving system.
Where we landed was to leverage Microsoft Teams and Excel spreadsheets to coordinate the orders. The users of our application and the organization receiving the request are both on Microsoft Teams as part of their regular business operations. Every day at 9 AM, users on the channel will receive an automated message for the Diabetes equipment requests that came in the previous day (if there were any). The message will include a link to that Excel file that they can download and operate on in any way they need to.
Setting Up SharePoint
The first step to getting this process bootstrapped is to get the SharePoint environment ready. A new SharePoint site should be set up for this specific use case, with any HIPAA compliance policies applied to it. This ensures that the data is isolated from the rest of the ecosystem and only authorized use cases can push data in or pull data out. Once created inside of the Documents folder, create a Templates folder, and create an Excel file that will be used for each instance of the list.

Then select the rows that you need for headers plus one row. Then, Insert -> Table, and select that the table has headers.

Update the column headers based on the use case.

By default, Excel tables will have an empty first row. When using the Logic App to append new rows, it will leave that empty first row. There doesn’t seem to be a good way either to directly delete that empty first row once there is a legitimate data row. Excel also doesn’t let you Filter out that blank first row. There is a way to do it indirectly, by setting up a Does Not Equal filter…

Add in an empty does not equal filter…

… that hides the empty first row.

Once created, manually Duplicate the template to a sibling folder of Templates, “Diabetes DME Requests.”

Rename the file so that it clearly says it contains PHI (to help with audit logging).

Logic App – First Pass
With the SharePoint fully set up, it’s time to move on to developing the automation for adding additional rows to the Excel document as requests come in.
First, create a new Event Hub Namespace, which our application will connect to when it needs to inform the Logic App of a new request. For our use case, a Basic tier is sufficient. This will allow for up to 10 Event Hubs at a minimal cost.

Then, create our Event Hub.

Next up is the creation of the Logic App. Putting it in the Consumption tier is fine; it will help with the cost. No Log Analytics is required as this is fairly straightforward.

Once the Logic App is created, create an Event Hub trigger. Have the connector named the same as the Event Hub Namespace:

Click on the Event Hub Namespace to have it select a policy.

Then, click Create. Rename the Trigger to be more descriptive, and change which Event Hub it’s pulling from.

The next step is to decode the base64 encoded message we get from the Event Hub. Click on the New Step button, select Built-in, search for “variable”, and add the “Initialize variable” action.
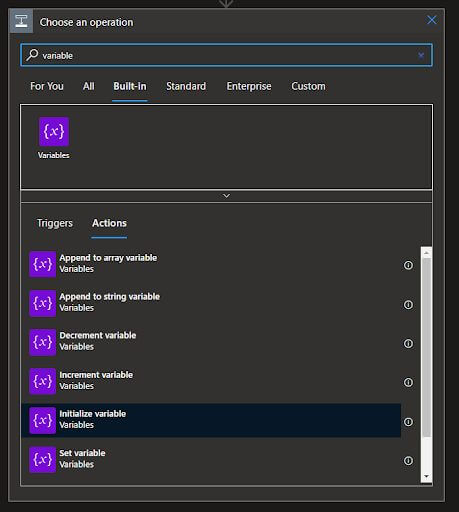
Rename the step to be more descriptive, and set the name of the variable. Then, set the Type to be Object, and put in an Expression that base 64 decodes as well as defines it to be a JSON object.

Next, switch back to the Dynamic Content tab, make sure the cursor is within the decodeBase64 parenthesis, and select Content.

The full expression is as follows:
json(decodeBase64(triggerBody()?['ContentData']))
The resulting step should look like this.

Now, add a new step, select Built-in, search for Parse, and select the “Parse JSON” action.

When it shows up, rename the action to be more descriptive. Within the Content field, click to select the Message variable.

Then, click on the link to generate the schema from a sample payload. Given the structure of the Excel document, the following is what would be expected to be received from the Event Hub.
{
    "Name": "Smith, Test",
    "DOB": "Jan 4, 2021",
    "Gender": "M",
    "Request Information": "New glucometer, 15 day supply of test strips"
}
That will produce the following schema.

The schema, by default, does not allow for omitted properties. If this will be a problem with the nature of the messages that the Logic App will receive, it is recommended to finish out the rest of the Logic App first. Then, at the very end, update the type to be an array that includes “null.” This has to be done at the end because as soon as the type becomes an array, the parsed variable no longer becomes selectable to add to new areas of the Logic App.
Anyway, now that the message from the Event Hub has been wired in, the next step is to determine if the file for the day of the submission exists. If it does not exist, then it should be created by copying the template to a file whose naming convention matches the expectation for the date of the submission.
To set this check up, pull the metadata from SharePoint for the file. Click to add a New Step, search for SharePoint, and select the SharePoint action.

Then select the “Get file metadata using path” action.

Once added, rename the action to be more descriptive, select the previously created SharePoint site, and select the target file.

Then, create a new Step, select Built-in, search for “Condition”, and select the “Condition” control.

Once the action is created, rename it to be more descriptive. Then, click on the ellipsis and select “Configure run after.”
Since it’s possible that the previous action errored out if the file does not exist, this step needs to be configured to still run even if the previous action failed. Select all of the available options.

Back on the action, click on the “Choose a value” for the condition. Click on Expression, and add in both length() and coalesce(). The coalesce is used to allow for null values coming from the previous action in case it errored out when the file did not exist. The expression should look like this.

Then switch back to Dynamic content, make sure the cursor is inside the coalesce(), and select the Id of the current day’s file metadata.

Then, scroll to the end of the expression and add in a ‘’ to the coalesce(). The full expression should look like this.
length(coalesce(body('Get_current_day''s_file_metadata')?['Id'], ''))
Then, set the operand to be 0. The resulting action should look like the following.

Then, in the True branch, click to add a New Step. Select SharePoint and then Get file content. Rename the action to be more meaningful. Select the SharePoint site and then the template file.

The next step to add is Sharepoint -> Create file.
Rename the action to something more meaningful, select the Diabetes DME SharePoint site, select the Diabetes DME Requests folder, and use “PHI Diabetes DME Request 2021-10-25.xlsx” filename.
The full True branch should now look like this.

We’re now at the point where, after the Condition is done, there always exists an Excel file that can be written to.
Now, add a new step under Excel Online (Business) -> Add a row into a table. Rename the action to be more meaningful, select the Diabetes DME Request SharePoint site, and select the Documents library and File.
At this point, you may see an error when you click on the Table dropdown. I have already reported this as an incident to Azure Support. Until it is fixed, use a custom value of “Table1.” The parameters dropdown will then show all of the various columns to add in.

Select all of them, scroll down to the “Parse Message from Event Hub” section, and start selecting the corresponding fields.

Once done, the Action should look like this.

Woohoo! Nice work.
Wrap Up
The steps described in this blog post allow for the adding of a Logic App on Azure to append rows to an Excel file. It took a lot of trial, and mostly error, to figure out how to describe what I wanted in the way that the Logic App would understand. Hopefully the steps that I outlined in this blog post will save others the time it took me to come up with them.
Homework
Outside of adding a Logic App that appends rows to an Excel file, there are a few things that I didn’t cover in this walkthrough. Those I leave as homework for you.
We didn’t walk through how to configure the Logic App to determine the file name based on the date of the submission. The way to do it is to create Variable steps in Azure, using the Code view for the Logic App to pull in the Variable’s value. The only caveat I ran into with this was the encodeURIComponent() calls that the Logic App was doing internally. I had to go into the Code view to see why my runs were failing, and it was because it was doing a double encodeURIComponent().
The other part not covered is a very simple Logic App that wakes up on a timer, gets the current date, finds the previous date, and checks for a file in the SharePoint from that previous date. If one exists, it creates a Microsoft Teams message to a Channel with a link. This is very simple in comparison to the previous Logic App, and also serves as good homework.
Check out these resources to help with your “assignments!”
More From Zach Gardner
About Keyhole Software
Expert team of software developer consultants solving complex software challenges for U.S. clients.
Share This Post
Join The Thousands Of Devs Who Subscribe

Discuss This Article
Subscribe
Login
0 Comments
Oldest