
Implementing GitHub OAuth with NextAuth.js
In my last post, Introduction to Web Apps with Next.js, we went through the steps of setting up a new Next.js project, customizing a landing page, and implementing a very simple web application. In this post, we’ll implement an Open Authentication (OAuth) based Single Sign-On (SSO) API within Next.js using NextAuth.js. We’ll be using GitHub as our provider, but the steps here are very similar for other platforms, such as Google or Discord. This will allow us to place portions of our website behind a login screen, restricting access to certain content or APIs for anonymous visitors.
OAuth Overview
OAuth 2.0 is the current industry standard for authorization within web applications. It is maintained by a working group within the Internet Engineering Task Force (IETF), which has developed voluntary standards for user practices since 1986. To learn more about the IETF, you can visit IEFT.org.
OAuth maintains user sessions by storing session tokens internally through cookies and local storage on the client device and/or on the server in a session store. This token is issued by the provider and stored in memory on the device requesting authorization and/or on the web server. The token typically includes a security key, an expiration date, and a scope defining the token’s level of access. This prevents the user from having to retype their password or otherwise sign in again until this token expires.
It might seem intuitive to think that typing in a password more often is more secure, but remember that every time you enter a password, there is a marginal risk of that password being exposed. Phishing, snooping, and old-fashioned “over-the-shoulder” social engineering are all common problems. It’s important to keep these things in mind when working with any authentication solution.
A common use-case for OAuth is Single Sign-On Service (SSO), that is, allowing users to sign in using their existing accounts without having to create a new one for every service or app they use. For simple applications, this can be sufficient to secure views and API endpoints without the need for a dedicated database of users.
Through the use of user IDs and secret keys in your server environment, you can offload much of this process to a provider your users are already using. That isn’t to say you can’t use your own database to store users, and in most commercial applications, you will want to do this. If you are building out a portfolio or a hobby project, however, third-party OAuth is sufficient for keeping track of who is using your app and how they are using it.
Regarding scope and level of access, a token may only be used to validate actions that are defined in their allowed scope. Typically, you only need to verify basic user information such as email address or user ID, but for write access to the provider or other sensitive operations, you may need to configure your application to request additional permissions.
Creating an OAuth Application in Github
The first step in securing our application is to configure a Developer App in Github. This can be done at github.com/settings/developers, as pictured below.
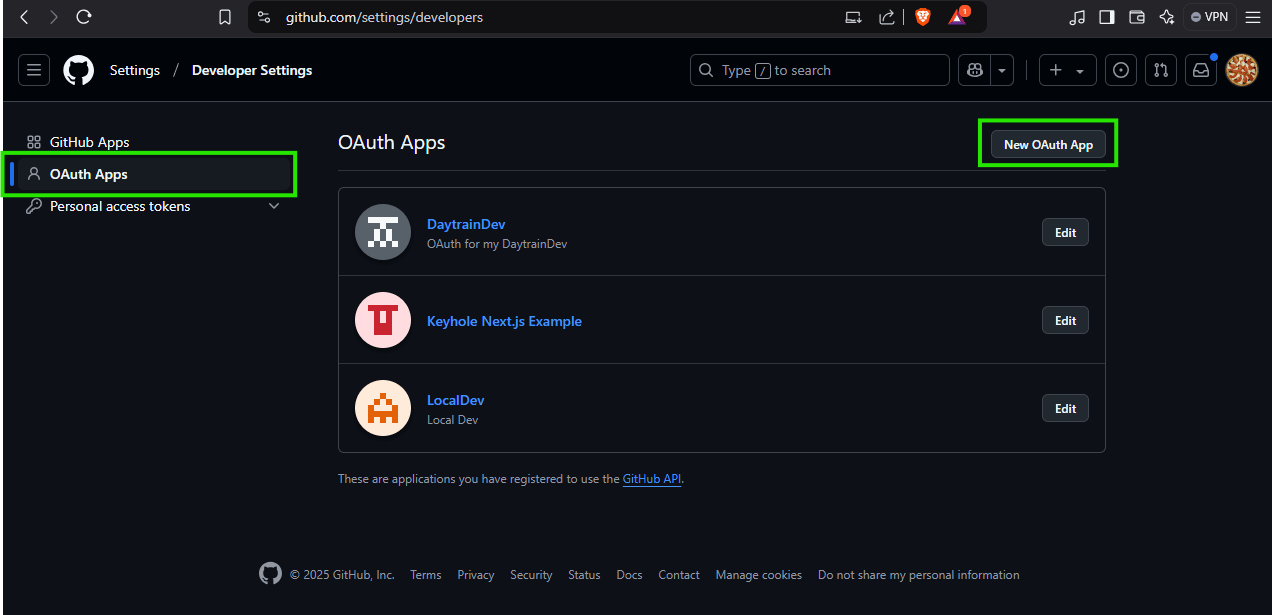
In the above screenshot, you’ll notice I have multiple applications set up. The bottom one, LocalDev, is what I use for developing OAuth apps on my local machine. It doesn’t matter what you name it or how you describe it, but make sure you include the homepage URL of your project in your local environment, http://localhost:3000 by default, and a callback URL: http://localhost:3000/api/auth/callback/github.
Device flow is an option that allows you to have the user enter a verification code to verify their sign-in. We won’t be covering that in this article for the sake of time. However, if you have a database of users in a commercial application, you need to consider it, especially if you allow your user to take sensitive or destructive actions. You can see an example of these settings below.
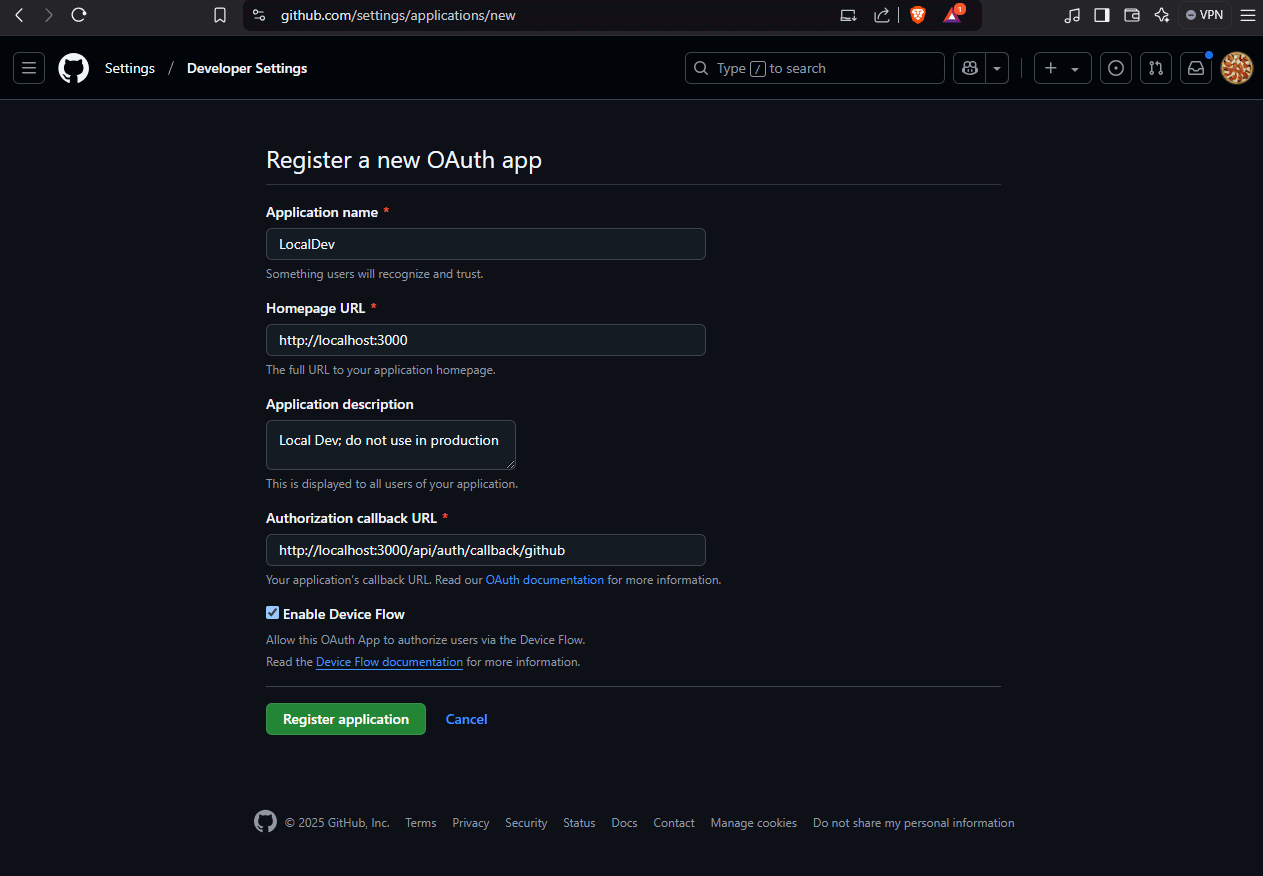
Once you register your application, generate a secret on the next screen and make note of both the secret and the ID. We will use these as environment variables in the next step. Without this ID and secret, we won’t be able to authenticate users through GitHub.
When you deploy, you’ll absolutely want to create a separate OAuth application for each environment you plan to run your software. This means creating separate apps for local development, production, staging, and other environments. Replace http://localhost:3000 in both your homepage and callback URLs with the address of your target environment, such as https://your-domain-here.app.
Adding NextAuth.js Dependencies to Your Next.js Project
If you don’t already have a Next.js project going, you can get one ready by following the steps for setting up a Next.js Web Application from my last post, Introduction to Web Apps with Next.js</a>. For the purposes of this exercise, I would recommend using the App router with Next.js version 14 or greater.
To install NextAuth.js, first run npm install next-auth from the command line in your project folder. This will add the next-auth package. next-auth includes another package, oauth as a dependency, which you can see if you examine the dependencies in your package-lock.json.
This is a well-documented implementation of the Auth.js library for OAuth, which supports a variety of providers including GitHub. They have a lot of documented examples on their site, but we are going to implement the basics a little differently.
Defining Environment Variables
If you haven’t already, create a file named .env in your project root. In this file, you’ll want to define four environment variables, as follows.
NEXTAUTH_URL=http://localhost:3000
NEXTAUTH_SECRET=very-secure-secret
AUTH_GITHUB_ID={your OAuth App Id from above}
AUTH_GITHUB_SECRET={your OAuth App Secret from above}
Absolutely ensure that this file is included in your project’s .gitignore file to prevent committing these secrets into your version control. Never push secrets into version control! In production, you’ll want to replace very-secure-secret with something more secure. This is used internally by next-auth for validation sessions between the client and the server and helps keep our application secure.
Authentication Service
Next, create a file at src/app/services/AuthService.ts. Here, we are going to configure our authentication provider and instantiate some things that depend on our environment variables. We are going to keep our secrets abstracted here at the service layer, and export wrapper functions that don’t need our configuration provided.
import NextAuth, { AuthOptions, getServerSession as _getServerSession } from "next-auth";
import GithubProvider, { GithubProfile } from "next-auth/providers/github"

const authOptions: AuthOptions = {
  providers: [
    GithubProvider({
      clientId: process.env.AUTH_GITHUB_ID ?? '',
      clientSecret: process.env.AUTH_GITHUB_SECRET ?? '',
    }),
  ],
}
export const getServerAuthHandler = () => NextAuth(authOptions);
export const getServerSession = async () => await _getServerSession(authOptions);
Import Path Shortcut
Before we create the rest of our files, let’s define a shortcut for our import paths. This will prevent us from needing long relative paths (ie: ../../../..) in our import URLs. This will make your import statements easier to read and is a good practice to adopt as your project begins to grow.
If you already did this when setting up your project, then you can skip this step. First, open the tsconfig.json in your project root. Under compilerOptions, add a key called paths and provide an object mapping your shortcuts to their sources, like so.
{
  "compilerOptions": {
    …
    "paths": {
      "@keyhole/*": [
        "./src/*"
      ]
    },
    …
  },
  …
}
It’s possible to enforce decomposition rules through multiple TypeScript configs and path shortcuts. For example, you can disallow services from being imported into page templates directly to encourage the use of a well-defined controller layer. We won’t go over the details of this now, but keep it in the back of your mind as your project grows.
API Controller
Now that we have a service defined and can import it cleanly, create another file at src/app/controllers/ApiController.ts. Here, we are going to instantiate getServerAuthHandler and export the resulting authHandler for use in our authentication API.
import { getServerAuthHandler } from "@keyhole/services/AuthService";

// more here later

export const authHandler = getServerAuthHandler();
A concept to point out here is the “function closure.” Collecting a function by executing another function allows us to define a function at runtime without providing the required parameters. Back on our service layer, our authentication handler is being created from our existing authentication options, so there is no need to export those to the controller layer. This type of decomposition between controllers and services is common.
Authentication API Routes
Earlier, we defined a callback URL for our OAuth application. Now, we are going to implement a catch-all route for any route under the prefix api/auth/, then route all traffic directly to a route handler exported by the next-auth package. This will handle all of the routes needed for sign-in and sign-out flows.
Create a file at src/app/api/auth/[...nextauth].ts. This naming convention tells the App router to collect any URL parameters after src/api/auth so they can be forwarded along to our handler. The only thing this file needs to do is export our authHandler as GET and POST.
import { authHandler } from "@keyhole/controllers/ApiController";

export { authHandler as GET, authHandler as POST }
There is a lot happening behind the scenes here. Next.js has several naming conventions you can use to collect routes for use by routes and pages. The syntax [...variable] will collect any number of route parameters, like x/y/z, and store them in an object, such as {x: ‘foo’, y: ‘bar’, z:’qux’}. The next-auth package contains code internally that will read these variables and handle the appropriate route.
Example API Endpoint
Before we can test our authentication, we will need a route that displays different results when the user is logged in or logged out. Let’s go back to our ApiController and update it by adding another handler.
This one will pull in a user session from a helper function we wrapped in our service above. It will then display a failure message if the session does not exist and a success message if it does exist. This is a simple way to restrict API functionality to logged-in users.
import { getServerAuthHandler, getServerSession } from "@keyhole/services/AuthService";
import { NextRequest, NextResponse } from "next/server";

export const baseHandler = async (req: NextRequest) => {
  const session = await getServerSession();

  if (!session) {
    return NextResponse.json({
      content:
        "You must be signed in to view the protected content on this page.",
    });
  }

  return NextResponse.json({
    content: `This is a protected api. You can access this api because you are signed in as ${session.user.email}.`,
  });
};

export const authHandler = await getServerAuthHandler();
Now, create a file at src/app/api/route.ts that exports this handler, similar to how we did for our authentication routes.
import { baseHandler } from "@keyhole/controllers/ApiController";

export { baseHandler as GET, baseHandler as POST };
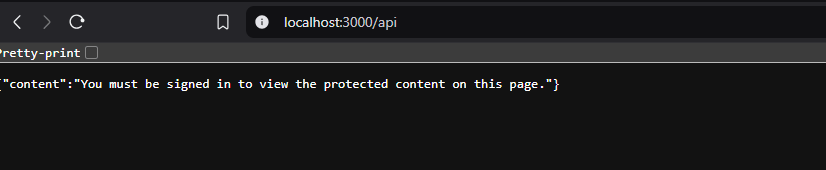
With your app running, navigate to this route in your browser. You should see the message that you are not logged in.
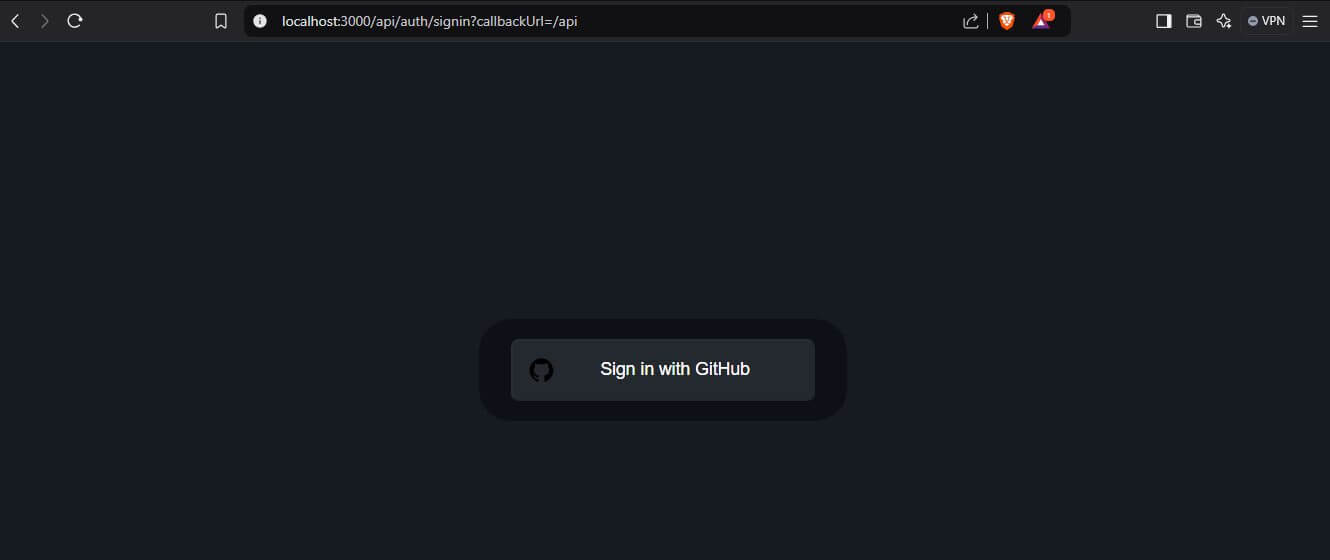
To sign in, navigate to /api/auth/signin?callbackUrl=/api. If you followed the steps above correctly, you should see a button labeled “Sign In with GitHub.”
Once you sign in, you should be routed back to /api. Now that you are signed in, you will see a different message.

Page Controller
Now that we have confirmed our authentication is working, let’s add a controller for our visual pages at src/app/controllers/PageController.ts<M. For now, we will have two separate functions for retrieving props for our views; one for pages that should be displayed at all times and another for pages that should be displayed only if a user is signed in.
import { getServerSession } from "@keyhole/services/AuthService";
import { redirect } from "next/navigation";

export const getPublicPageProps = async () => {
  const session = await getServerSession();

  return {
    name: session?.user?.name ?? undefined,
  };
};


export const getPrivatePageProps = async () => {
  const session = await getServerSession();

  if (!session) {
    redirect(`/`)
  }

  return {
    name: session?.user?.name ?? undefined,
  };
}
Note that on a public page, we return our properties regardless of whether the user is logged in. By contrast, for private pages, we redirect users to the home page. You may choose to route them to a sign-on page instead.
Example Custom Page
For this example, we will use the PageController we created above to display a simple custom message on the homepage. In your src/app/page.tsx, import getPublicPageProps.
import { getPublicPageProps } from "@keyhole/controllers/PageController";
…

export default async function Home() {
  const { name } = await getPublicPageProps ();

  return (
          …
          <h1 className="p-2 text-3xl font-bold text-center">Welcome to Keyhole Next{name && `, ${name}`}!</h1>
          …
    </main>
  );

Allowing Remote Images to Display
By default, Next.js will block images from unknown origins, including our user’s profile image from our third-party OAuth provider, GitHub. Add this remotePatterns setting in your next.config.mjs file. This will allow your project to load images from avatars.githubusercontent.com, which will be useful for displaying our visitor’s avatar in the next step.
/** @type {import('next').NextConfig} */
const nextConfig = {
  images: {
    remotePatterns: [
      {
        protocol: 'https',
        hostname: 'avatars.githubusercontent.com',
        pathname: '/*/**',
      },
    ],
  }
};
export default nextConfig;
Example Custom Header
We’ve seen how to work with session data on the server side, but the client side is a bit different. If you don’t have a header for your site layout, go ahead and create a component at src/app/components/header.tsx. We’ll pull this into our site’s layout. Include links to public and private pages as desired.
"use client";
import Image from "next/image";
import { Session } from "next-auth";
import { SessionProvider, signIn, signOut, useSession } from "next-auth/react";

const UserBar = () => {
  const { data: session, status, update } = useSession();

  return (
    <div
      className="fixed left-0 top-0 p-0 m-0 flex flex-row w-full justify-stretch border-b border-gray-300 bg-gradient-to-b from-zinc-200 backdrop-blur-2xl dark:border-neutral-800 dark:bg-zinc-800/30 dark:from-inherit border bg-gray-200"
    >
      {status === "authenticated" && session?.user?.image ? (
        <>
          <div>
            <Image
              className="rounded-full"
              src={session?.user?.image}
              alt={"Profile Image"}
              height={48}
              width={48}
            />
          </div>
           {/* …(private links) */}
          <button className={'ml-auto p-3'} onClick={() => signOut()}>
            Logout
          </button>
        </>
      ) : status === "unauthenticated" ? (
        <>
          <div className="p-2 text-3xl">👤</div>
          <p className="px-2 py-3">Guest</p>
          {/* …(public links) */}
          <button className={'ml-auto p-3'} onClick={() => signIn()}>
            Login
          </button>
        </>
      ) : (
        <>
          <p className="px-2 py-3">Loading Session...</p>
        </>)
      }
    </div>
  );
};

export const Header = ({ session } : { session: Session | null}) => {

  return <SessionProvider session={session}>
    <UserBar />
  </SessionProvider>;
}
There are a few things going on here, so let’s go through them. First, at the very top, we are ensuring that this component renders on the client device using the directive “use client” – at the top of our file.
Also notice that we aren’t exporting UserBar directly, but rather, wrapping it in a SessionProvider and passing along our session data. This session data actually comes from the server, but the provider makes it accessible to any nested react components via the useSession hook. All of this happens on the client side.
In our user bar itself, we are going to inspect the session not only to see if the user is logged in but also to make sure that our session is fully populated. Unlike our earlier example on the server side, we are rendering a client-side view. We can display some data that our user session has available by default, such as the user’s profile image and display name.
To add this header to your layout, head over to src/app/layout.tsx and make a few changes. Import the Session type from next-auth and our Header component. Be sure to collect the session data from your layout props and pass it along to your Header.
…
import { Session } from "next-auth";
import { Header } from "@keyhole/components/header";
…

export default function RootLayout({
  children,
  session,
}: Readonly<{
  children: React.ReactNode;
  session: Session | null;
}>) {
  return (
    <html>
      <body>
        <Header session={session}/>
        {children}
      </body>
    </html>
  );
}
You may or may not be logged in already from the previous API Endpoint exercise. If you are, you should see your name and profile picture.


Further Development
There are several ways to extend and customize your authentication solution. Middleware, custom session data, and even custom token shapes are possible for more advanced applications. Using custom callbacks, you can create custom user profiles and take more control over the user authorization flow. By implementing a separate database to link provider accounts, you can allow one user to sign in using multiple providers. You can configure OAuth apps with access to your GitHub Organization’s repos and data as well. You can also follow (or contribute to) our Next.js example project on GitHub.
Want more tips and tricks like this? Check out the Keyhole Dev Blog for developer how-tos, project insights, and all things modern web development. We’re always sharing what we’re learning—come join us!
More From Bob Palmer
About Keyhole Software
Expert team of software developer consultants solving complex software challenges for U.S. clients.
Share This Post
Join The Thousands Of Devs Who Subscribe


Discuss This Article
Subscribe
Login
0 Comments
Oldest