
My Reaction To React
We at Keyhole have been helping our clients adopt JavaScript-based single-page applications for over five years. We have done everything from rescuing JavaScript SPA web applications built without a MV* framework, but with 1000-plus line jQuery functions, to mentoring and training on popular frameworks such as Backbone.js or Angular.
We have been impressed with the adoption and advancement of the ever-changing JavaScript ecosystem. Server side, headless JavaScript (Node.js) has led to good tooling and packaging options along with server side remaining available. Additionally, the new ECMA6 standard has turned JavaScript into a viable general purpose programming language, that is arguably, on the same plane as C# or Java. It certainly has a large number of available frameworks and tooling options.
Angular 2 is an example of the latest advancements in the JavaScript evolution. Besides providing a nice MVC framework for implementing SPAs, it provides a robust CLI (Command Line Interface) that provides developer support. Also, TypeScript or ECMA6 can be used and transpiled using Babel into modular browser-independent JavaScript.
React is another framework that competes with the Angular 2 framework. Which framework is better and more popular brings up too much “religious debate” for my comfort, and frankly it does not really matter. Properly applied, either Angular 2 or React will yield a successful, maintainable SPA implementation. We always tell clients to assume the UI technology is going to change, so physically decoupling your UI implementations from server side implementation is most important.
This Post
React differs from the other frameworks I’ve worked with in a handful of ways. In this blog, I will show tangible examples of React’s unique features and capabilities, particularly how it handles HTML-based Components.
JSX
Admittedly, when I first heard about JSX through grumbling of co-workers, I came in with a slightly negative attitude. But as I started developing with it, I found it took less code to lay out a component-based UI, as opposed to an HTML template-based approach. My negative attitude turned into a desire to work with it more.
JSX is essentially a typed, object oriented language that compiles to efficient JavaScript. JSX commands mirror HTML syntax, thus, you can use these HTML objects to layout an HTML UI.
Here’s an example React ECMA6 expression.
const elements = <div><h1> hello world </h1></div>;
Notice this is not a string expression, but the HTML tags are actual typed JSX object commands. All of the HTML elements are available. Here is a form example:
   const elements = <form submit=”  “>
                                     <label> User Id:</label>
                          <input type=”text” />
 	       </form>
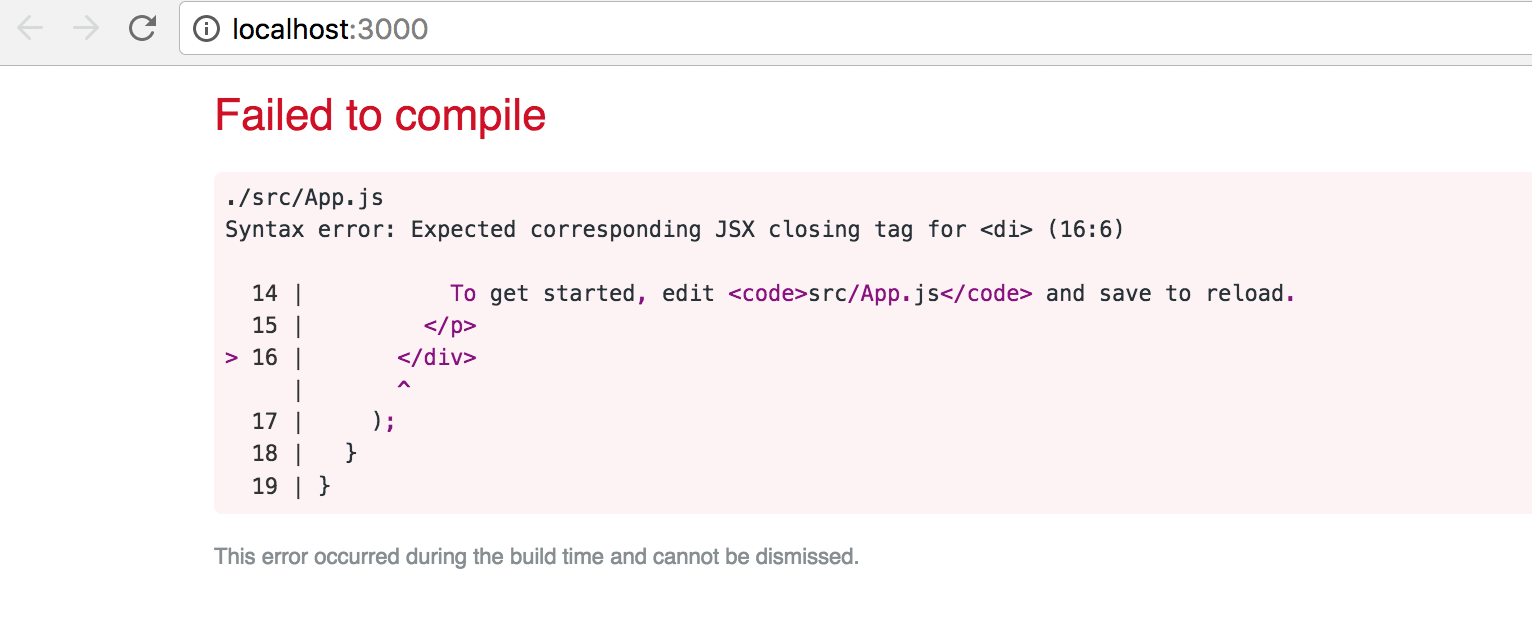
JSX is type checked at compile time. If it is malformed, then you will get a compile time error. As an example, here is an expression with misspelled < div >.
         <di>
           <p className="App-intro">
             To get started, edit <code>src/App.js</code> and save to reload.
          </p>
        </div>
Here is compile time error that occurs.
Like template languages, object expressions can be embedded inside JSX expressions. Here is an example of this:
let datetime = new Date();
const elements = <h1> The time is {datetime} </h1>;
Here is how you can add JSX expressions to an array to produce an < option > list.
let items = [‘item 1’,’item 2’,’item 3’];
let options = [];
items.forEach( item => {  options.push( <option> {item} </option>) });

const elements = <option> {options} </option>;
Rendering
JSX produces HTML for browser rendering using the following expressions:
const elements = <h1> Hello World </h1>;
ReactDOM.render( elements, document.getElementById(‘root’));
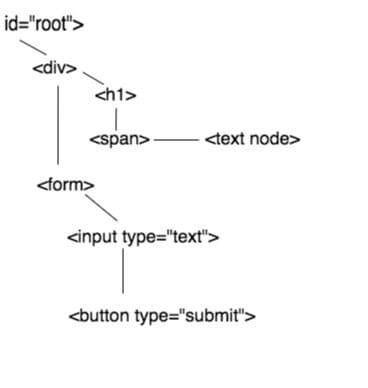
ReactDOM.render(
< div> <div> <h1> <span> Hello World Again </span>
</h1> </div> <form> <input type=”text”/> </form> </div>
, document.getElementById(‘root’));
The render method renders the JSX HTML as a child element of the HTML element returned from the browser DOM query. Sort of, at least indirectly, this happens.
React has a concept of a Virtual DOM, which is a tree structure. So, your JSX elements are rendered to the React Virtual DOM, and React then updates the actual Browser DOM. The virtual DOM is a tree structure of nodes, which provides a way for React to only update things that change. This eliminates page refreshes and only updates the browser DOM at an element granularity, which provides a very native application GUI-like user experience.
The tree structure eliminates developers from having to define and manage < div > IDs. The render method can be called as often as necessary. React will quickly diff the changes, quickly update the browser DOM in the node where changes are made, and diff all child nodes. This process makes rendering and updates very fast.
Many MVC frameworks requires HTML component boundaries to be associated with an element ID selector, typically a < div > somewhere in the layout.
React UIs will typically just have one main < div > ID. The application applies nested child component updates to a virtual DOM. React efficiently manages reflecting those updates to the actual DOM. This is unlike other frameworks that require the developer to keep track and refresh sections of the UI using element selector IDs. It’s a nice feature that React developers don’t have to worry about where and when the View Component is rendered to the UI.
This leads us into Components and how they can be composed into a UI.
Component Based
React JSX components can be defined as function-based components or as ECMA6 base classes. These components allow you to create custom JSX commands. Here’s how a function-based JSX component is defined:
  function DateTime() {
let dateTime = new Date();
return (<h1> Current Date Time is: {dateTime} </h1>);
  }
This is the cool part. The DateTime component is JSX enabled. Here’s how it can be used:
const elements = <div> <DateTime /> <div>;
ReactDom.render( elements, document.getElementById(‘root’));
The function name is used as the JSX tag/component name. The React convention is to camelcase component names.
Properties
Properties can be supplied to components through function arguments.
As an example, say we wanted to introduce a date string to display in the < DateTime > component like this:
const elements <DateTime date=”07/01/2017” />
Then you would modify the function component like this… additions are bolded.
 function DateTime(props) {
let dateTime = new Date( props.date );
return (<h1> Current Date Time is: {dateTime} </h1>);
  }
Notice the props argument and how it is used in the DateTime function.
Less Trivial Example
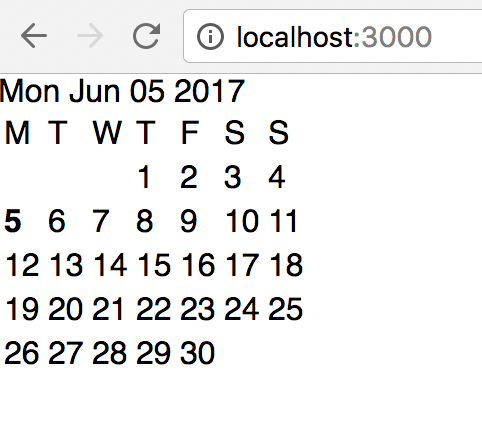
Now let’s see a less trivial example. Here is the JSX rendering of a < Calendar > function component that displays a calendar UI:
const element =  <Calendar date=”6/5/2017”/>;
ReactDom.render( element, document.getElementById(‘root’));
This is what it looks like rendered in a browser:
Here is the < Calendar > function component implementation:
function Calendar(props) {

 let daysInMonth = [31, 28, 31, 30, 31, 30, 31, 31, 30, 31,30,31];
 let dayOfWeek = ["M", "T", "W", "T", "F", "S", "S"];
 let date = new Date(props.date);
 let month = date.getMonth();
 let dayOfMonth = date.getDate();
 let firstDay = new Date((date.getMonth() + 1) + "/1/" + date.getFullYear()).getDay();
 let dow = [];
 for (var d of dayOfWeek) {
   dow.push(<td> {d} </td>);
 }

 let displayDays = [];
 let dayCount = 1;
 for (var r = 0; r < daysInMonth[month] / 7; r++) {
   let displayWeek = [];
   for (var c = 0; c < 7; c++) {
     if ((r === 0 && c + 1 < firstDay) || dayCount > daysInMonth[month]) {
       displayWeek.push(<td> </td>);
     } else {
       if (dayCount === dayOfMonth) {
         displayWeek.push(<td><b>{dayCount}</b></td>);
       } else {
         displayWeek.push(<td>{dayCount} </td>);
       }
       dayCount++;
     }

   }

   displayDays.push(<tr> {displayWeek} </tr>);
 }

 return (<div>
   <div>{date.toDateString()}</div>
   <table>
     <tr> {dow} </tr>
     {displayDays}
   </table>
 </div>);
}

ReactDOM.render(<div> <Calendar date={new Date()} />  </div>,     document.getElementById('root'));

function UserProfile(props) {

   return (
       <div>
           <div><h1>User Profile</h1></div>
           <div><b>Name:</b> {props.name} </div>
           <div><b>UserId:</b> {props.userid} </div>
            <div><input type="button" value="Avatar"/> </div>
            <div><img  height="200" src={props.avatar} /></div>
           <div><b>Roles:</b> {props.roles}  </div>
       </div>
      );
}

ReactDOM.render(<div> <UserProfile name="Clifford Squidlow" userid="[email protected]" avatar="https://devo-obsesso.com/images/media/12inches/main/drdetroit-sealed-cvr.jpg" roles="Admin, User, Developer"/> </div>,     document.getElementById('root'));

ReactDOM.render(
 <EventHandling />,
 document.getElementById('root')
);

ReactDOM.render(
 <LoginForm />,
 document.getElementById('root')
);

ReactDOM.render(
 <Calendar date={new Date()} />,
 document.getElementById('root')
);
In order to make this a more usable component, user interaction needs to be added. Turning the function component into a class-based component provides a way to handle user events that occur within the component.
Class Components and Events
Class-based JSX components provide a way to introduce and decompose functionality by spreading logic across methods in the class. Additionally, class-based components can maintain state.
Here is how the function-based < Calendar > component is implemented as a class-based component, which extends from a React component:
import React, {Component} from 'react';

const daysInMonth = [31, 28, 31, 30, 31, 30, 31, 31, 30, 31,30,31];
const dayOfWeek = ["M", "T", "W", "T", "F", "S", "S"];
const months = ["Jan", "Feb", "Mar", "Apr", "May", "Jun", "Jul", "Aug", "Sep", "Nov", "Dec"];

class Calendar extends Component {

    constructor(props) {
       super(props);
       this.state = {date: props.date};
       this.handleDayClick = this.handleDayClick.bind(this);

    }

handleDayClick(e) {

   let day = e.target.innerText;
   this.state.date.setDate(day);
   this.setState({date: new Date(this.state.date.getMonth() + 1 + "/" + this.state.date.getDate() + "/" + this.state.date.getFullYear()  ) })
}

render() {
 let date = new Date(this.state.date);
 let month = date.getMonth();
 let dayOfMonth = date.getDate();
 let firstDay = new Date((date.getMonth() + 1) + "/1/" + date.getFullYear()).getDay();
 let dow = [];
 for (var d of dayOfWeek) {
   dow.push(<td> {d} </td>);
 }

 let displayDays = [];
 let dayCount = 1;
 for (var r = 0; r < daysInMonth[month] / 7; r++) {
   let displayWeek = [];
   for (var c = 0; c < 7; c++) {
     if ((r === 0 && c + 1 < firstDay) || dayCount > daysInMonth[month]) {
       displayWeek.push(<td> </td>);
     } else {
       if (dayCount === dayOfMonth) {
         displayWeek.push(<td><b>{dayCount}</b></td>);
       } else {
         displayWeek.push(<td onClick={this.handleDayClick}>{dayCount} </td>);
       }
       dayCount++;
     }

   }

   displayDays.push(<tr> {displayWeek} </tr>);
 }

 return (<div>
   <div>{date.toDateString()}</div>
   <table>
     <tr> {dow} </tr>
     {displayDays}
   </table>
 </div>);
}

}

export default MyCalendar;
Class-based components also provide a way to capture events. In the example above, you’ll see how a day is clicked and the < Calendar > will render with a new date along with bolding the new date. Event handlers are added by using the onClick events that call handling methods on the class.
Here is where the event handling expressions, along with the reason for adding, are applied in the Calendar class component.
Bind this to the function in the constructor() method.
 ...
     this.state = {date: props.date};
       this.handleDayClick = this.handleDayClick.bind(this);

    }
Add the onClick event property to JSX < td > element in the component render() method.
...
    if (dayCount === dayOfMonth) {
         displayWeek.push(<td><b>{dayCount}</b></td>);
       } else {
         displayWeek.push(<td onClick={this.handleDayClick}>{dayCount} </td>);
       }
       dayCount++;

...
Add the handleDayClick() method event handler implementation to the component class.
handleDayClick(e) {

   let day = e.target.innerText;
   this.state.date.setDate(day);
   this.setState({date: new Date(this.state.date.getMonth() + 1 + "/" + this.state.date.getDate() + "/" + this.state.date.getFullYear()  ) })
}
Component State and Form Controls
Class-based components also provides a way to handle state. The previous section’s < Calendar > component stores the current date in a class instance state variable. The ability for Component instances to store state is important when working with UI forms. React also uses this state mechanism to fire the render() method when “state” changes.
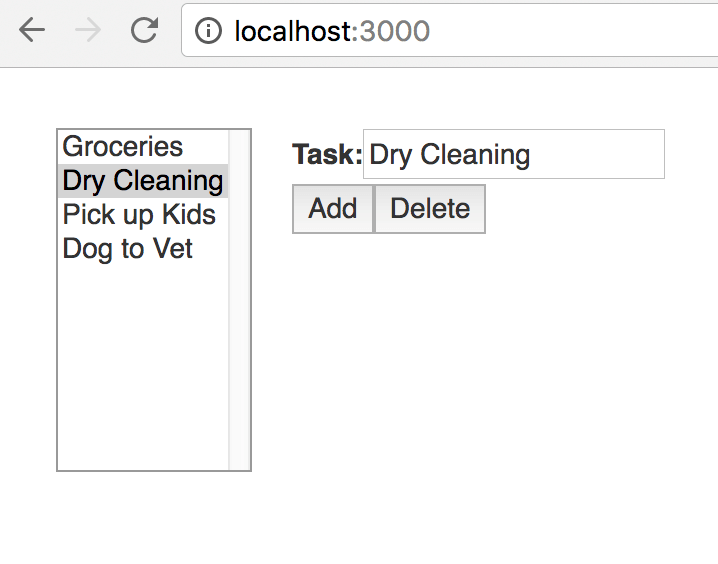
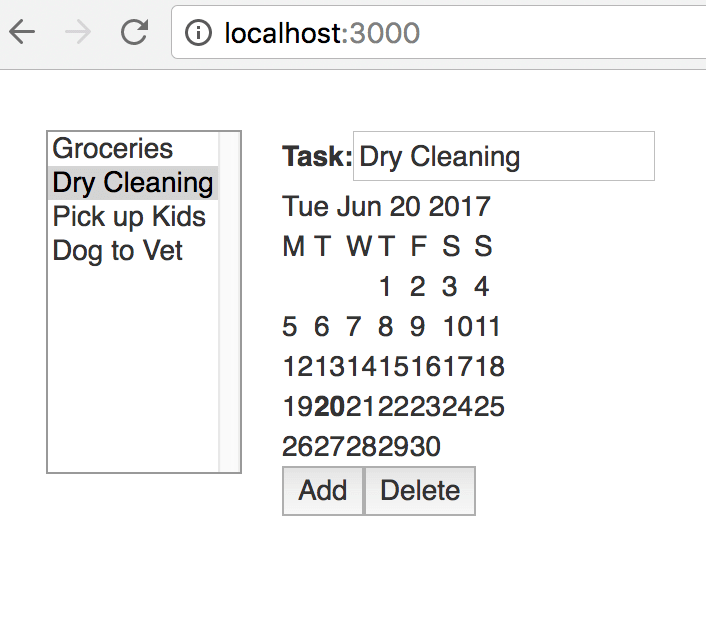
To see how component state and UI forms work together in React, here is a simple < ToDo > React class component that implements a way to add, edit, and delete a “To Do” list. Here is what it looks like rendered in the browser.
The JSX expression looks like this:
 ReactDOM.render(
 <Todo />,
 document.getElementById('root')
);
Here is the complete source code for the < ToDo > class component implementation:
import React, {Component} from 'react';

// Initial Todo Input Values
let items = [{id: '1', value: 'Groceries'}, {id: '2', value: 'Dry Cleaning'},{id: '3', value: 'Pick up Kids'},{ id: '4', value: 'Dog to Vet'} ];

class Todo extends Component {
constructor(props) {

   super(props);
   this.state = {id: '2'};

   this.handleChange = this.handleChange.bind(this);
   this.handleSubmit = this.handleSubmit.bind(this);
   this.handleDelete = this.handleDelete.bind(this);
   this.handleEdit = this.handleEdit.bind(this);
   this.handleAdd = this.handleAdd.bind(this);

}
 handleChange(event) {
   this.setState({id: event.target.value});
 }

 handleEdit(event) {
     for (var key in items) {
       if (items[key].id === this.state.id) {
           items[key].value  = event.target.value ;
       }
   }

   this.setState({id: this.state.id});

 }

 handleAdd(event) {

     items.push({ id:'10', value: 'New Task'});
     this.setState({id: '10'});


 }

  handleDelete(event) {
      let id = this.state.id;

     for (var key in items) {
       if (items[key].id === id) {
           items.splice(key,1);
           this.setState({id:'1'});
           return;
       }
   }

 }

 handleSubmit(event) {
   event.preventDefault();
 }

 find(id) {

  for (var key in items) {
       if (items[key].id === id) {
           return items[key].value;
       }
   }

   return '';

 }

render() {

   // This should be in a style sheet
   let style = { display: 'inline-block', verticalAlign: 'top', marginRight: '10px', marginLeft: '10px', marginBottom: '10px', marginTop: '10px'};
   let centerStyle = { width: '800px',  marginTop: '20px', marginLeft: '20px'};
   let options = [];

   for (var key in items) {
           options.push(<option value={items[key].id}>{items[key].value}</option>);
   }


   return (
      <div style={centerStyle}>
       <div style={style}>
         <select value={this.state.id} onChange={this.handleChange} size="10">
           {options}
         </select>
        </div>
        <div style={style}>
         <label> Task: </label>
         <input type="text" value={this.find(this.state.id)} onChange={this.handleEdit} />
         <div>
          <button type="button" onClick={this.handleAdd}>Add</button>
           <button onClick={this.handleDelete} type="button">Delete</button>
          </div>

       </div>
      </div>
   );

}

}

export default Todo;
The < ToDo > component defines an object array with a list of objects with properties for and ID, date, and value. The render() method builds a < list > JSX by looping over the items and adding < option > expressions. It then outputs the JSX, along with a selected item and add, delete buttons. Editing is performed by direct editing the text input. You can see the virtual DOM in action by typing text into the task input field; the item in the list is updated, without the entire page being refreshed.
When a < ToDo > item is selected, the item ID is saved in the component state and is used for delete and update operations.
This example is spartan looking, but CSS is also compiled and typed in JSX. A style sheet is introduced and applied to a component simply by importing it in as shown below.
import './index.css';
A class name is applied using className attribute. Here is an example import expression.
const element = <div className=”header”>Hello World</div>;
I’m guessing that ClassName is used instead of class in JSX due to its overloaded meaning.
Component Reuse
Here is where the power of JSX components can be realized. The component can be reused simply by embedding tags where needed. The < ToDo > component can be enhanced by adding a date for each < ToDo > task. So this can be done by simply importing the < Calendar > component and adding JSX to the < ToDo > render() method, bolded below.
...
return (
      <div style={centerStyle}>
       <div style={style}>
         <select value={this.state.id} onChange={this.handleChange} size="10">
           {options}
         </select>
        </div>
        <div style={style}>
         <label> Task: </label>
         <input type="text" value={this.find(this.state.id)} onChange={this.handleEdit} />
         <div>
            <Calendar date={this.findDate(this.state.id)} />
         </div>

         <div>
          <button type="button" onClick={this.handleAdd}>Add</button>
           <button onClick={this.handleDelete} type="button">Delete</button>
          </div>

       </div>
      </div>
   );

}

…
The resulting rendered UI looks like this in the browser.
The ability to create JSX components can be a very productive feature in decomposing application UIs into reusable elements. This feature of React is competing with the HTML Web Components – HTML5 specification. React is available now for use across all browsers via transpilation, so we will let the reader decide which component framework to utilize.
“Reaction”
Hopefully this introduction to React was informative.
We at Keyhole are JavaScript proficient, currently helping many clients utilize other JavaScript MV* frameworks, such as Angular 1 and 2 and Backbone.js. React Core is not really a full MV* framework, as out-of-the-box it does not provide routing, dependency injection, view/controller abstractions, or model support. However, there are React-specific packages you can add to fill in for support. Also, the Flux open source framework does provide a MV* application architecture for React.

React’s UI DOM rendering is very fast. I admittedly was initially skeptical of the JSX-based expression because of my bias toward Backbone or Angular 2 type HTML-based templates. However, I quickly warmed up to JSX. The type checking and ability to create and consume custom components using HTML-like syntax provides a simple, well known API for developers. Also, I felt like I could get more done with less code when compared to using other frameworks.
It’s worth noting that since React Core is not a full blown MV* framework, the JSX mechanism can be integrated with other frameworks such as Backbone. See React’s documentation for how to do this.
If you are a JavaScript UI developer, give React a try. You might be impressed.
Note: We have a new React class available for development teams!
More From David Pitt
About Keyhole Software
Expert team of software developer consultants solving complex software challenges for U.S. clients.
Share This Post
Join The Thousands Of Devs Who Subscribe


Dave, Great writing. The complete how-to and why and full code made it easy for me to understand. This is neat stuff! Keep up the good work!
Dave,
Congratulations on an excellent article. I’ll definitely give it a shot.
Regards,
Jorge Castillo
I don’t think the title of your article matches the content lol. Just kidding, mainly because I had some doubts after reading the article.