
OpenShift Quick Start: Build, Deployment and Pipeline
Automation is the secret ingredient for Microservices success. The OpenShift platform does a lot of the heavy lifting for implementing a continuous build and deployment platform. As the previous blogs in this series pointed out, OpenShift is a based upon Docker containers and uses Kubernetes to orchestrate them across computing resource nodes (i.e. Amazon EC2).
Building a container involves compiling or packing up a service’s source code into some type of deployable component, then using Docker file (with required server software identified and configuration) to create a container image. OpenShift, using Jenkins and Docker, will build a container image & store it to an image repository. Then, using Kubernetes, this image will be deployed to a resource Node. OpenShift can do this in a continuous, no-down-time manner.
This blog introduces the automated Continuous Integration / Continuous Delivery (CICD) features of the OpenShift platform using both the Web Console and the Command Line. A hands-on exercise then shows how a Jenkins build Pipeline can be customized.
—
This post is a continuation of our hands-on OpenShift Quick Start blog series. In the first post we introduced OpenShift. In part two, you worked to get OpenShift running locally & adding a Container with an API service to a Pod. In part three, you worked on scaling pods and managing Cluster with the CLI. Make sure you’ve completed those steps step prior to starting the continued exercise below!
Part 1: Exploring Pipelines
Each project on a Cluster will have a build configuration that is accessible from the Builds->Builds menu option. A build config allows a source code-based build strategy to be utilized, so you can point to a private or public Git repository, and specify the type of repository that it is. OpenShift has built-in knowledge for the following languages and protocols.

This configuration is available from the Actions menu. When a build is started, the source will be cloned or checked out, and the languages build mechanism executed. In the case of Node.js, it will use NPM. You can see this by viewing the log console. When complete, it appears in the Builds list.

OpenShift keeps track of build history for each application service. Successful builds result in an image being created and stored in the repository Image Stream and by default is automatically deployed to the Pod, using the built image deployment strategy.

Docker Images that are already built can also be uploaded to the Image Stream. The catch is that the image needs an OpenShift config file included in order for it to be added to the OpenShift image stream.
Deploying
Built Images will trigger an automatic deployment to a POD. Deployment information can be viewed from the Applications->Deploy option which will display a list of executed build jobs.
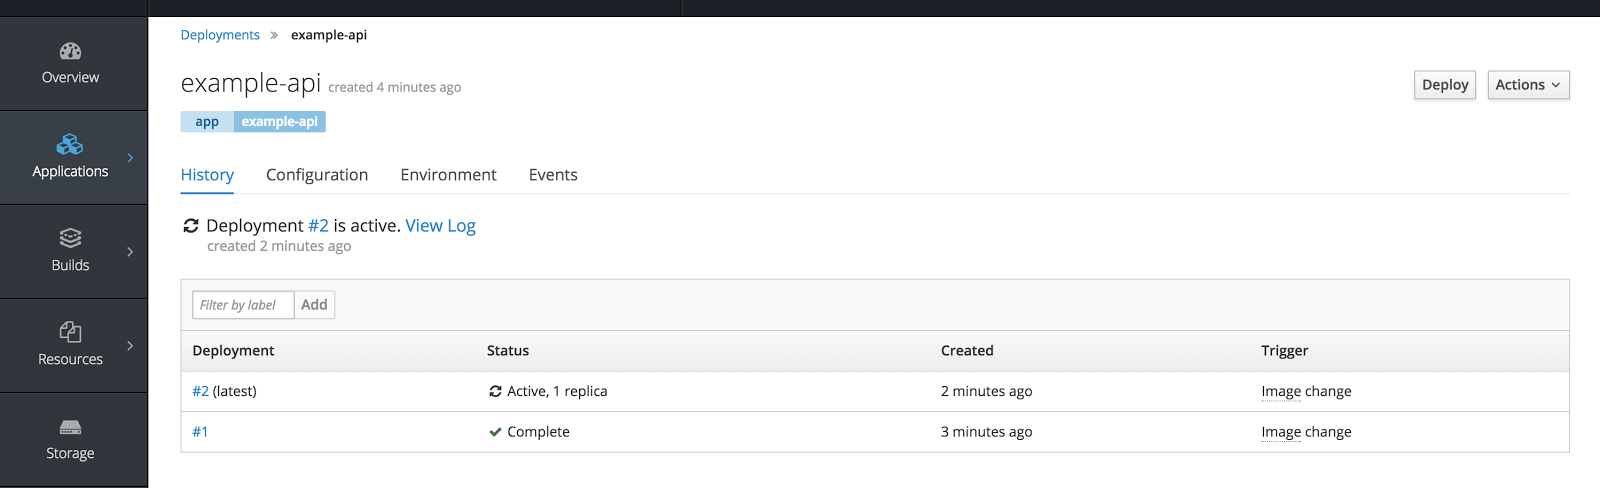
This view will display status and how the build was triggered. Another image to POD deploy can be performed by clicking the Deploy button.
There are also capabilities to perform resource allocation and scaling rules configuration from the Actions menu.

From a Deployment view, environment variables can be set. Logging and deployment events can also be viewed.
Pipelines
The concept of deployment pipelines offers a way to customize and control how, where, when, and what happens when deploying application services. By default, there are no pipelines defined with the exception of building and deploying. OpenShift’s pipeline mechanism is actually Jenkins 2 underneath the covers.
You create a Pipeline for an application service by visiting the Builds->Pipelines view, and clicking the Create Pipeline button. This will create a default pipeline configuration with Building, and Deployment Steps.

Additionally, pipeline steps can be added to perform testing, notification, etc. This can be done simply by editing the Pipeline, which will open a Jenkins Pipeline Configuration editor.

Using Groovy, the pipeline steps can be modified and saved. The exercise below will add a Notification step that will text a success message as the final step of a pipeline.
You can see how OpenShift bundles Jenkins, by select in the View Console of a build Pipeline. It launches a new tab with a Jenkins Dashboard for the project.

Command Line Interface (CLI)
Any operation that the web console performs can also be performed using the CLI. Here are some CLI examples to build and deploy:
Start build for example-api config:
$ oc start-build example-api
Deploy a build:
$ oc deploy example-api
Start a pipeline build:
$ oc start-build sample-pipeline
There are numerous CLI commands available to interact with Clusters. Issuing oc --help will list available commands.
Part 2: Customized Pipeline Exercise
The exercise steps below will walk you through Creating a Pipeline with an SMS notification step. You will need to have a local OpenShift cluster running with the example API service project running. See the previous “OpenShift Cluster Quick Start Blog” for instructions to bring you to this step.
1. Select the Builds->Pipelines option, and click Create Sample Pipeline. If you already have a pipeline defined, you can skip to step 4 that edits the pipeline config and adds a new stage.

2. Change the Name field entry to example-api. You can leave the remaining fields unchanged, and click Create button at the bottom of the screen.

3. Click the Start Pipeline button. You should see the build and deploy pipeline stages successfully executed. This will perform a Docker Container Image build and deploy a new instance to the POD. If you receive a failure, give it another try; sometimes a timeout will occur on local in memory installs.

 import groovy.json.JsonOutput

    try {
       timeout(time: 20, unit: 'MINUTES') {
          node('nodejs') {
              stage('build') {
                openshiftBuild(buildConfig: 'example-api', showBuildLogs: 'true')
              }
              stage('deploy') {
                openshiftDeploy(deploymentConfig: 'example-api')
              }
               stage('Notify') {
4. You can add a new Notification Stage by editing the pipeline from the Builds->Pipeline view and replacing the Jenkins 2 Pipeline Groovy script with the script shown below. Replace the bolded number with our cell phone number. You phone will be texted when you deploy.
                 def convoURL = 'https://khs-convo.herokuapp.com/api/convo'

                 def payload = JsonOutput.toJson([
                                         Body : 'success 1913nnnyyyy',
                                         To : '1913270360',
                                         From : '1913270360'
                                         ])
                sh "curl -X POST -H \'Content-type: application/json\' -d \'${payload}\'  ${convoURL}"


              }
            }
       }
    } catch (err) {
       echo "in catch block"
       echo "Caught: ${err}"
       currentBuild.result = 'FAILURE'
       throw err
    }
5. Start a pipeline build from the Builds->Pipeline view. The new Notify stage should appear and your cell phone should receive a success text message from your OpenShift cluster indicating a successful build.
Shameless Plug
The SMS notification mechanism is Keyhole’s KHS{Convo} premium SMS framework. Learn about how Keyhole can help you use it here.

Note: Stages execute in the proper order, but display currently indicates incorrect order when all stages are complete. This is a reported bug that will be resolved.
Thoughts
And there you have it! Make sure to stay tuned for our next post in this series, where we’ll give a hands-on approach for using a STI (Source to Image) utility to create and deploy a Spring Boot Java image.
As you can see, OpenShift goes a long way in providing a “ready to use” CICD platform. It implements the mechanism that throttles down traffic to a service, until its inactive, and then deploys and starts a newly built service. Other strategies can be employed, exploiting the Kubernetes Orchestration Framework.
Of course, you could pull together the pieces using Docker, Jenkins, and other frameworks and scripts, but if you are bought-in to the value of Containerization using Docker, OpenShift is an option that is hard to beat.
Series
- Introduction to Managing Docker Containers with OpenShift and Kubernetes
- OpenShift Quick Start – Installing OpenShift locally & adding a Container with an API service to a Pod
- Scaling Pods and Managing Cluster with the Command Line Interface
- This Post –> Continuous Build and Deploy with Jenkins 2 Pipelines
- Using a STI (Source to Image) Utility to Create and Deploy Spring Boot Java Image
More From David Pitt
About Keyhole Software
Expert team of software developer consultants solving complex software challenges for U.S. clients.
Share This Post
Join The Thousands Of Devs Who Subscribe
Discuss This Article
Subscribe
Login
0 Comments
Oldest