The Power of Amazon Lightsail
Amazon Lightsail allows a developer to build applications and websites fast, with very little cost, using pre-configured cloud resources on AWS. You can create a website or application in just a few clicks and automatically configure networking, access, and security environments with ease. It will easily scale as needed, or you can migrate your resources to a larger AWS ecosystem, such as Amazon EC2.
Recently, a client wanted to move and update an existing marketing / informational WordPress site from a typical hosting provider to their existing AWS environment. Let’s walk through that process and also explore some of the other options that are available with Amazon Lightsail.
About Amazon Lightsail
To learn more about how Amazon Lightsail works and all the possibilities of what you can do with it, check out this website.
Features
Lightsail offers simplified services such as instances, containers, databases, storage, load balancing, CDN, and virtual servers. When needed, you can expand to EC2 and integrate with any of the other services that AWS offers. More on Features, here.
Get an AWS Account
Let’s get started on setting things up. You will need an AWS account. If you don’t already have an AWS account, you will need to Sign Up for one.

Create a WordPress Instance in Amazon Lightsail
After logging into your account, the first thing you will need to do is set up a new instance.
- Sign in to the Lightsail console. On the Instances tab, click Create Instance.

- Choose a AWS Region and Availability Zone.

- Choose an instance image, platform and blueprint. In this example, we are using WordPress, but there are all kinds of other options depending on your needs, including LAMP, MEAN, Node.js, and Django.

- If this is your first instance, a default SSH key pair will be created, or you can create your own. Also, you can Add a launch script and turn on Automatic Snapshots.

- Choose an Instance Plan.

- Enter a name for your instance.

- Finally, choose Create Instance, and your new WordPress site will be created.


Connect to Your Instance to Get the Password for Your WordPress
The default password to sign in to the WordPress administration dashboard of your website is stored on the instance. We will need to connect to the instance using the browser-based SSH client in the Lightsail console and get the password. Let’s begin.
- On the Instances tab of the Lightsail home page, choose the SSH quick-connect icon for your WordPress instance.

- After the browser-based SSH client window opens, enter the following command to retrieve the default application password.
cat $HOME/bitnami_application_password

- Make note of the password from the console. You will use it later to sign in to the WordPress administration dashboard.


Sign Into the WordPress Administration Dashboard
- Get the public IP address for your WordPress Instance, and go to http://YourIPAddress/wp-login.php.

- In the Username or Email Address box, enter user. In the Password box, enter the default password obtained earlier. Then, choose Log In.


You are now signed in to your new WordPress site.

For more information on using WordPress with Lightsail check out this article:
Getting Started using WordPress from your Amazon Lightsail Instance.
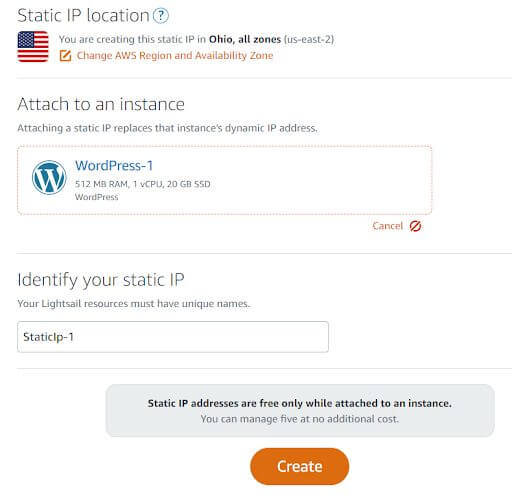
Create a Static IP Address
The default public IP for your WordPress instance changes if you stop and start your instance, so you may want a static IP address that will stay the same even if you stop and start your instance.
Check out this How To to walk you through the process of setting one up.
Create a DNS Zone and Map a Domain to Your WordPress Instance
You may need to transfer management of your domain’s DNS records to Lightsail. This allows you to more easily map a domain to your WordPress instance and manage more of your website’s resources using the Lightsail console. This tutorial will get you up and running.
Backups (Snapshots)
- On the Lightsail home page, choose the name of your instance for which you want to create a snapshot.
- Choose the Snapshots tab.

- Under the Manual snapshots section of the page, choose Create snapshot. Then, enter a name for your snapshot. Or you can choose to turn on Automatic snapshots, and it will backup daily and store the seven most recent snapshots.
- Choose Create to create the Snapshot.

Working with Amazon Lightsail Instances Using AWS Cloud9
AWS Cloud9 allows for an easy way to connect to and work with the code on your Lightsail instances. This article will get you going.

Wrapping Up
I hope this post helped get a good idea of what is possible with Amazon Lightsail and how easy it can be to get an application or website set up on AWS.
If you enjoyed this post, I encourage you to check out the many more we have on the Keyhole Dev Blog. If you’re looking for more information on Lightsail, take a look at the resources I’ve listed below. I found them helpful.
Other Resources
There are so many other things that you can easily do with Amazon Lightsail, including setting up a load-balanced environment, managing more disk space, and using Lightsail for more than just WordPress.
Here are a few more resources to help you out.
More From Todd Horn
About Keyhole Software
Expert team of software developer consultants solving complex software challenges for U.S. clients.
Share This Post
Join The Thousands Of Devs Who Subscribe

Thanks for the blog post. Having a managed instance of Wordpress, or really anything, is something everyone should seriously consider. Allows us more time to focus on tailoring the application to the needs of the business, and less on things like ssh-ing into a server.
Out of curiosity, have you ran into any drawbacks with Lightsail?