
How to build an Attestation Page using Microsoft Power Apps
Over the course of my career, many of the clients I’ve worked with have a common need: a mechanism for recording their customers’ signatures. Their reasons vary – to approve medical care, ok changes to a proposal or invoice, or acknowledge understanding of a company policy, but it seems that many clients need this functionality. While there are many SaaS solutions on the market, leveraging existing Microsoft solutions such as Power Apps is often more cost-effective.
The purpose of this demo is to show you how easy it is to leverage Power Apps to create a quick, internal solution for creating an Attestation page. Power Apps can easily be tailored to meet your company’s design guidelines and delivered to your platform of choice, individualized, and tied to complex workflows leveraging the tools you use.
This post is organized into three, fairly simple steps. I tried to break it down into minute, succeeding tasks, so it’s easy to follow along. Without further ado, let’s jump right into it!
Part 1: Getting Started with Power Apps
Getting started is easy as navigating to Power Apps in Microsoft365 and following the steps below.
First, we’ll create a Blank Canvas app for use on tablet devices. We’ll use Canvas to build out the UI after.
- Navigate to Power Apps in your Org and click Blank App.
- A modal window will appear. Click on Blank Canvas App.

- Give the app a name. I’m naming mine “Attestation Demo.” Then, choose the Tablet option and click Create.

- Now, click the Insert option on the Menu, choose HTML Text, and type Permission Form.
- Paste the HTML below, or make your own HTML.
<html><head><title></title></head><body><p><b>PURPOSE </b><br><o:p></o:p>You are being asked to create a Power Automate application to collect documentation for your self-interest.<o:p></o:p><br><br><b>STUDY PROCEDURES</b><br><br>Learn how to create a Generic Consent form using Power Automate<br><br>A. Use a HTML Text field<br>B. Use a Label and Text Box<br>C. Use a Pen Tool and use it's output <br>D. Save output in HTML <br>E. Convert HTML into PDF</p><p>I will try my best to learn this skillset. </p></body></html>
- Now, click Main Menu –> Insert → Text → Label. Then, enter “Full Name” and arrange as desired.
- Then, click Main Menu → Insert → Input → Text Input and arrange as desired.
- Click on Text Input and edit Properties to the right. Add “fullName” where it says TextInput1.
- Click Insert → Input → Pen Input.
- Now, select Insert → Input → Button → and Change Text to “Submit.”

- With that done, hit Ctrl + S to save your work, and we’re ready to move on.


Part 2: Create a Power Automate Flow
The following steps in Part 2 of this tutorial will show you how to map the various inputs from your canvas app using Power Automate. Power Automate (formerly known as Flow) is a sequential workflow process that allows you to create a process that can be automated or triggered by various tools in Microsoft’s ecosystem. In these steps, we will map data passed through our canvas app as parameters into this flow. Part 3 will cover how to trigger the Power Automate workflow.
- Click Create new flow.

- Create a “Blank Flow.”
- In order to ensure this creates an actionable Power App flow, delete the top level PowerApps. This step just ensures that you have correctly defined your flow for use with your Canvas app.
- Now, you have the option to add new connectors and triggers. Choose Power App by clicking Power Apps. This should work V2 and below.

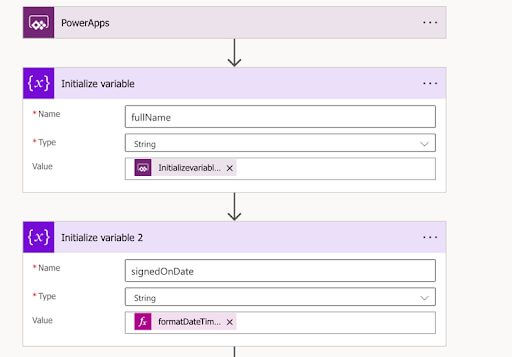
- Click New Step, type “Initialize Variable,” and select that option.
- Enter Name as “fullName”, Type as String, and choose the option Ask in Power Apps.
- Note: It’s important to use caution when using this option as it dynamically maps this as a “Required Parameter” that will be used in to trigger the Power App and pass it there.

- Click Save.
- Create another new step, Initialized Variable. Let’s Name it “signedOnDate” and give it a Type String.
- Click on Enter Initial Value then click Expression. Type in
formatDateTime(utcNow(),'yyyy-MM-dd')and click OK.
- Click Save.
- Now, open a New Tab, go to your One Drive in Office 365, and create a folder. I named mine “AttestationDemo.”
- Switch back to your Power App tab.
- Note: For this next step to work, you will need to follow the following steps in order to create the Dynamic Values for the function we will create on the Canvas side of the application. We will take the Canvas coordinates, convert them into a Base64 image, and insert that within the context of an HTML page. There are other methods to do this within a Word Document, but for the purposes of this demo, we will leverage the HTML method.
- Continuing on, create a New Step. Enter Create File on this step, then choose Create File One Drive for Business.
- Set the Folder Path to “/AttestationDemo”

- File Name should be set to the “fullName” variable from the dynamic content modal and “_AttestDemo.html” should proceed it. This is a simple means of concatenating a value.
- For File Content, paste the following:
<h1>Demo<h1><p>This Content was signed by:<br/>@{variables(‘fullName’)}<br/>On @{variables(‘signedOnDate’)}<br/></p> <img width=”200px”src= > - In this step, we will add a Dynamic Content Variable using Ask in Power Apps.
<img width="200px"src=@{triggerBody()['Createfile2_FileContent']}>You can also drag and drop the “Ask in Power Apps” after the HTML scr= element – see the screenshot below.

- Click Save.
- Now, add a New Step, “Convert file using path.”

- For File Path, choose Path from the Dynamic Value Modal.
- For Target Type, choose “PDF.” from the drop-down menu.
- Click Save.
- Create the next step using “Create File.”
- Note: This may seem like a duplicated step but this is actually setting up formatting for another document a PDF.

- For Folder Path, “/AttestationDemo.”
- For File Name, select the “fullName” variable, and add “.pdf.” This trick effectively concats them. You can concat optionally.
- For File Content, choose “File Content.”
- Note: Sometimes a bug will occur with this preview functionality where you have to reset this field after editing.
- Click Save.


Part 3: Wiring up your Canvas App to Trigger your Flow
In this final step, we will click the “X” on the corner of the Flow window to return to our Canvas app from the Flow model. This is where we will wire our UI to map our inputs to parameters and trigger the Power App Flow as a function.
- Click on the Pen Input/Signature area.
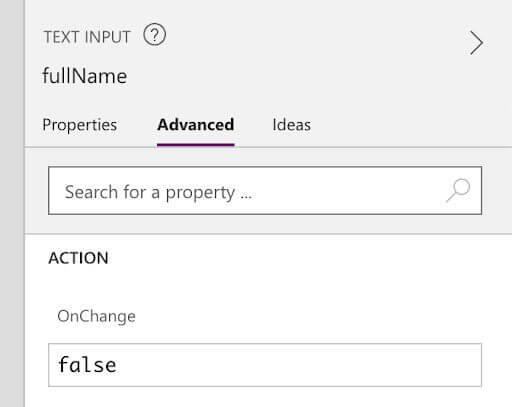
- To the right, you will see the Properties for this component; we want to choose the Advanced tab.
- In the Advanced tab, look for OnSelect.
- Once you find it, cut and paste the following script into it.
Set(varSignedPen, Self.Image)

- Now, click on the Text Input. Above the Properties tab, let’s rename input to “fullName.”

- Next, click on the Submit button.
- Now, in the Advanced tab under OnSelect, you can cut and paste the following script. Or, type it in to see the IntelliSense in action.
‘PowerApp->Initializevariable’.Run( fullName.Text,JSON(
varSignedPen,JSONFormat.IncludeBinaryData ))
- Click back to the Main Menu –> File –> Save to save the app.
- Then, click the Play button to preview your app. Go ahead and test your app! Click Submit once since we have not scripted a page to show you’ve been successful.
- Return to your OneDrive tab, and you will see the output of your work. It should look something like this:


Wrapping Up
Thanks for taking the time to learn how to build a simple Attestation Page. When I initially set out to learn how to use the Pen Input tool with Power Automate, there was not much detail on how to leverage it. Eventually, I made the correlation on what Canvas was doing and realized that converting the output of Pen Input using JSONFormat.IncludeBinaryData function could solve this issue for me. This trick can be useful when dealing with images using Power Automate flows. Power Automate has much more capability and can be used within Teams, Sharepoint, Outlook, SQL and even as FaaS.
If you have feedback, leave me a comment below! Always interested to hear what the community has to say. And if you liked this post, be sure to subscribe to the Keyhole Dev Blog.
More From Chris Vaught
About Keyhole Software
Expert team of software developer consultants solving complex software challenges for U.S. clients.
Share This Post
Join The Thousands Of Devs Who Subscribe

Great post, Chris! I think under the covers, a PowerApp is essentially a LogicApp. I’ve been using the Azure Resource Group project in Visual Studio to automate deployments of my LogicApps across multiple environments. I wonder if the same thing would work for PowerApps.
Also, where does the data for each PowerApp run get stored? In a default Microsoft Dataverse? I think you’d have to mark some of those actions as having sensitive inputs to make sure that they are HIPAA compliant, especially if it’s in a shared Dataverse.