
Azure Web Apps in Docker Containers – Part 1
So you want to host a web application on Azure with minimal overhead, but how is this done? Azure makes it possible by running an App Service using Docker containers. Setting up an App Service is simple and can be accomplished with a few steps.
In this blog, I’ll explain the steps necessary to generate a Docker image in Azure. Then, we will deploy a web application based on an image we generate. We host the application with the following steps:
- Create a Container Registry
- Build a Docker image
- Create a Web App
Note: An Azure account is required. If you do not already have one, you can set up a free account, but it will require a credit card.
Basic Azure Terminology
If you are new to Azure, take some time to become familiar with the following terms.
- Resource Group: a container that holds related resources for an Azure solution. The resource group includes those resources that you want to manage as a group. You decide which resources belong in a resource group based on what makes the most sense for your organization. Link
- Container Registry: a managed, private Docker registry service based on the open-source Docker Registry 2.0. Link
- App Service: enables you to build and host web apps, mobile back ends, and RESTful APIs in the programming language of your choice without managing infrastructure. Link
Step 1: Create a Container Registry
The first step is to create a container registry. Here’s how to do it:
1. Log in to the Azure portal.
2. Click Create a resource to open Azure Marketplace:

3. Under Marketplace, click Containers then Container Registry:

At this point, if you do not already have an existing Azure account, you will be prompted to create one.
Note: The Resource group will be created at the same time the Container Registry is created.
4. Complete the Container Registry form, then click Review + create then Create:

Upon completion, the following screen appears:

To view details about your newly created registry, click Go to resource.
Step 2: Build a Docker Image
Azure imports the source code, which contains the Dockerfile, from the repository to build the image. This is how to build the Docker Image:
1. Open the cloud shell by clicking on the icon highlighted with the red arrow below:

2. Click the Cloud Shell icon.
If an existing storage account doesn’t exist, a new one must be created:

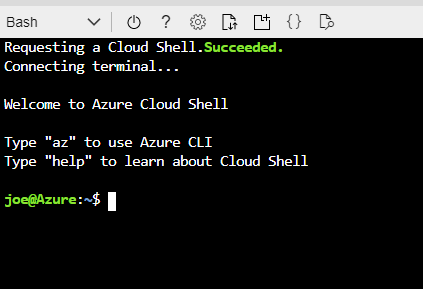
3. Clone the source code from GitHub to Azure:
joe@Azure:~$ git clone https://github.com/jsciara-keyhole/AzureDockerBlog.git
4. Move into the source code:
joe@Azure:~$ cd AzureDockerBlog/azure[]
5. Run the build command:
joe@Azure:~/AzureDockerBlog/azure$ az acr build --registry DockerRegistryExample --image image .
These steps build the Docker image in Azure, and the steps from the Dockerfile will appear in the shell as they are executed:

The image is now created and ready to use in Azure.
To view the image, look under Services, and select Repositories:

Step 3: Create a Web App
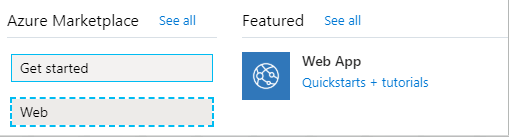
1. Navigate back to Home, and select Create a resource. Under Azure Marketplace, select Web and then Web App:
2. Complete the form with the following settings:
a. Set Resource Group – the dropdown list will contain the resource group previously created.
b. Set Name. In this example, we use “azure-docker-container-example.”
c. Set Publish to Docker Container.

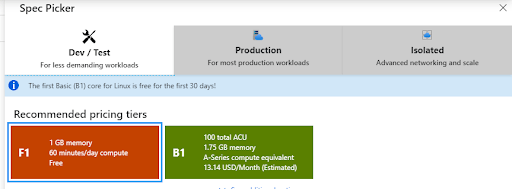
c. The default SKU and size is set to Production and will incur charges, so you will need to modify it. To change it:
1. Click Change size – this opens the Spec Picker:

2. Select Dev / Test.
3. Under Recommended pricing tiers, select F1 then click Apply:
3. Click Next:Docker.
4. Complete the form with the following:
Options=Single ContainerImage Source=Azure Container RegistryRegistry=DockerRegistryExampleImage=image- The startup command can be placed in the
Startup Commandfield. If the command already exists in the Dockerfile, leave this field blank.

5. Click Review + create then click Create.
To view the newly created application, click Go to resource. Click the URL located in the upper right-hand corner to navigate to the site.

Clicking the URL link opens a new tab in the browser and launches the website.

Wrapping Up
First, we started by creating an Azure Container Registry. Next, Azure created a Docker image. Finally, we set up a Web App.
Using Azure to host a web application from a Docker container is, in reality, simple. Of course, as in all things, the first time through is a little tricky, but you’ll catch on quickly after completing the steps a few times. One thing is for sure, this process makes our lives as developers a little easier.
More From Joe Sciara
About Keyhole Software
Expert team of software developer consultants solving complex software challenges for U.S. clients.
Share This Post
Join The Thousands Of Devs Who Subscribe

Discuss This Article
Subscribe
Login
0 Comments
Oldest